
This post is sponsored by Cricut and filled with only my opinions and projects, you may also find a few affiliate links!

If you’ve bought a Cricut machine (or are thinking about buying a machine) chances are you’re wondering what Design Space even is? Maybe you’ve heard about it but you don’t understand it… or you’ve even downloaded the program and given it a whirl but are majorly confused.
Don’t worry! Today we’re going to go over the entire workspace: What exactly is Cricut Design Space and How does it work.
Ready to jump in? Here’s all the topics we’re going to cover:
- What is Cricut Design Space
- How to Start a New Project
- The Canvas
- Top Toolbar Actions
- Left Toolbar Actions
- Layers Panel Actions
Ready to take the leap but not sure which machine is right for you? Check out my Explore Air 2 and Maker comparison before pulling the trigger. I go over the pro’s and con’s of each machine and even have an easy to read check list of each machine’s features so you can decided which cutting machine is perfect for you.
What is Cricut Design Space:
Cricut Design Space is the software that you’ll need to use your machine. It’s a designing software that lets you create new designs, upload your own designs, or use one of the designs in the Cricut Access library and then cut them with your Cricut Machine.
Although I suppose cut isn’t exactly the right word anymore… Cricut has expanded their machine so much that cutting is only the tip of the iceburg. You can use the same design to cut, foil, write, emboss, engrave, perforate, score… and so much more.
Regardless of what project you’re doing you’ll prepare all your design files in Cricut Design Space. It’s your one stop shop for awesomeness.
How to Start a New Project:
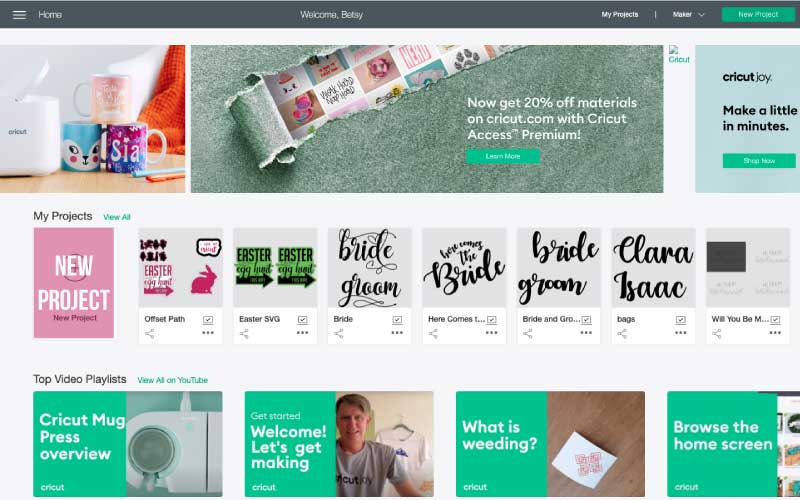
When you open Cricut Design Space you’ll see plenty of options. You’ll see ads at the top for Cricut Access, materials, machines… all the good stuff you need to make your projects.
The next row of items is a list of “my projects”. Once you’ve started working on pieces and saving them to your Cricut Library they’ll appear here. You can click view all to see the entire list or select the most recent project you made to pick up working where you left off.
This “my projects” row also has the “new project” button. If you’re working on a new project this is the best place to start. It will pull up a blank canvas so that you can design a project, import an SVG or open Cricut Access to grab design files.
For now let’s open a new project so that we can go over the complete work space.
Volia!
Here it is! A blank work space just waiting for your designs. It’s set up similar to other design software so if you’ve ever other design programs you’ll be very familiar with this layout right off the bat.
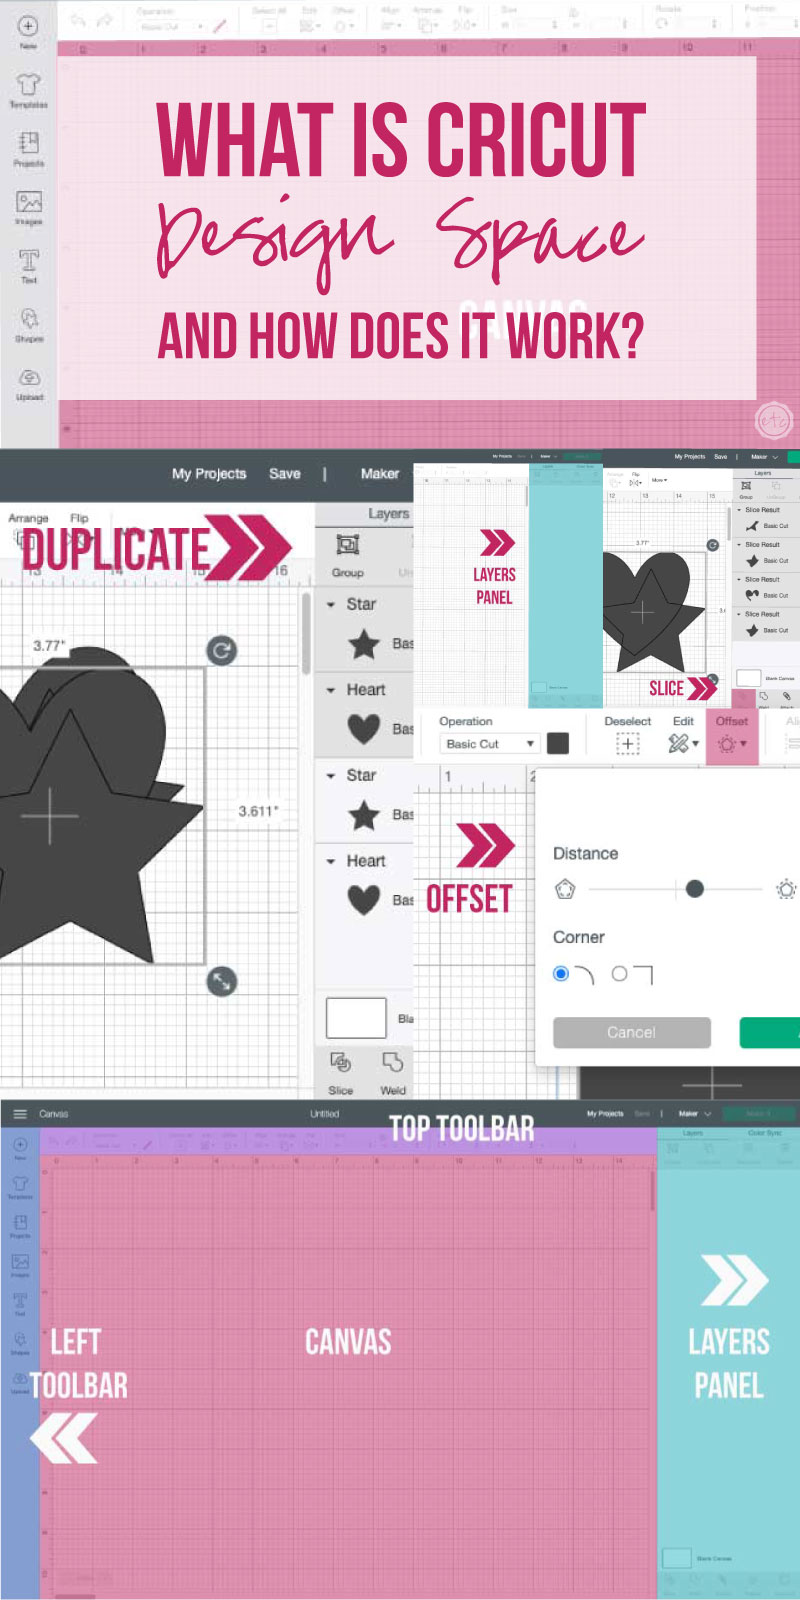
If this is your first venture into the world of design software that’s ok too. The work space is broken down into four sections. The top toolbar, the left toolbar, the canvas and the layers panel. Each of these areas has it’s own actions and buttons that do different things.
We’re going to go over all of them so that you have a complete understanding of how Cricut Design Space works. Ready?
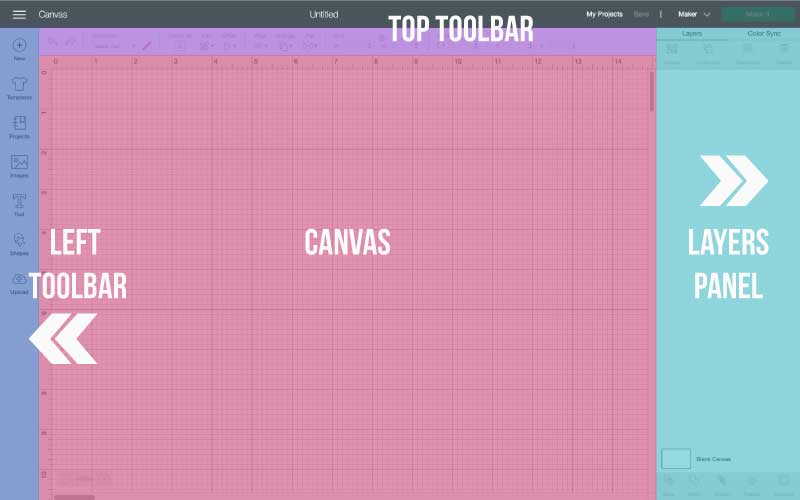

The Canvas:
Okay so this is the biggest area of the work space. It’s blank right now because there’s not a project on it but basically this is where your project goes. Your designs will appear here so that you can manipulate them into the perfect masterpiece.
You’ll notice that the entire area is set up like a grid and marked with rulers around the outside. The rulers actually show the real scale of items when you cut them with your Cricut. So two inches on the canvas will be two inches in the real world (on your real life cutting mat!) so when you’re trying to re-size something to fit a t-shirt or a sign this makes it really easy to make sure things are the right size.
As you re-size them Cricut will tell you if you get to big… remember just because you can make something 50 inches wide in Cricut Design Space doesn’t mean you can cut something 50 inches wide on your 12 by 12 cutting mat! Keep things either 12×12 or 12×24 and you’ll be good to go!
Anything larger than that and you’ll have to do a little bit of doctoring work. Meaning you can cut things in pieces on multiple mats and then put them together in the real world. Like this adorable baby name sign I made for above the crib in my friends nursery. This thing was cut out of basswood on my Cricut Maker and used 8 different cutting mats to cut all the pieces.
Check out the full tutorial for how to cut a large wooden name sign here.

Top Toolbar Actions:
The top toolbar is where you’ll edit your design. You can use these buttons to size or re-size an item, undo an action you didn’t mean to make, re-characterize a path from a cut path to a foil path, change the color of an item and even create an offset path.
Basically if you want to manipulate how a design works you’ll probably use this toolbar.
And since most of us are familiar with Microsoft Word or other typing programs having a top toolbar you should be use to heading to the top of the screen to change things.
Let’s take a look at all of the buttons!
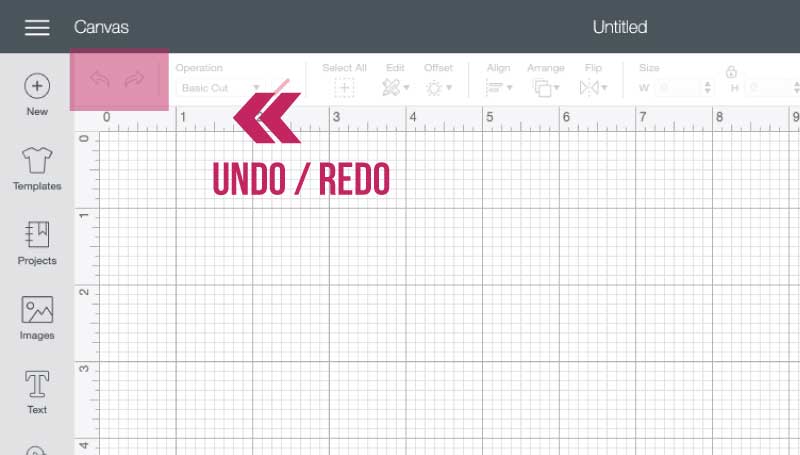
1 Top Toolbar: Undo / Redo:
The first button is actually a set of two buttons. The back arrow is undo and the forward button is redo. So if you change something and then don’t like it you can click undo and it will *poof* go back to the way it was.
Like magic!
Then if you decide you like the second option better you can click the redo button and it will *poof* change back.
Like magic!
Let’s face it… you use undo way more than redo but that’s ok. Think of it as an eraser for your pencil work… if you don’t like what’s happening you can just change it back.
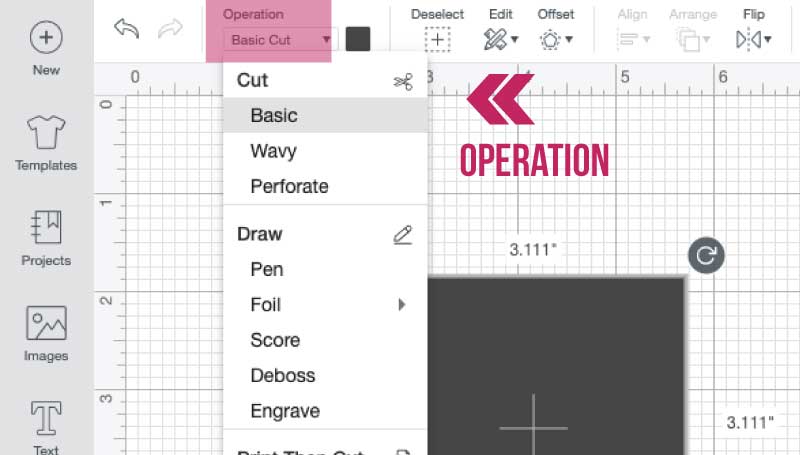
2 Top Toolbar: Operation
The second button is a little more complicated. The operation button controls the actual path of your object. So if you have a square the operation panel will let you select if you want to cut that square out of vinyl, or if you want to use a pen to draw the square on cardstock, or maybe you want to foil on leather.
Regardless of what material you’re using (you could cut the same square out of vinyl, cardstock or leather! That’s a whole different portion of the program) the operation will tell your Cricut what to do with that line.
As of right now the operations that are available are: cut (in basic, wavy or perforate styles), draw (with a pen, foil tip, scoring tip, de-bossing tip or engraving tip) or print then cut (which you’ll use for stickers or die cuts).
Want to see this little operation tab in action? I have an entire tutorial on how to use the foil tip… where we’ll change our cut lines to foil lines instead.
Check out the Full How to Use the Foil Tip Tutorial Here!
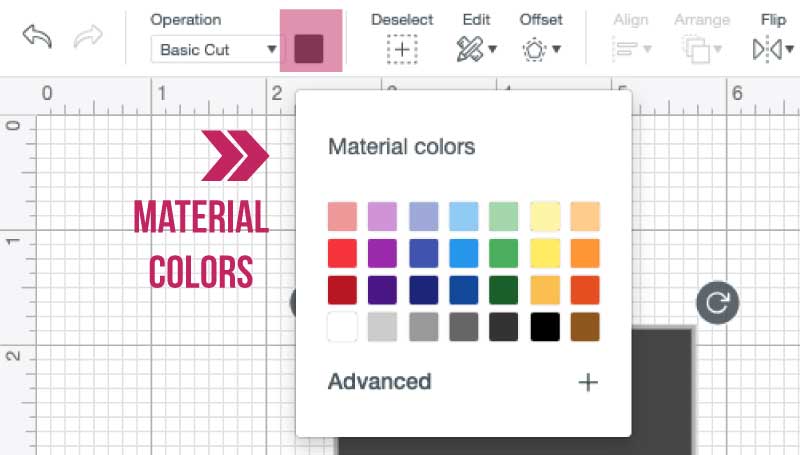
3 Top Toolbar: Material Colors
Ready for materials colors? When you create a new item it will be black by default… and if you’re only making one item you never need to change the color.
But say you want to make one project with multiple colors of vinyl or even multiple types of materials. That’s where the color panel comes in.
You can make one layer pink and one layer blue (honestly the colors are a little irrelevant as long as they’re different you’re good… but I like to coordinate mine to the colors of the materials I’m using so that I can keep them straight). Then Cricut will know to put everything pink on one cutting mat and everything blue on another cutting mat.
So that you can cut pink vinyl first and then blue infusible ink.
It’s the perfect way to keep your materials separate even within the same project.
Take this little “Dear Santa” sign for example. I loaded the SVG into Cricut Design Space and then made all of the rose gold iron-on one color (pink) and all of the black iron-on a different color (black). Then Cricut knew to separate them when making the cutting mats!
Click Here for the Full Letters to Santa Sign Tutorial!
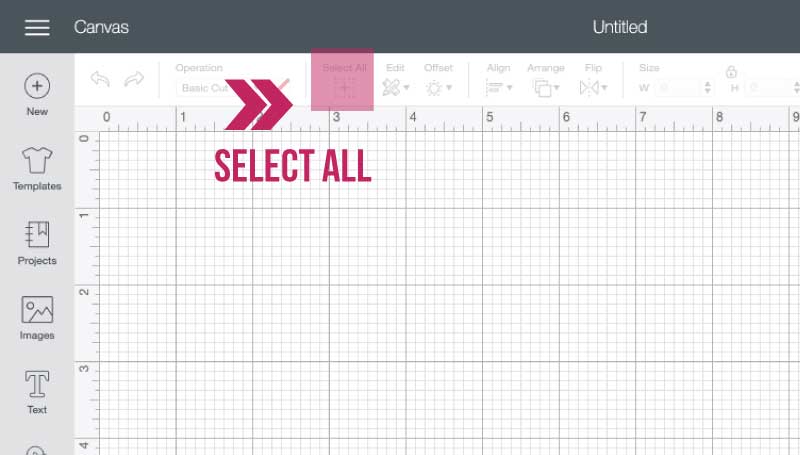
4 Top Toolbar: Select All / Deselect
Number four is the select all or deselect all button. This little baby is perfect for re-sizing a design.
If you’ve uploaded an SVG into design space (or grabbed one from the access library) and it looks perfect then you’re good to go. But what if it looks just a bit to big? Say it’s 12 inches wide but you only need a 3 inch wide design.
Click the select all button and Design Space will automatically select every single path and letter. Anything on the canvas. Then you can easily use the little re-size arrows that show up around your item to re-size the entire design down to 3 inches.
Perfect!
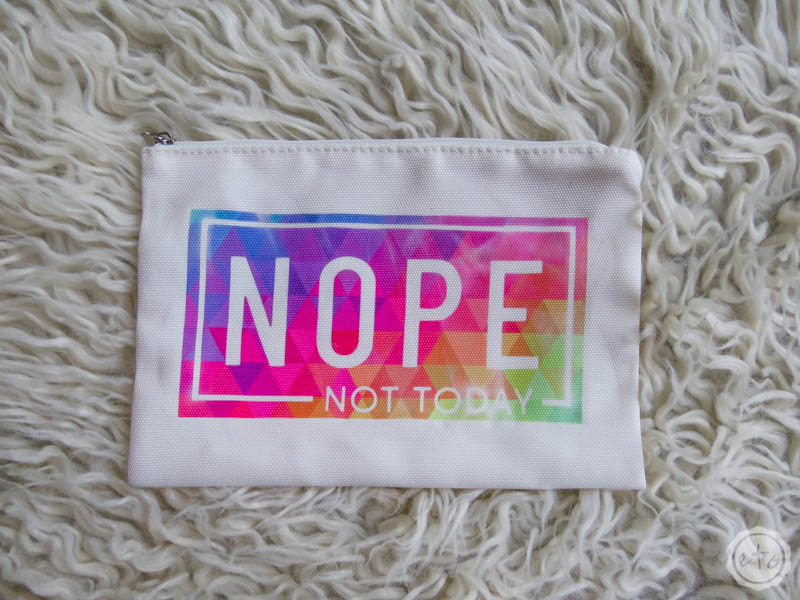
Take this little cosmetic bag for example. I downloaded this design from the Cricut Access Library… it’s super cute! But it was meant for a larger item. So I selected the entire design and re-sized it to fit my little infusible ink compatible cosmetic bag.
Easy peezy!
Follow the Full Cosmetic Bag Tutorial Here.

5 Top Toolbar: Edit
The edit functions are your basic cut, copy, paste features. If you are use to design software and know the shortcuts on your keyboard then you may never reach for this feature.
I find myself trying to command c things that can’t even be copied sometimes, I’m just so use to the shortcuts by now!
But my Mom is not familiar with keyboard shortcuts and she uses these buttons all the time. They do exactly what they say they will.
The cut button will cut whatever you’ve selected off the canvas. It will completely disappear from the spot it’s currently in and be held on an imaginary clipboard for you to paste it somewhere else.
Copy works in the same way except instead of cutting the item out of it’s current location it simply makes a copy of it on the imaginary clipboard.
Whether you copy or cut, once you have something on the imaginary clipboard you can paste it onto the canvas in a new spot to work with.
Easy peezy.
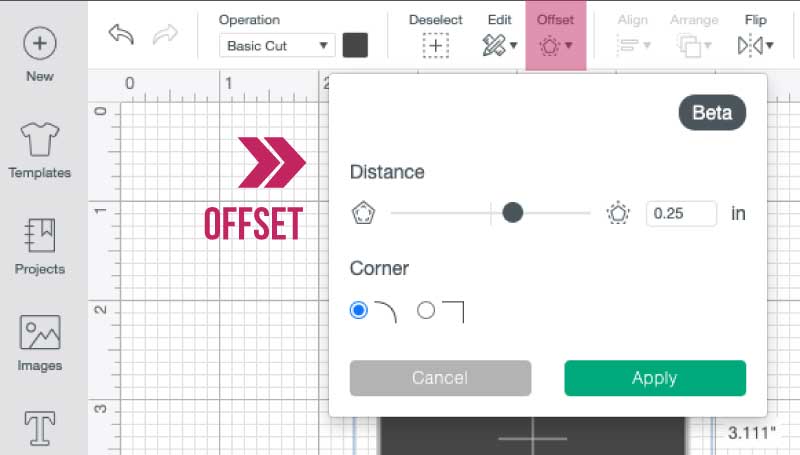
6 Top Toolbar: Offset
Offset is Cricut’s newest and greatest claim to fame! It’s a brand new tool that lets you make outlines and shaddows for designs in seconds.
You can make a white background around a design and flatten it to make a sticker, you can make an outline around text for a background or you can outline a design to make a 3-dimensional shape like the background behind the bunny on the wreath below.
Either way it’s a fantastic tool that people have been asking for for years. It does take a bit of explaining though so I’ve put together a full tutorial (and video!) which you can check out below.
Check out the full Offset Path Button Tutorial Here.

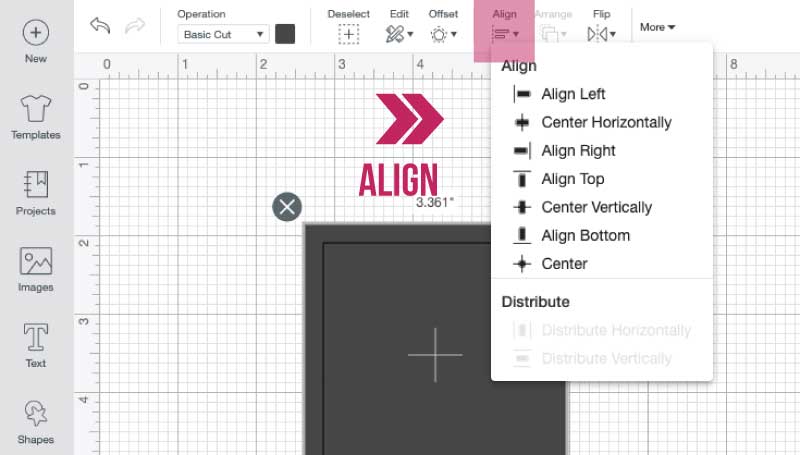
7 Top Toolbar: Align
If you have more than two items the align button can be your best friend.
Essentially it will take whatever items you’ve selected (whether it’s two or twenty) and line them up according to which button you’ve selected.
This can be helpful when creating multiple items! Especially if you need to make sure they fit together before you cut them out.
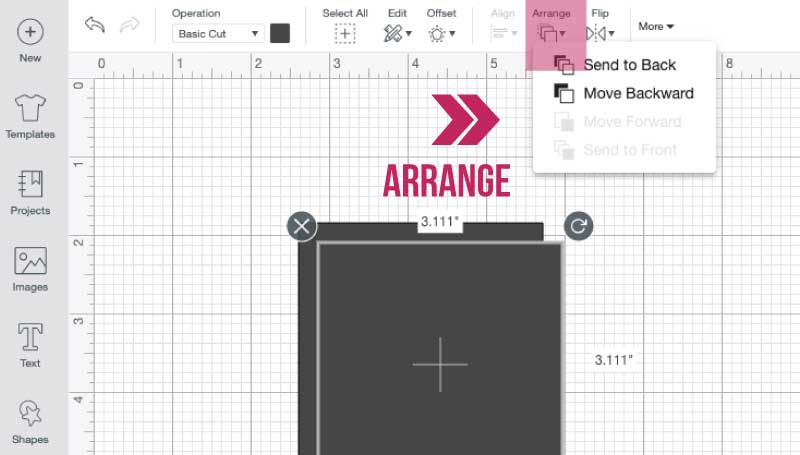
8 Top Toolbar: Arrange
Ready for the arrange button? If you have multiple layers in your layers panel this button will help you keep them in the proper order.
Essentially you can select the layer you want to manipulate and then select either “send to back” and it will go to the bottom of the layers panel or “send to front” and it will go to the top of the layers panel.
Of course, when you’re working with a design the item at the top of the layers panel is on top of the design and the item on the bottom of the layers panel is at the back of the design.
If you just need to move the layer up one or down one you can select “move backward” or “move forward” and the layer will move one layer at a time to the front or back.
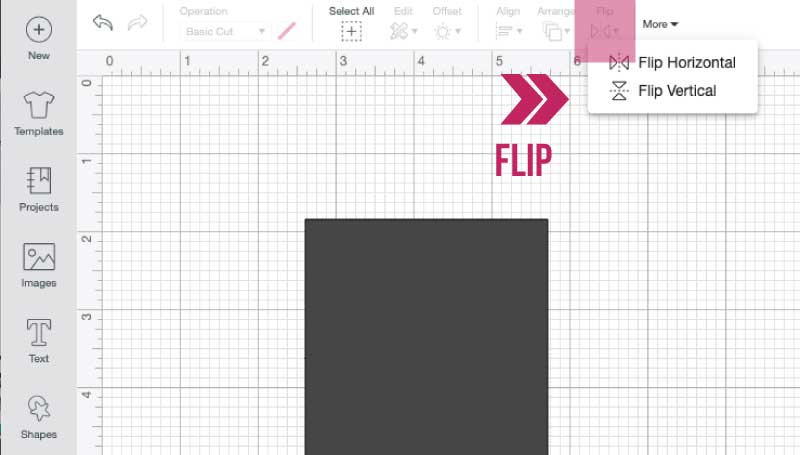
9 Top Toolbar: Flip
This is another self explanatory button. If you need to flip your design over the horizontal or vertical access (say you want to mirror a design to have two) then this is the right spot.
Keep in mind that if you flip something the wrong way or don’t love how it looks you can always hit the undo button to take it back to normal.
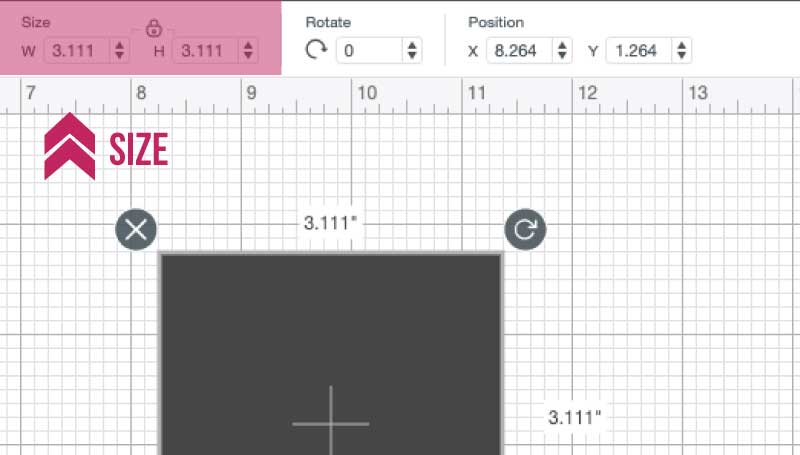
10 Top Toolbar: Size
Now we move on to the right side of the toolbar! We have three functions over here and the first one is size.
When you’re resizing an item you can always select it and manually re-size it. Most of the time that’s good enough but if you’re trying to make a piece that’s an exact size you’ll have better luck with the size panel here.
Simply put in the size you want your item to be (maybe two inches wide?) and it will automatically re-size it to 2 inches wide.
The little lock button means that it will change the height to stay proportional to the width. So you don’t even need to do any math. Of course, if you need to change the proportions you can click the lock icon, it will unlock and then you can change the width and height completely independent of each other.
So I could take my 2 inch by 2 inch square, unlock the button and make it a 2 inch by 4 inch rectangle.
Perfect!
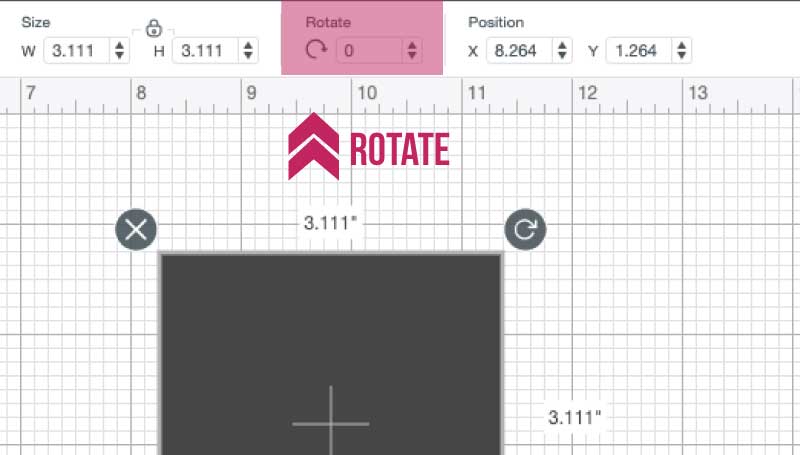
11 Top Toolbar: Rotate
Similar to the size panel rotate lets you rotate an item to a certain degree. While you can always manually rotate an item if you need an exact 90 degree angle (or a harder one like 45 degrees!) then the rotate panel will make that much easier.
And easier is always better.
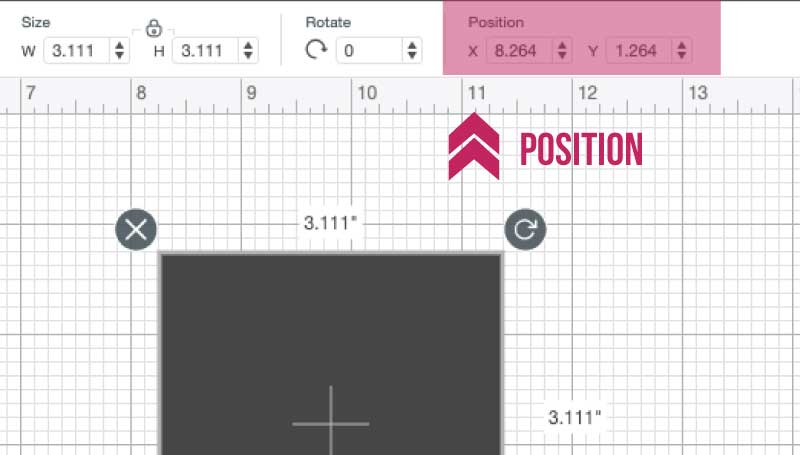
12 Top Toolbar: Position
Think of the position panel as battleship for your Cricut. You can use the postion panel to make sure your items are exactly 1 inch apart or that you have 1/2 an inch of space between an entire gaggle of items.
The position panel will place your item exactly where you want it on the canvas, simply type in the location for the x and y axis and watch the magic happen.
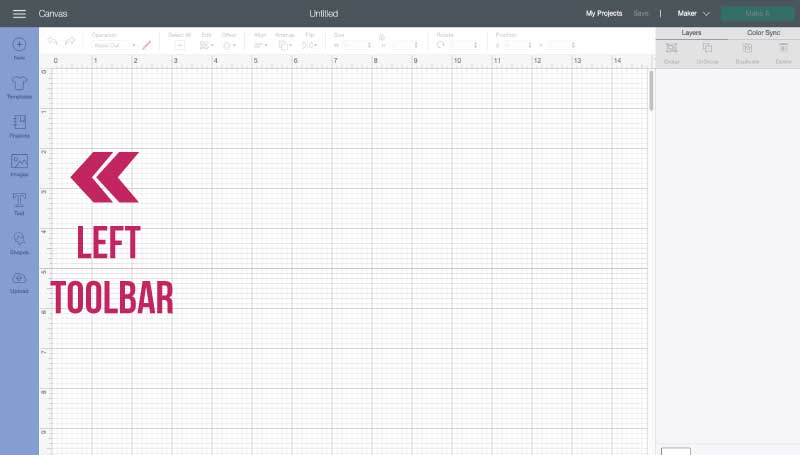
Left Toolbar Actions:
If the top toolbar handles actions to manipulate a design, the left toolbar helps you get a design onto the canvas.
Here you’ll find buttons to help you upload a custom design, grab a design from the Cricut Access Library, add text to a design or even select a shape for our latest project.
All the good stuff!
1 Left Toolbar: New
Okay… this one is easy. The new button will give you a new canvas. A whole new project really. If you’ve made one project and you want to make another one (make sure to save) and then hit new.
A blank canvas will pop up: clean and fresh and ready for your design.
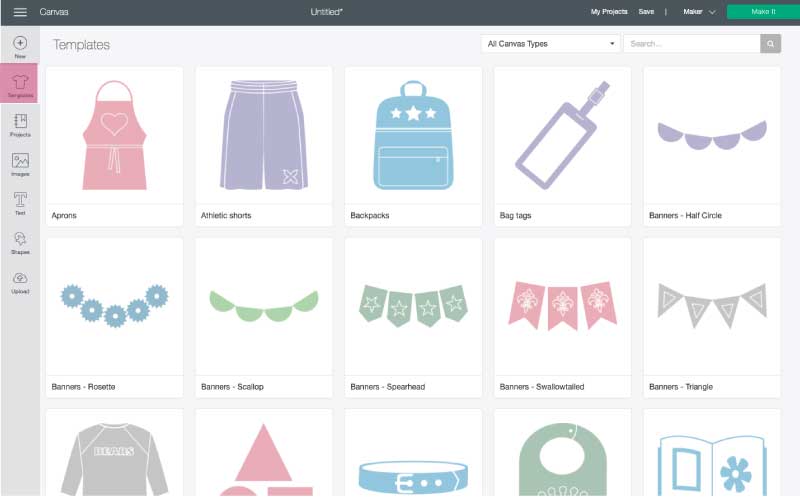
2 Left Toolbar: Templates
The template panel is great for spacial awareness. If you need to size a decal for a t-shirt grab a t-shirt template… and you’ll know it’s the perfect size before you ever hit make it!
Not to mention there are more templates then you ever dreamed of… which is great for inspiration! I mean… dog collars? What could I make with a dog collar!
Want to check out a few t-shirt designs you could pop on a template?
Here are a few adorable baby onesie designs, or maybe you’re looking for a unicorn t-shirt… or my personal favorite: the entire Game of Thrones collection.

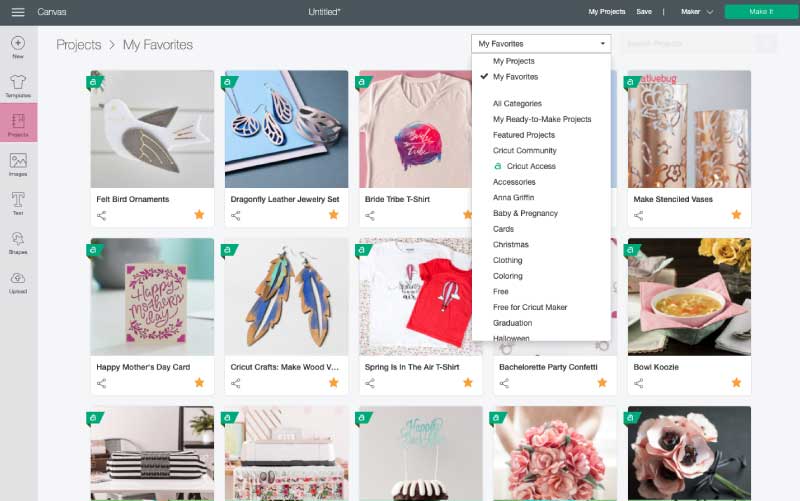
3 Left Toolbar: Projects
Let’s face it… once you’ve been using Cricut Design Space for a while you may have an entire library of your own projects to go through. Or you may be a new member without a single project to your name. Either way the projects panel will show you all. the. options.
This is where you can access all of the projects in the Cricut Access Library (see what I did there!) both the free and paid options, you can heart your favorites and they’ll go to the “My Favorites” section. Or you can access your own projects (any Cricut access projects you’ve made will be saved under “My Projects” as well.
Basically whether you’re looking to work on an existing project or select a new project it’s all under the projects panel!
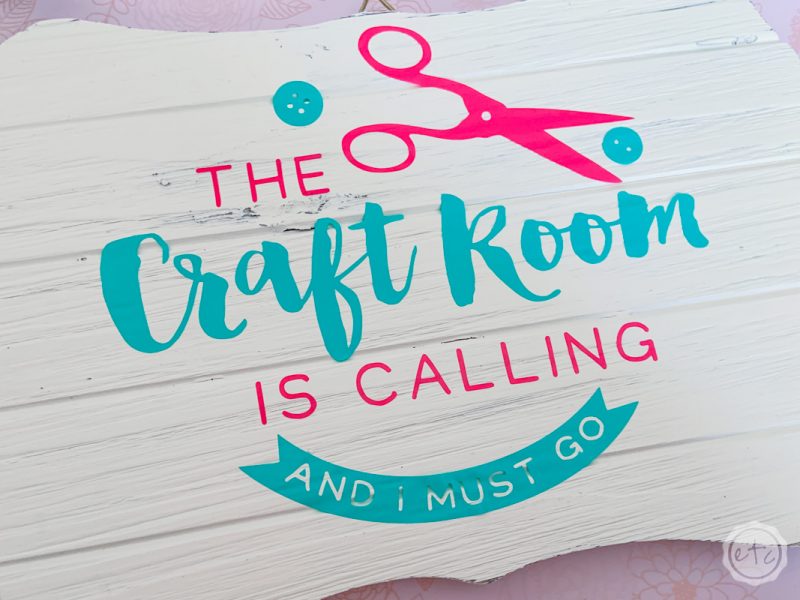
Want a close up? I made this little Craft Room sign with a design I pulled from the Cricut Access library!
Check out the Full Tutorial for the Craft Room Sign Here.
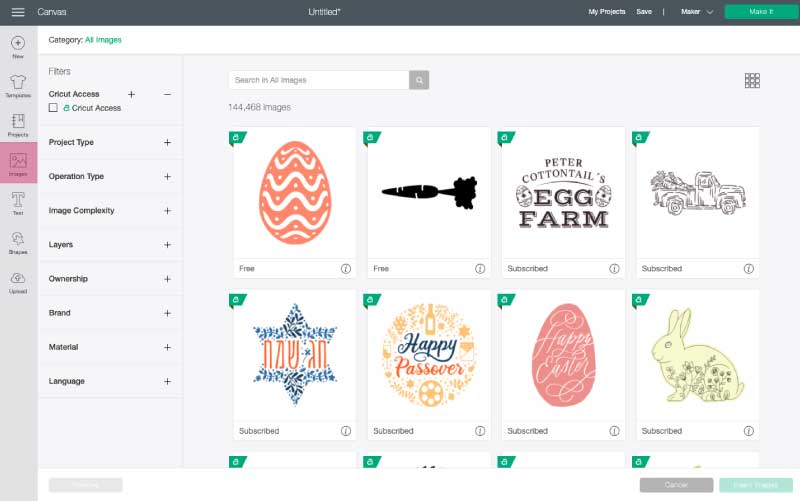
4 Left Toolbar: Images
Ready to have your mind blown!
If you have Cricut Access (or you just want to buy an easy project) you can head to the images tab to see all the pretty images that are avilable to create. If you’re looking for simple images you can select ownership and select free… and all the pretty free designs will pop up!
This is a great way to find simple things… like a carrot design file for the Bunny project you’re working on. Or larger design inspiration like the intricate files you see above.

5 Left Toolbar: Text
Ready for another self expanatory one? Text will allow you to add text to your project. Once you add text to the screen you can change it’s font, size, color and location.
You’ll have a choice between Cricut fonts and fonts on your own computer. Just remember that you’ll need to pick your fonts wisely. You want them to be beautiful but also functional.
Thicker fonts cut better than thinner fonts, and only writable fonts can be filled in with a pen. If you try to use a pen and an un-writable font you’ll simply get an outline of your word.
Luckily the writable fonts have a little icon next to them so you always know which ones to look for.
One more tip? If you’re working with a script font you may need to weld the words before hitting make it… otherwise they’ll cut out each letter individually instead of the word as a whole.
Ready for an example? I used the Text tool to write out these names for my Stocking Tags! They turned out pretty cute (if I do say so myself).
Check out the Full Tutorial for these Leather Stocking Tags Here.

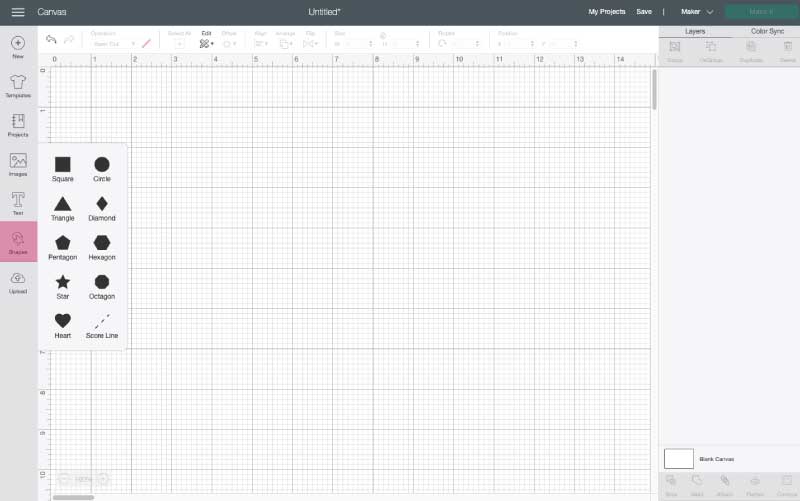
6 Left Toolbar: Shapes
Need a square? Cricut has your back! The shapes panel has all of your basic shapes for creating projects. Square, Circle, Triangle, Diamond, Pentagon, Hexagon, Star, Octagon, Heart and even a Score Line.
You can use these on their own or to make larger projects.
Either way they’re always available!
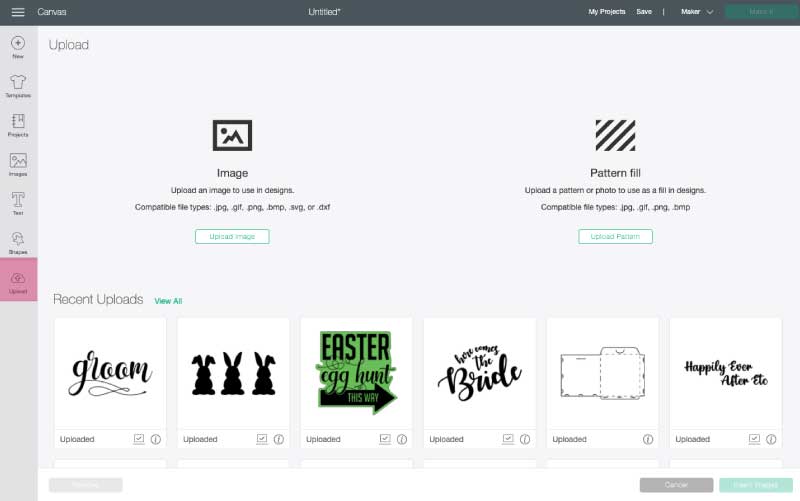
7 Left Toolbar: Upload
Last but not least we have the upload button… this is where you’ll upload any png’s or svg’s from outside sources. It’s a pretty easy process but if you need help I have a full tutorial on both.
Check out the How to Upload SVG’s Tutorial Here.
Check out the How to Upload PNG’s Tutorial Here.
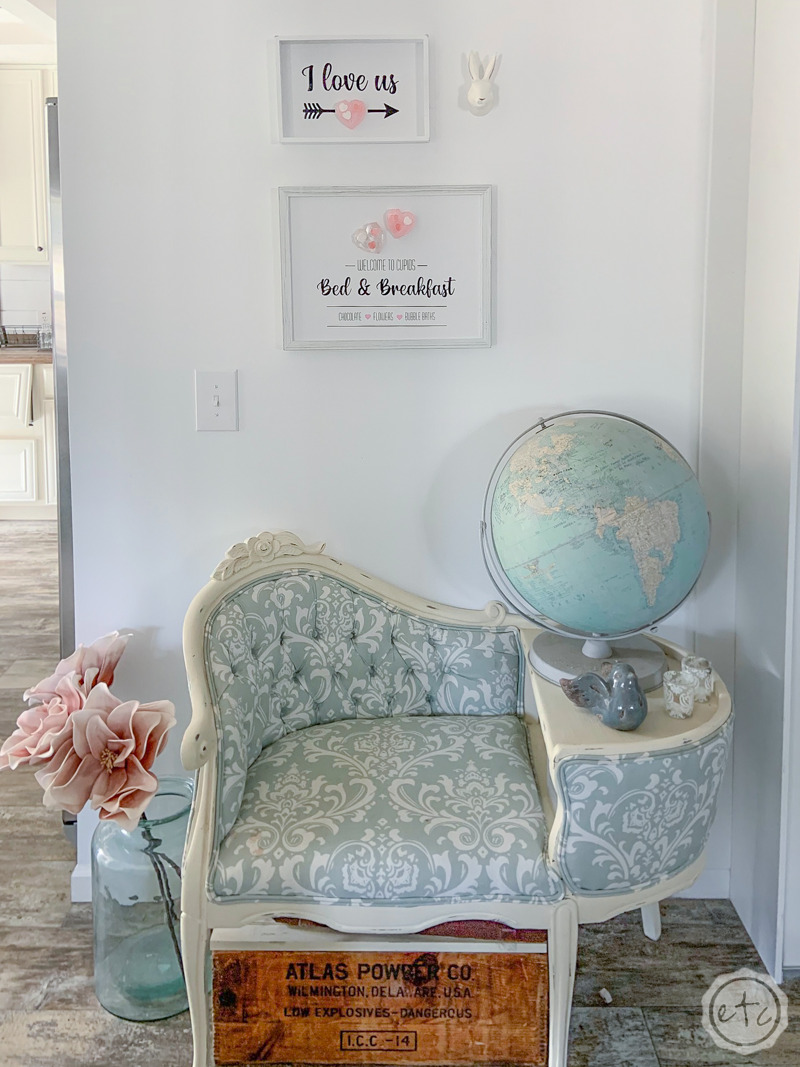
Want to see it in action? I uploaded these FREE SVG’s from my Valentine’s Day collection to make these adorable signs.
Check out the Valentines Day Sign Tutorial Here.
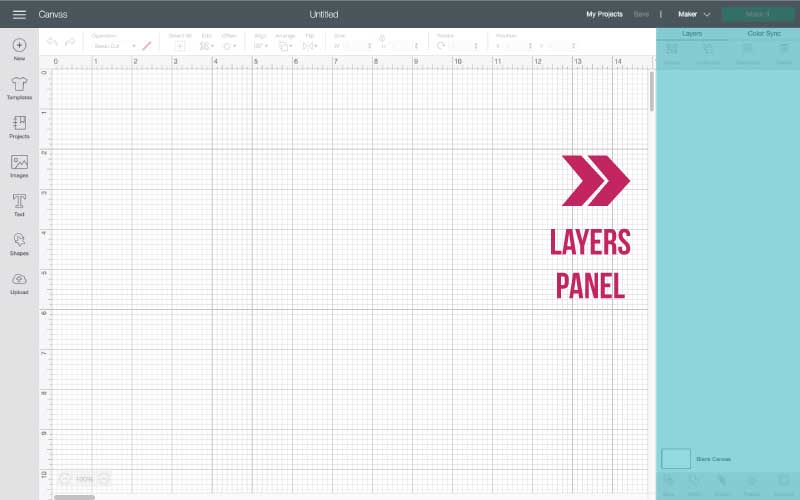
Layers Panel Actions:
Once you actually import a design it will appear on your canvas… and a little version of it will appear on the layers panel to the right. The layers panel will let you manipulate that design in many ways. It will also show you whether a design is on top of the design or on the bottom in proportion to the other designs on the canvas.
Best of all the layers panel will let you weld, attach, group or flatten your images so that they go to the cutting mat screen exactly how you want them to… and not how Cricut Design Space wants them to!
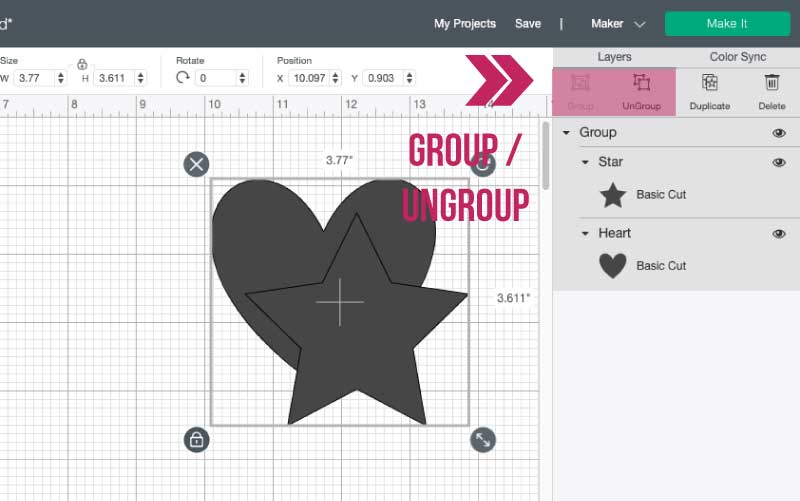
1 Layers Panel: Group/UnGroup
The group and un-group buttons are great when you have multiple objects that you want to keep together on the canvas but don’t necessarily want those items to cut in a specific formation.
Say I have three different shapes or layers that need to stay together but they’re different colors and need to be cut out of different materials. I may group all 3 layers together to keep them as one piece once I’m finished editing all the layers individually.
Then all 3 layers will still function individually but they’ll be movable as one item, or I can turn them off and on in the layers panel (using the little eye) as one item.
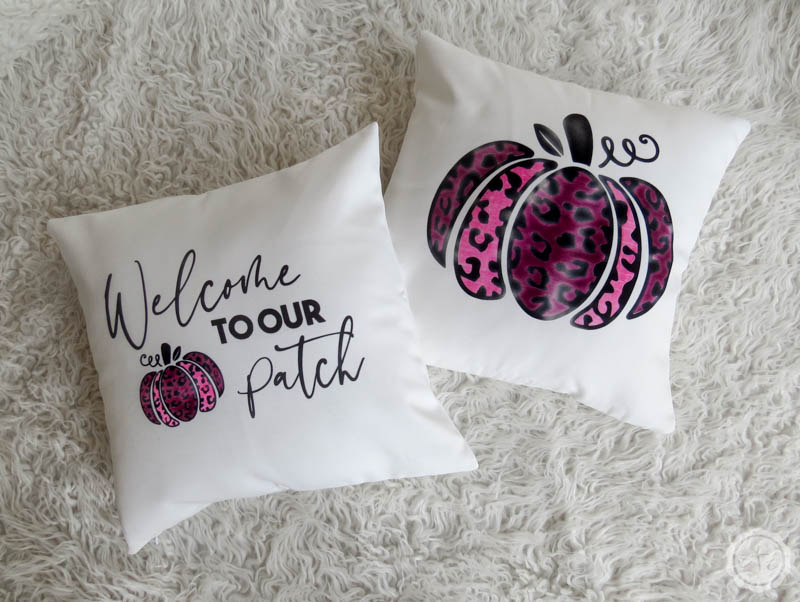
I typically use the group button when I’m working with multiple projects on one canvas. Take this little cheetah print pumpkin pillow. It has 3 layers (black, raspberry and pink) that needed to stay together. Each layer was welded individually and then the entire design was grouped together. That way I could size the entire pumpkin as one for my pillow and not worry about sizing each layer individually… which would be a nightmare since the cheetah spots need to fit perfectly in the colored areas.
Once I sized the group I could turn it off the pumpkin layer and work on the design for the other pillow. Perfect!
Follow the full tutorial for these little cheetah print pumpkin pillows here.

2 Layers Panel: Duplicate
Fairly self explanatory… the duplicate button will take a layer (or multiple layers) and duplicate them. Which is perfect if you need a bunch of something.
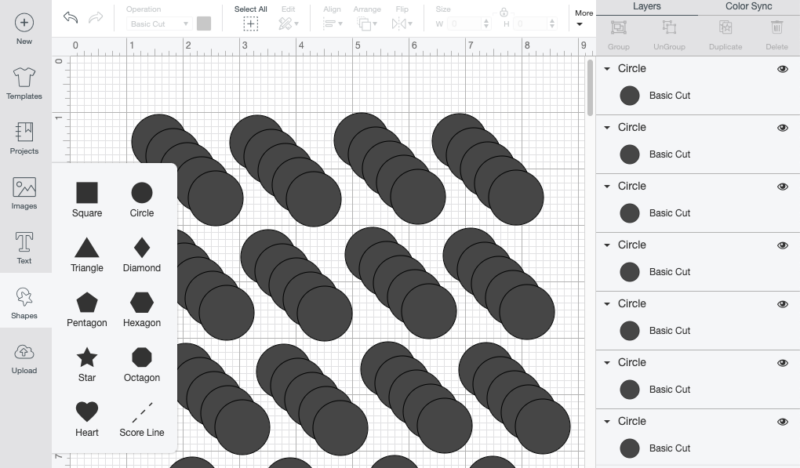
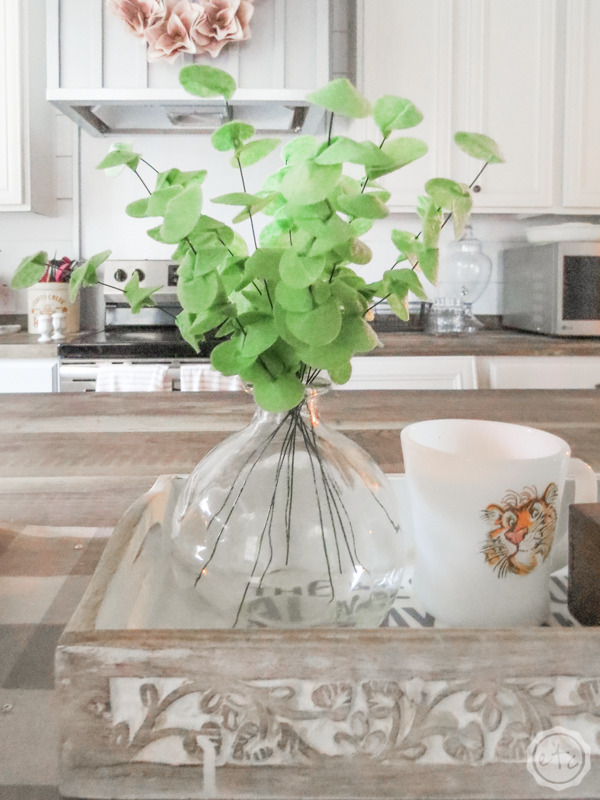
For example, these little felt eucalyptus stems look amazing but they’re really just circles! Instead of drawing 80 million circles I drew one, then I duplicated it a bunch of times until my entire cutting mat was full.
Of course, duplicate is typically for smaller projects. So if I needed two stars and hearts I could duplicate them and now I have two sets. If you need 50 of the same object (like my circle) it would be easier to create one, hit make it and then adjust the number of project copies to 50… and Cricut will automatically duplicate the item for you.
Follow the full Felt Eucalyptus tutorial here.

3 Layers Panel: Delete
This one is pretty self explanatory… I don’t even have a fancy example for you!
If you have an image or a layer on your canvas and you don’t want it anymore hit the delete button.
Bye bye!
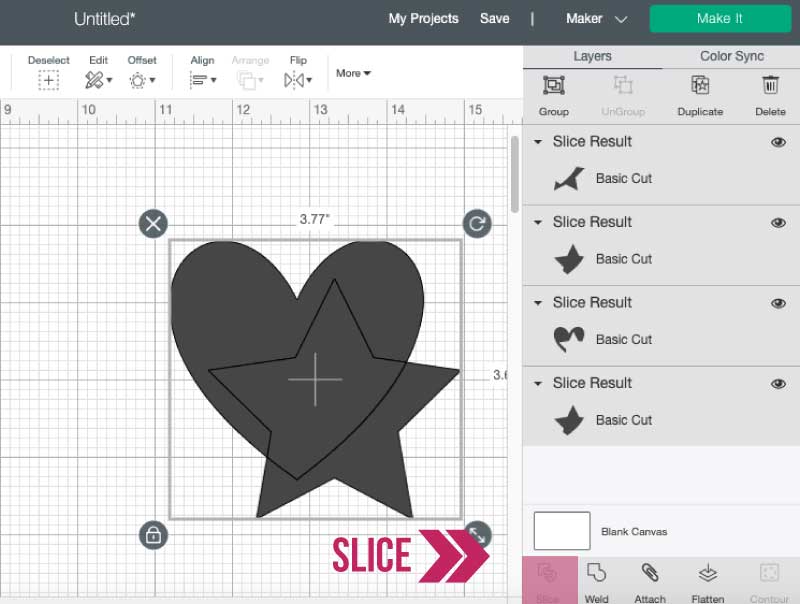
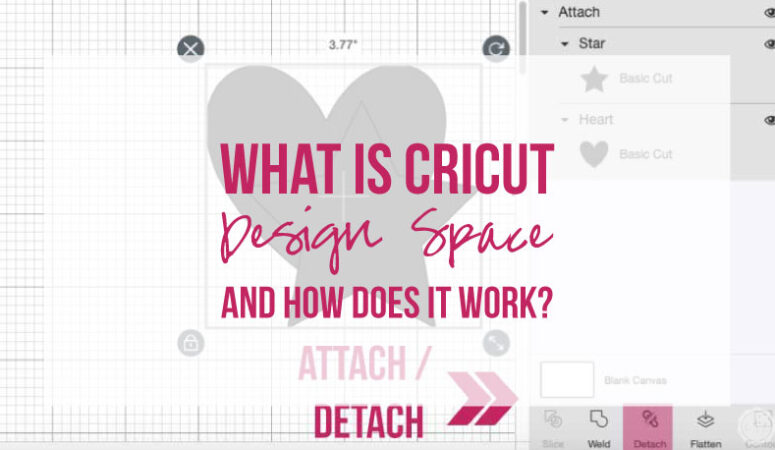
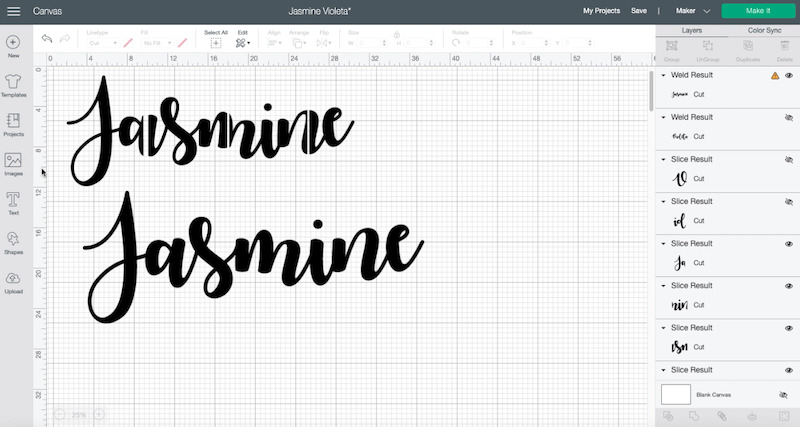
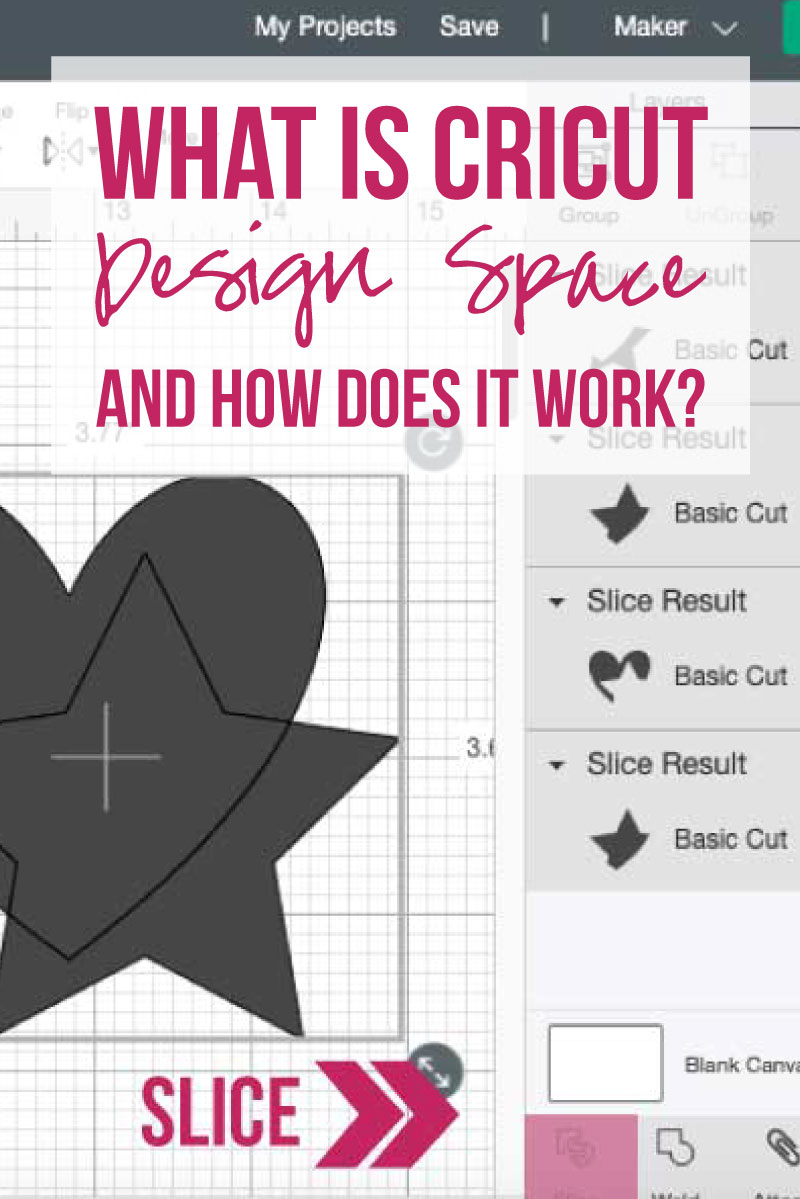
4 Layers Panel: Slice
The slice tool can be a bit intimidating but very useful when you’re working with multiple designs. Basically if you over lap two designs and click slice the slice tool will “slice” the images everywhere they intersect.
So in the image above the slice tool star and heart into four sections. Since there’s two images it separated the heart into a top and bottom and the star into a top and bottom. Since the star and heart are 100% overlapped in the middle the bottom of the heart and the top of the star look 100% identical.
So now I could delete that middle identical layer and have a space in between the heart and star empty. Or I could put the star completely inside the heart and have a heart with a star cut out of it.
Which is pretty cool!
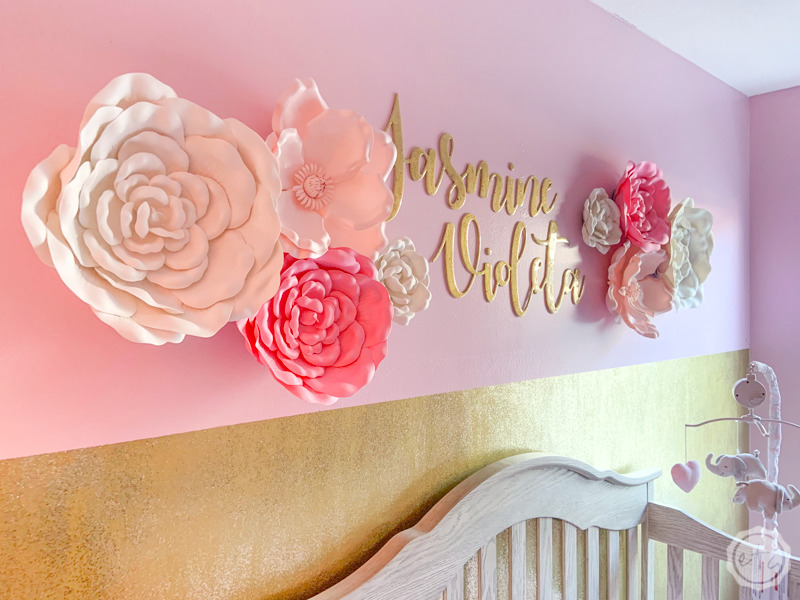
I use the slice tool all the time when making larger projects. I can make a design and then “slice” it into sections that will fit on my cutting boards. Remember the large baby name sign for my friends nursery up above? I used the slice tool to take “Jasmine” and seperate it into four sections that my Cricut could cut.
The finished sign is almost 3.5 feet wide so there’s no way I could cut it out in one continuous piece! Instead I had to slice it into four smaller areas.
I show you exactly how I did this in the full large baby name tutorial if you’d like to see the whole process.

5 Layers Panel: Weld
The weld tool is super easy and one that you’ll use all. the. time. It takes two images (a heart and star perhaps) and fuses them into one layer with a single cut line all the way around the item. If your heart is pink and your star is purple once welded they will be one item with one color… so this only works for welding items that are one color or cut out of one material.
If you import an SVG with lots of layers and you want them to stay in place while you cut you can select the entire canvas and weld it all together. Cricut’s first instinct is to take every image on your canvas and configure it on the cutting mat to waste the least amount of space. If you’re working on 3 separate designs then that might be fine. But for things like words you want them to stay in their “configuration” so that you don’t have to reassemble them.
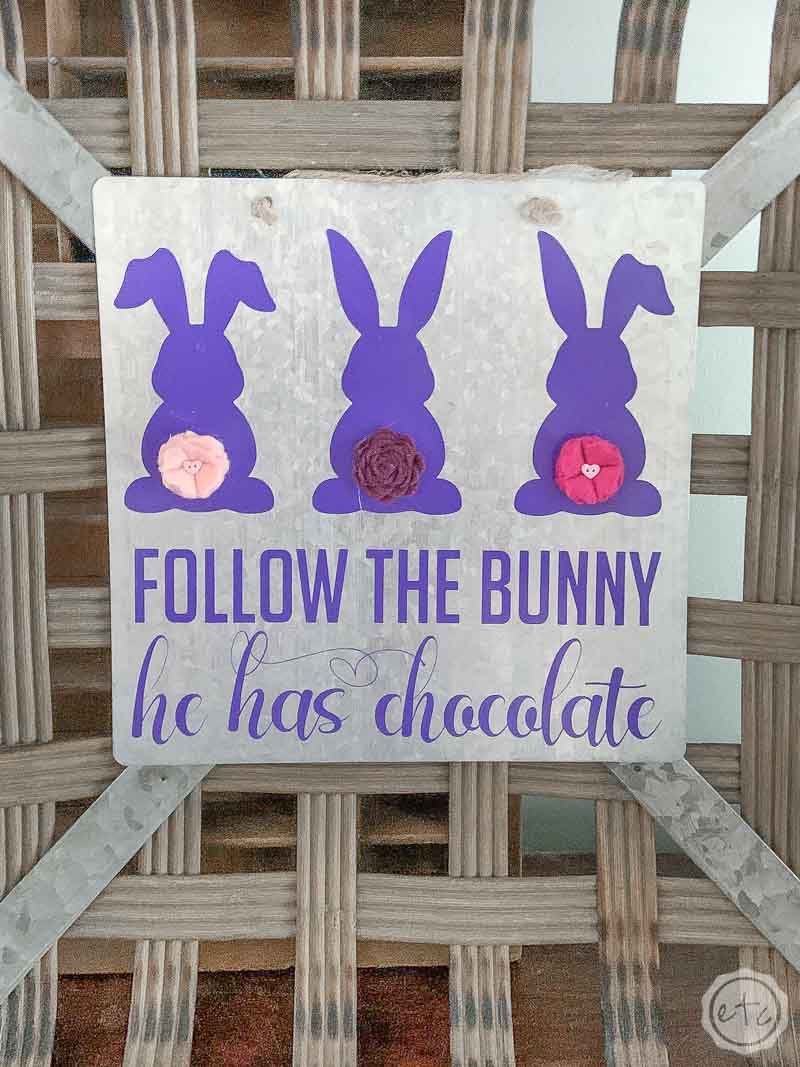
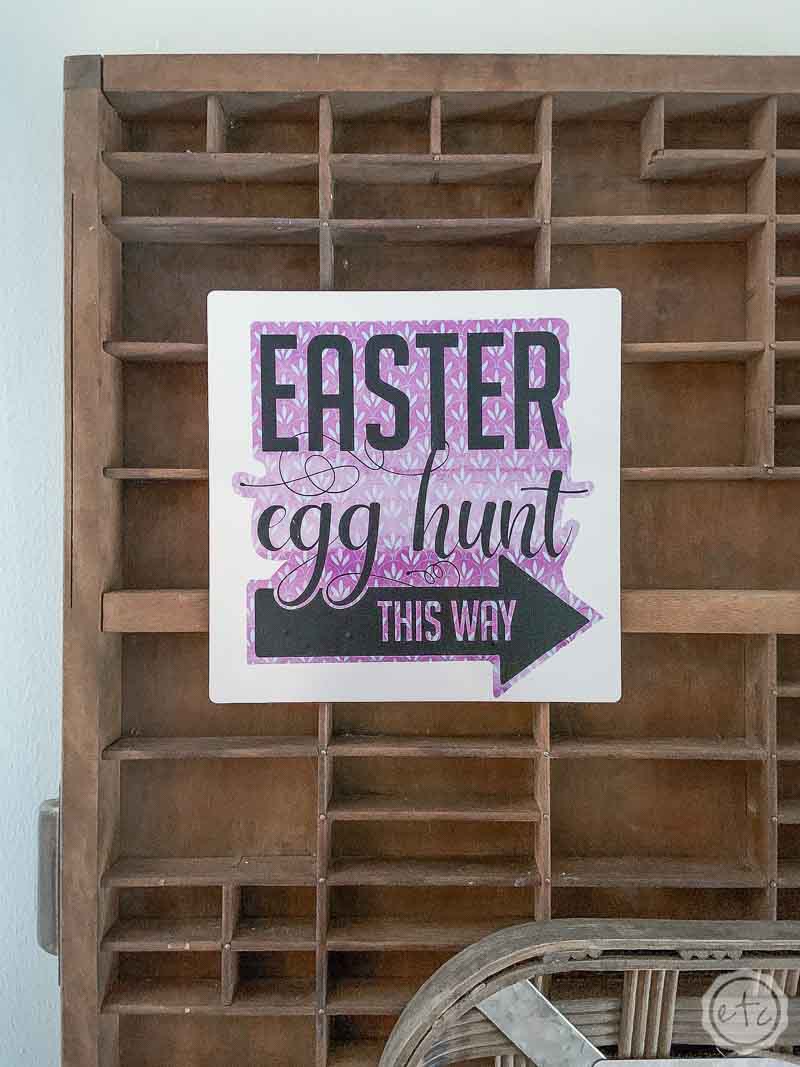
For example on this little Easter design I actually imported two SVG’s: the bunnies and the quote (from my FREE Easter SVG’s). I didn’t want to have letters and bunnies mixed up all over the cutting mat so I sized them and put them together in a design I liked and then welded the entire piece together.
Sine I was cutting the whole project out of purple vinyl that was the perfect solution. If I was cutting the bunnies out of one material and the words out of another material I could have welded them in two separate layers instead of one.
Remember that weld is permanent so once you hit weld there is no un-weld button. There is an undo button but that only helps if you’re a step or two past weld… if you welded something an hour ago and have designed 50 other parts to your design in the meantime you’re stuck.
Check out the full tutorial for this little Easter Sign here.
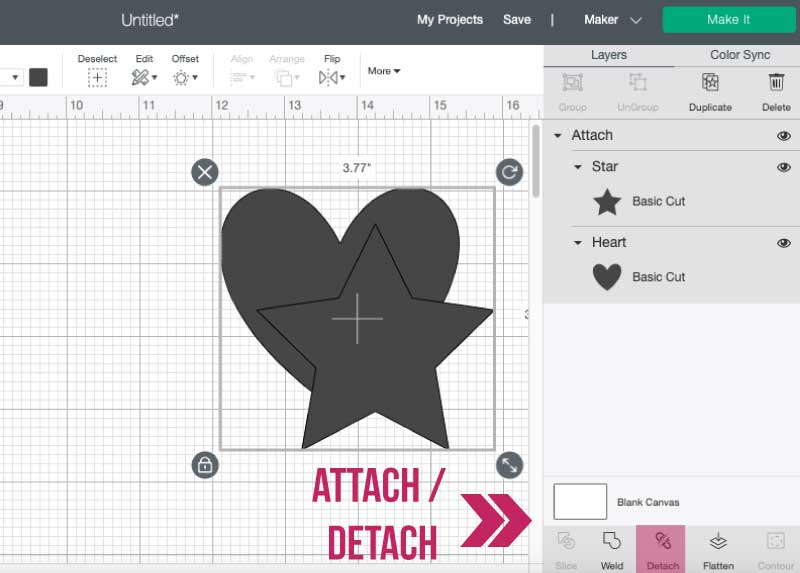
6 Layers Panel: Attach/Detach
The attach/detach button is right next to weld because it is very similar. It takes both of your items and “attaches” them together. This will keep them in the same space on your cutting mat so that they cut in the perfect formation.
Unlike weld attach keeps your items separate. So they don’t fuse together. Instead they simply stick together.
If I were to cut my little star and heart as attached pieces the star would cut out and the heart… once cut I would have 3 pieces: an upper heart, middle section and a lower star.
If you attach something and then cut it make sure that nothing is overlapping. As long as all the items are completely separate attach is the perfect solution. Especially since there is a detach button which makes it completely reversible.
Take this little Christmas sled for example. I used five different colors of vinyl on this project but all the colors were very far apart from each other. So I could attach a layer of purple pieces, a layer of light pink pieces, a layer of dark pink pieces and a layer of rose gold pieces. The white does overlap… so I had to weld that layer.
See the difference?
You can check out the full tutorial for this little sled here.

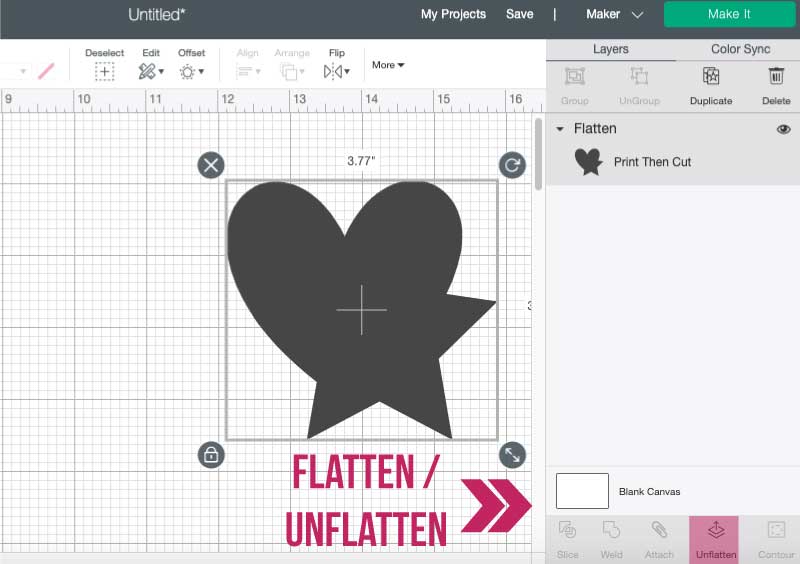
7 Layers Panel: Flatten/Unflatten
When it comes to flatten you’re in a whole new ballgame. Very similar to weld, the flatten button will take all the pieces in a project and fuse them together. But instead of fusing them into one big blob with one simple cut line the flatten button will take an image with different colors and simply smush them down into one flattened image (also with one simple cut line around the outside of the image).
This is the perfect solution for images. You can import a png, add an offset path and then flatten both layers for a sticker or die cut with a white edge around the entire piece.
That’s exactly how I made these little planner die cuts! I added a png image of the globe, added an offset path (a manual one since the easy offset button didn’t exist then!) and flattened both pieces together. Then I was able to add it to my planner.
If I had used sticker paper instead of card-stock this little globe would be the cutest sticker!
Check out the full DIY Die-Cut tutorial here.


8 Layers Panel: Contour
This button is amazing. Once you learn how to use it you’ll be amazed it ever scared the crap out of you. No? Just me?
Contour is the process of taking a welded image and removing any (or all) of the smaller negative images inside of it. So if you contoured an o you could remove the middle of the o and simply have a circle.
For larger images this means you can take away alllllll the little negative pieces in a larger piece to make a single path. For example, I imported one of my Free Easter SVG’s into Design Space.
I wanted to put this particular design on an aluminum blank but I thought the text by itself would be boring. Instead I created an offset path of the entire quote so that I could create a background for my text with infusibel ink.
The offset path goes around allllll of the edges. That includes the inside edges of the letters. Since I wanted a solid background that didn’t work. So I took my offset path and hit contour. I could then hit “hide all contour” and all the little pieces inside the larger design went away. This left me with one single shape that perfectly outlined my quote.
Check out the full infusible ink and vinyl sign tutorial here.


Leave a Reply