
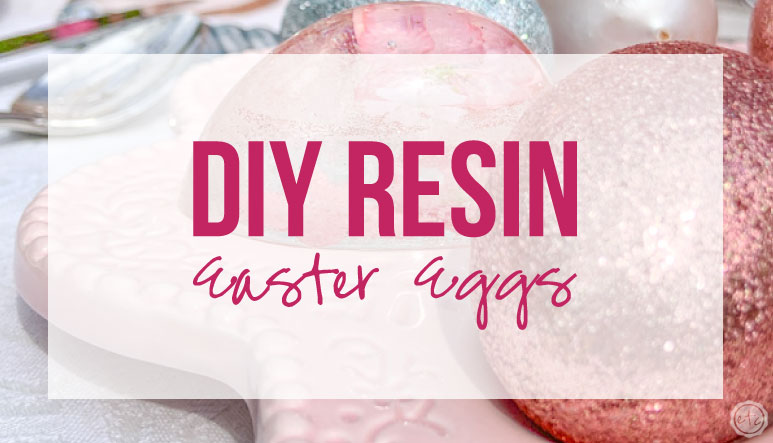


I have a fun craft for you today… a few Easter eggs to decorate for this year’s favorite holiday. If you’re new to resin this is a great place to start… since these little resin easter eggs can be as easy or as complicated as you want to make them.
In fact, I just couldn’t help but make a few *ahem* different versions of these cute little eggs! I’ll walk you through how to gather mix your resin and add multiple layers in each egg (to get a fun multi-layered look to each egg). Then you can pick what fun extras you want to put inside your egg!
Ready to get started?
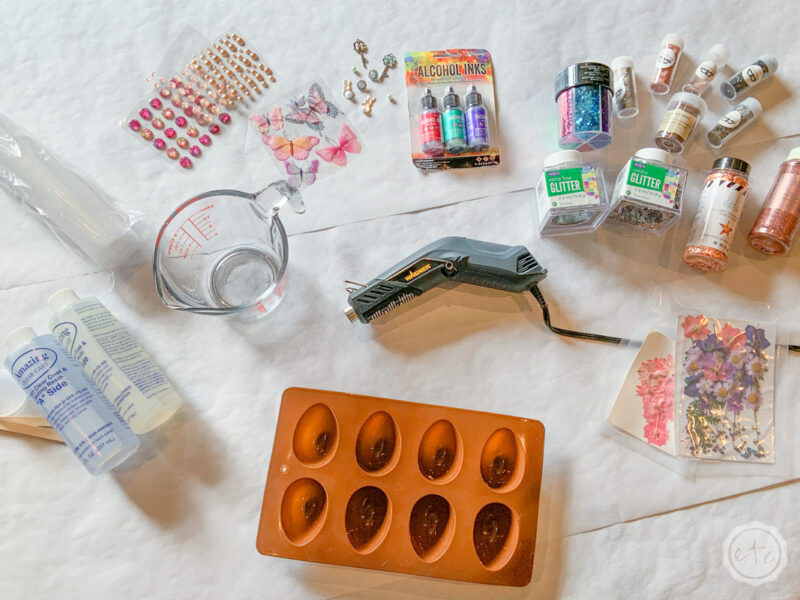
Supplies:
- Amazing Clear Cast Resin
- Respirator/Mask
- Gloves
- Wagner HT400 Heat Gun
- Silicone Egg Mold
- Freezer Paper
- Small Mixing Cups
- Silicone Measuring Cup/Larger Mixing Cups
- Popsicle Sticks
- Toothpicks
- Plastic Spoons
- Inclusions (Fine Glitter/Chunky Glitter/Alcohol Ink/Dried Flowers/Rose Gold Leaf/Charms)
Feeling a little intimidated by all the resin? Not sure what the heck inclusions are? Don’t know what to buy to get started with resin? This particular post will teach you everything you need to know about making resin Easter Eggs but if you want to go back to the beginning check out my Resin 101 Post. It’s a complete guide to getting started with all things resin.
Step 1: Gather Your Supplies
First things first… let’s get ready to party. Start by covering your entire work surface with freezer paper. This will project your table from the resin and alcohol ink we’ll be using for these eggs!
Once you mix your resin you need to use it right away… so you don’t want to be running in the other room to grab your heat gun or a new color of glitter. Go ahead and grab everything you could possibly need before you even open the resin tubes… and then form a plan.
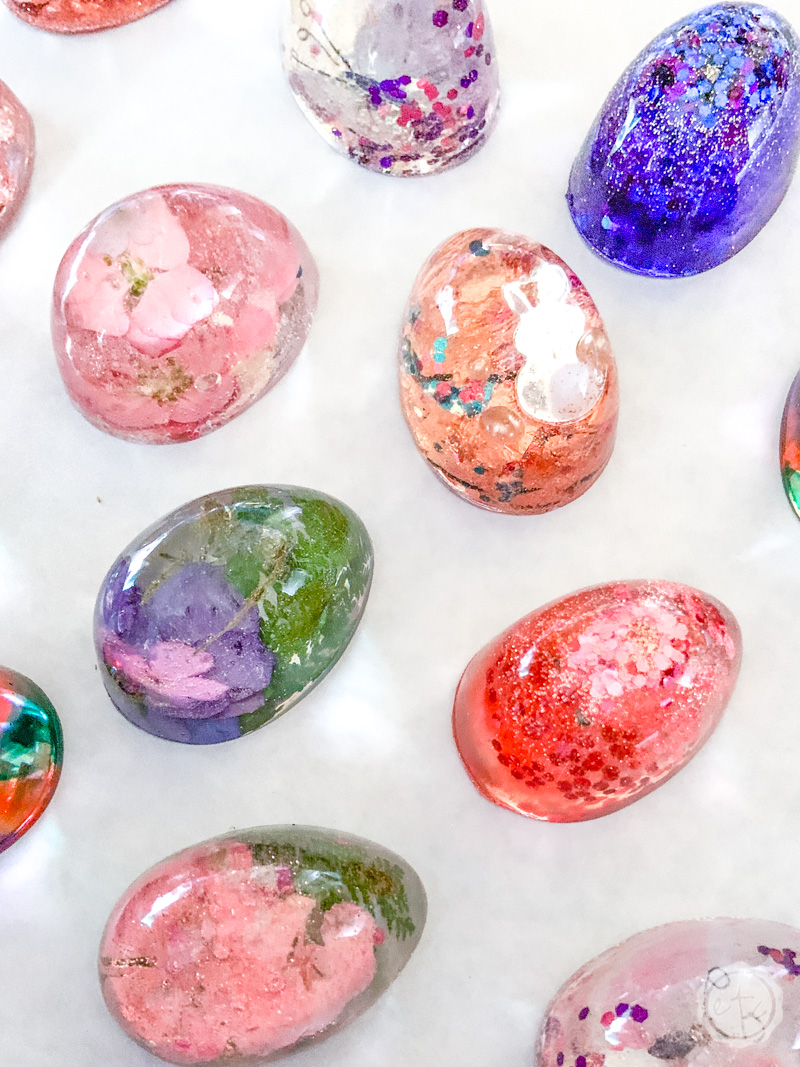
For this project I decided to make a variety of eggs. I wanted them all to be cohesive but different so I gathered supplies in a similar color palette that would all look work with my spring/Easter theme.
For my first round of eggs I decided to make 2 alcohol ink eggs (you can check out my 3 favorite techniques for working with alcohol ink in resin here), 2 with bunny charms, 2 with butterfly stickers and 2 with dried flowers (you can check out my tips on working with dried flowers in resin here).
Each egg is fairly similar: mix resin, add item. The main difference is whether you need 1 layer, 2 layers or 3 layers.
For example, alcohol ink mixes fabulously with the resin so you only need 1 layer of resin throughout the entire egg. Flowers, stickers and lighter items you’ll need at least 2 layers and heavier items like charms will need 3.
Ready to get started mixing resin?

Step 2: Mix Your Resin
Alright y’all let’s get started… by putting on our respirators. The directions on your resin will tell you to use resin in a well ventilated area because the fumes are… not pleasant. Despite reading the warnings (and working in a well ventilated area) I did not head directions well and thought I could get away with not wearing a respirator.
I was wrong.
I had a horrible headache 3 eggs in… don’t be like me. Wear all your safety gear. I promise it’s worth it! A mask may be sufficient however I grabbed my respirator that I use for painting projects and couldn’t even smell the resin through the filter so I’ll stick with that.
Now that our respirators are on let’s start mixing resin! The resin box will give you instructions for the exact type of resin you’re using… I picked up a box of Amazing Clear Cast and it says use a 1×1 ratio, that will be tacky in 30 minutes and cure in 24-48 hours.
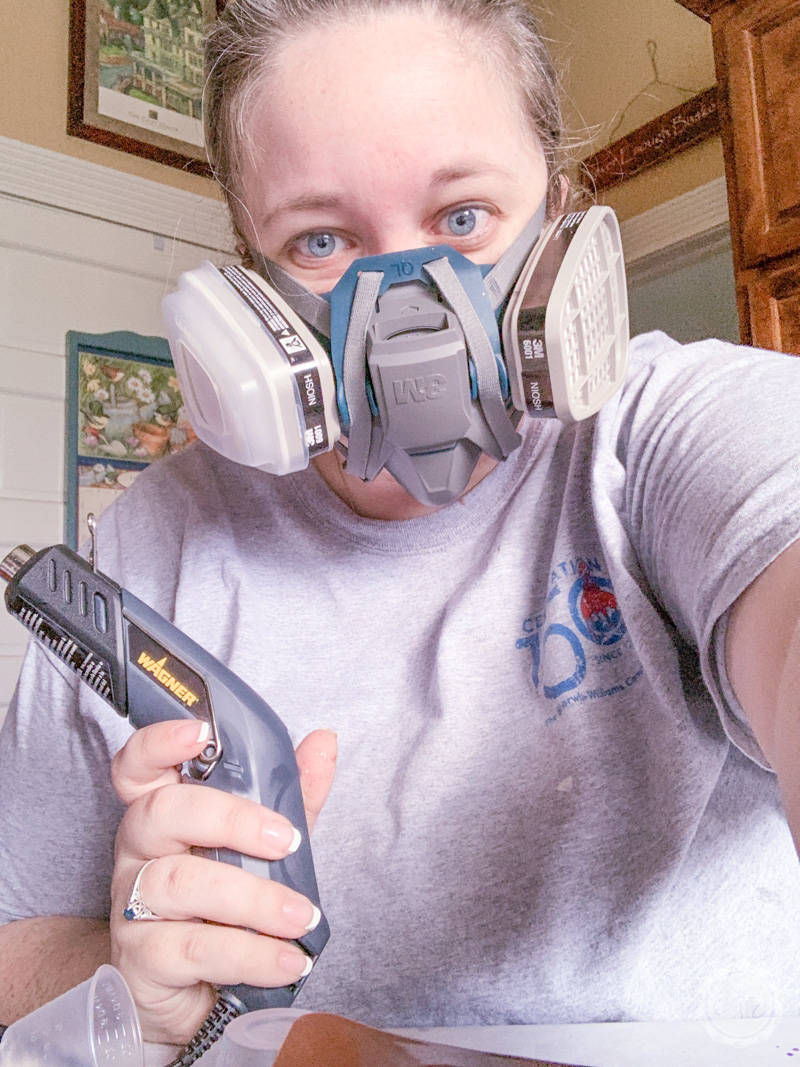
Yes, I know my respirator is on upside down… no I didn’t realize it until I was editing this picture…

I started by mixing about 1 cup of resin total in a medium mixing cup. The resin needs to be super mixed so after you pour in 1/2 a cup of part A and 1/2 a cup of part B you’ll stir the two together for 2 minutes with a little Popsicle stick.
Then once you’re done stirring you’ll pour the resin directly into the silicone mold. I poured 2 eggs full to the top of the mold (for alcohol ink) and the rest half way so that I could add fun extras on top.
Just keep in mind that this is quite a bit of resin so if you’re just learning you may try doing enough for 1 egg at a time. It will take longer but you’ll have better control. I like to use the little disposable mixing cups for this… you’ll go through them fast but it’s much easier than cleaning out the larger mixing cup each time.
Need a little help? Start at the beginning with my easy how to mix resin tutorial!

BONUS TIP: When working with resin only mix as much as you need (it WILL NOT KEEP) so for half an egg you’ll need about 15ml of resin (part a & b mixed) for an entire egg you’ll need about 35ml of resin (part a & b mixed) keep these measurements in mind when mixing your resin and you’ll be fine.


Step 2: Use your Heat Gun to Pop the Bubbles
Alright y’all this is definitely the fun part (well…. one of the fun parts!). Once you’ve poured your resin you’ll notice allllll the bubbles from stirring part a and b together… now I don’t know about you but this is not the look I’m going for.
I want crystal clear resin y’all!
Luckily there’s an easy solution, grab your heat gun and pop all those bubbles. I start by setting my little Wagner heat gun to low and pass it slowly over each of the egg molds. You’ll notice the bubbles rising to the surface and popping right away.

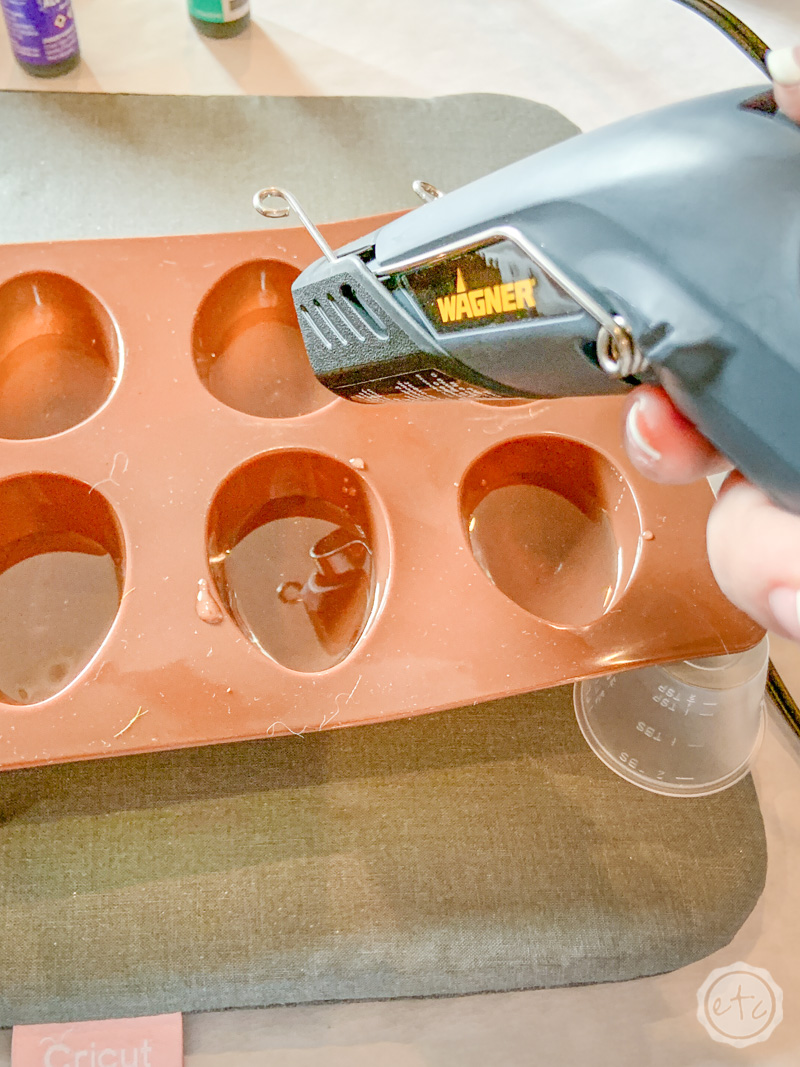
Once I’ve done a pass on low I take a look at the resin, are the bubbles still there or is it clear? If I still see bubbles I’ll hit those sections with the high heat from my heat gun. Most times that works but sometimes the resin from the end of the batch is extra bubbley… so I’ll take a popsicle stick and slowly mix that resin a bit to bring those bubbles to the surface. Then I’ll hit that section again with the heat gun.
Beautiful darling!
BONUS TIP: You may notice in the photo above that I have a little mixing cup under the corner of my mold. That’s because the heat gun makes this particular silicone mold a little soft… that’s fine. It won’t hurt it! BUT it does make the outsides slope downwards so a little medicine cup will help prop those edges up and keep the resin level.

Step 3: Add your Inclusions
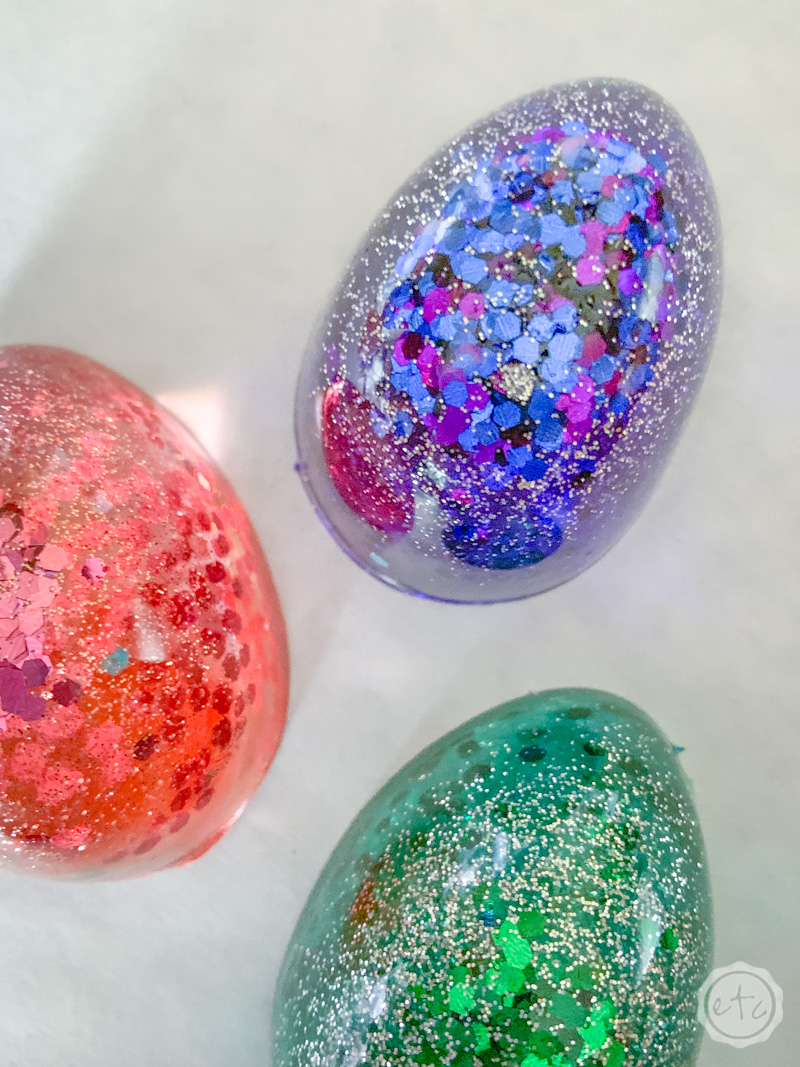
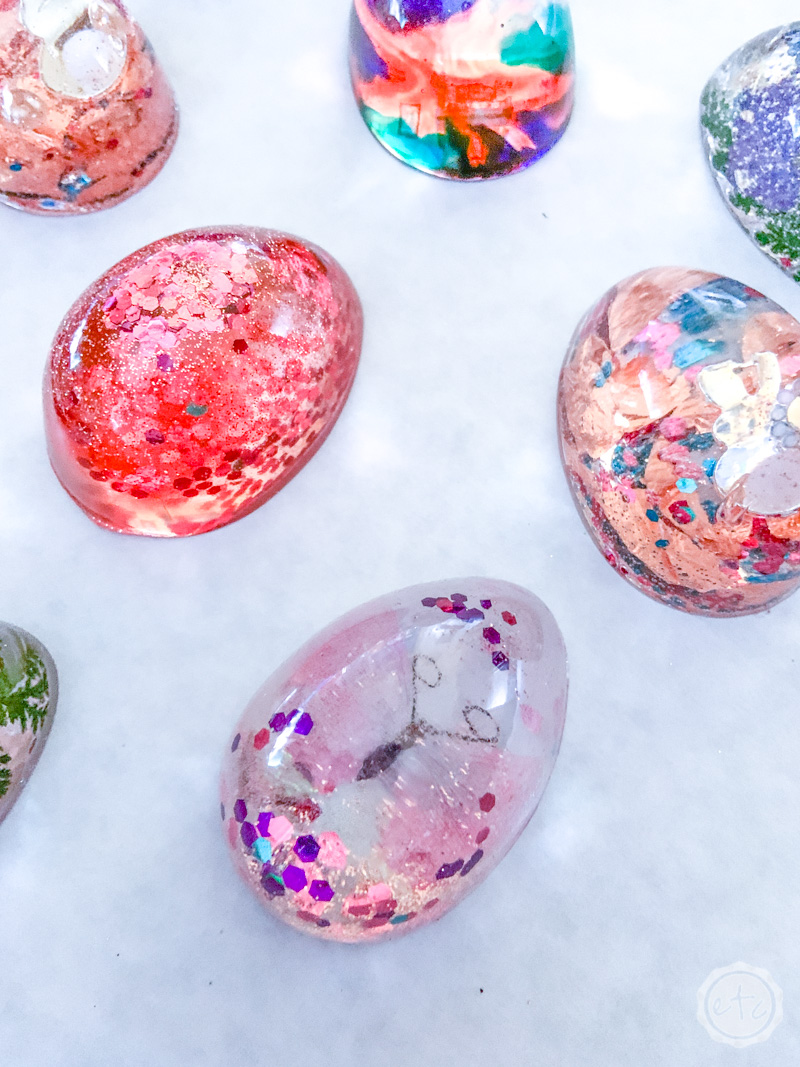
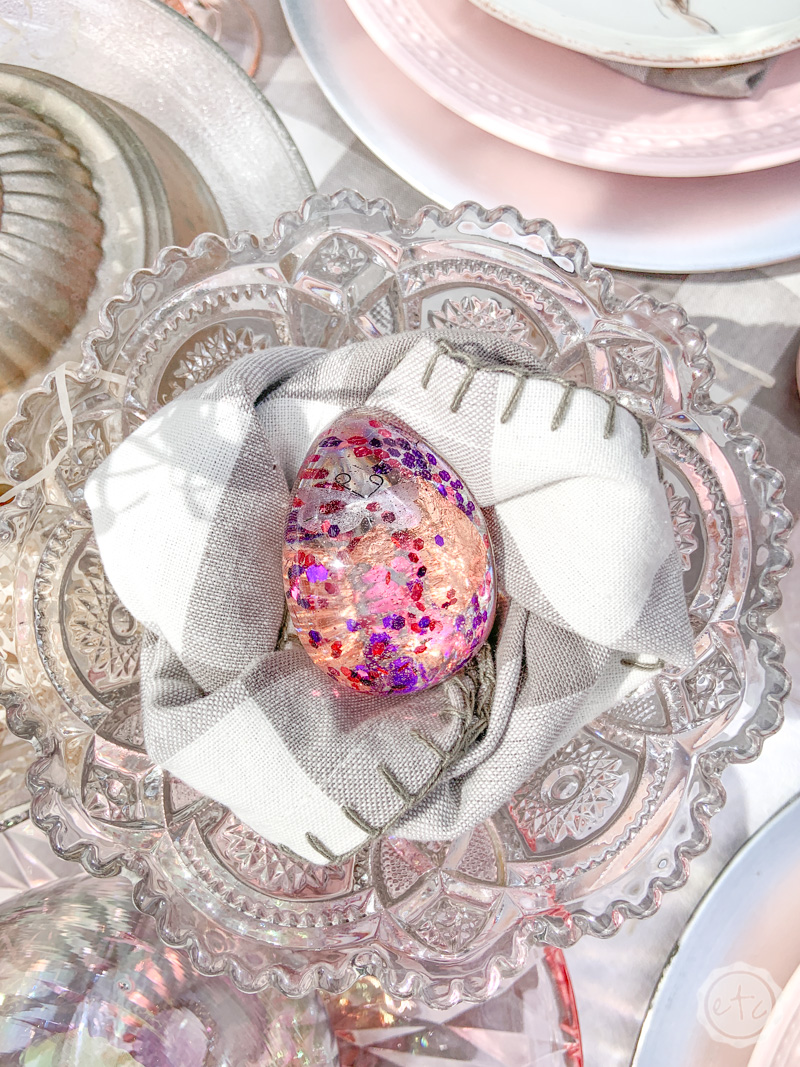
Okay inclusions is a fancy word I’ve heard fancy resin artists use as they work on their fancy resin projects (on YouTube). It basically means add all the fun little bits and bobs that makes each egg special: glitter, alcohol ink, dried flowers, rose gold leaf, or charms.
Alcohol ink you can add directly to your resin for a marbled effect or you can mix it together with glitter for a fun multi-media kind of look. (Follow the full alcohol ink tutorial here).
But the real show-stoppers here are all the 3-D embellishments that we need to layer.
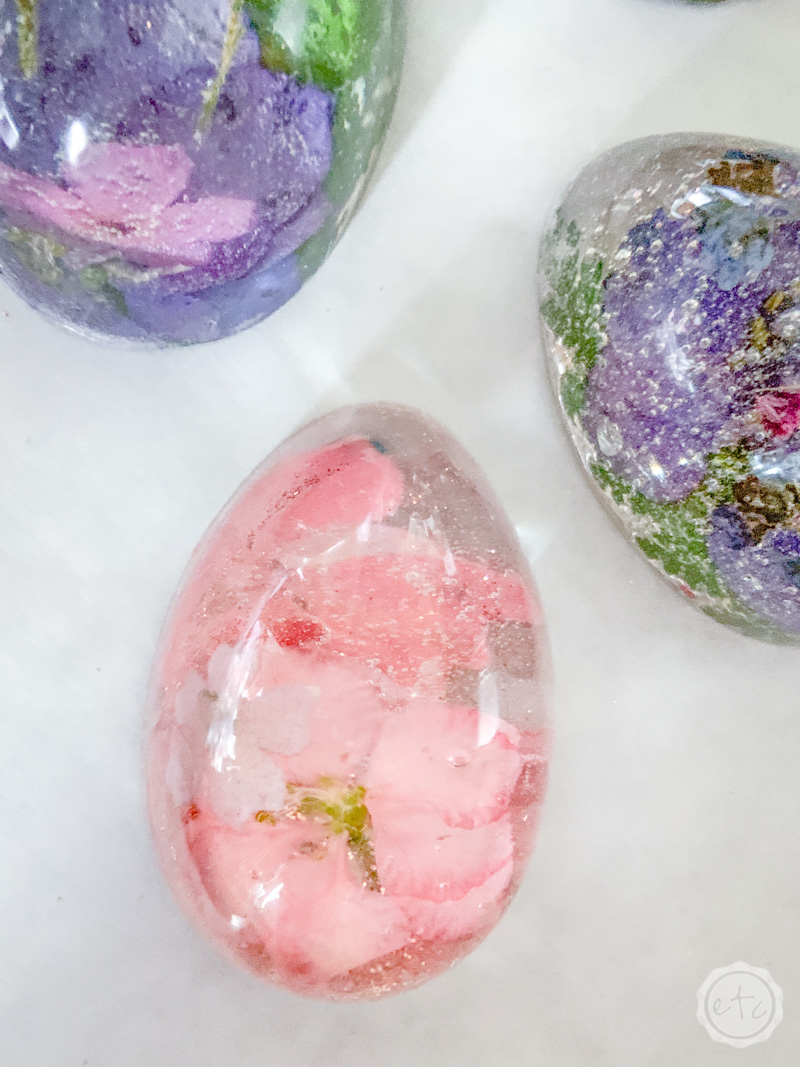
For layered resin we have a bit of a learning curve. Basically you’re looking for a 3-D kind of effect with an inclusion in the middle of the egg and at the back of the egg. Try to plan this out a little bit… if you add too much to the first layer you won’t see anything in the back layer!
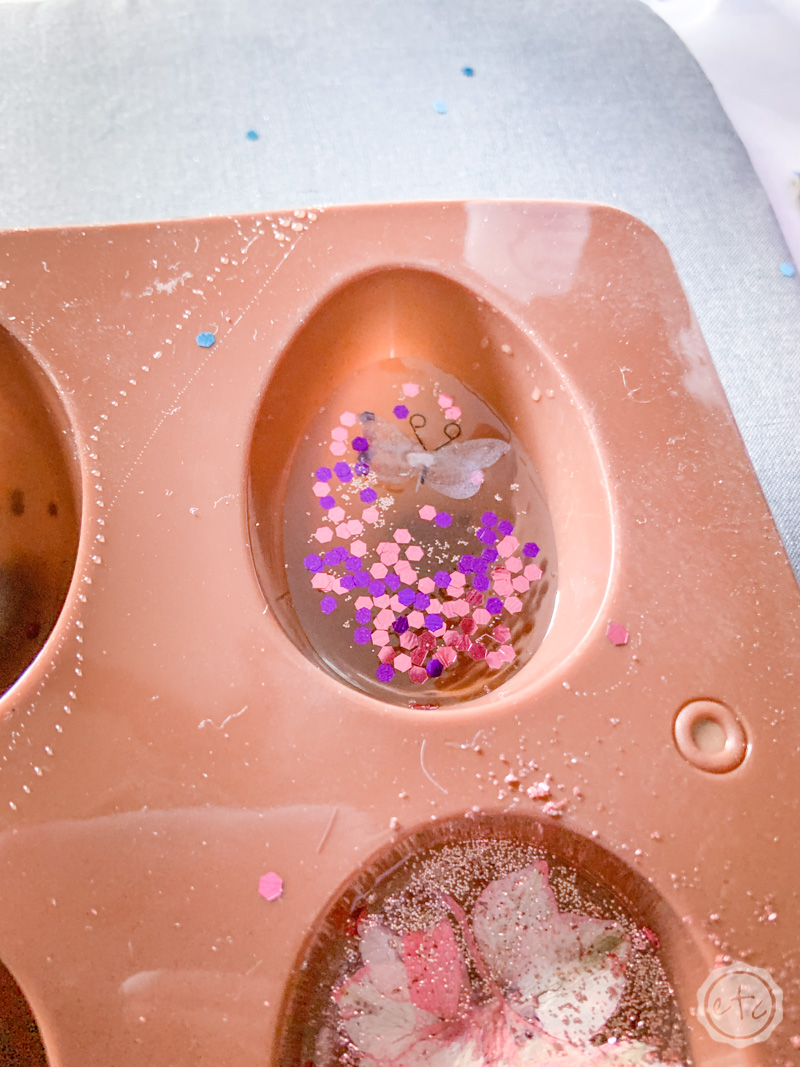
Since we’ve filled most of our eggs half way we’ll make a few variations of this. Lighter inclusions (like small flowers, glitter or rose gold leaf) can be added directly to the resin without waiting for it to cure at all. Just take a look at the picture above… I added the glitter right after popping the bubbles in the resin.
Rose gold leaf goes on like a dream to either wet resin or cured resin!
The little butterfly on the other hand is a clear sticker… and a bit heavier. If you were to add him to just mixed resin he would sink allllll the way to the front edge of the resin.
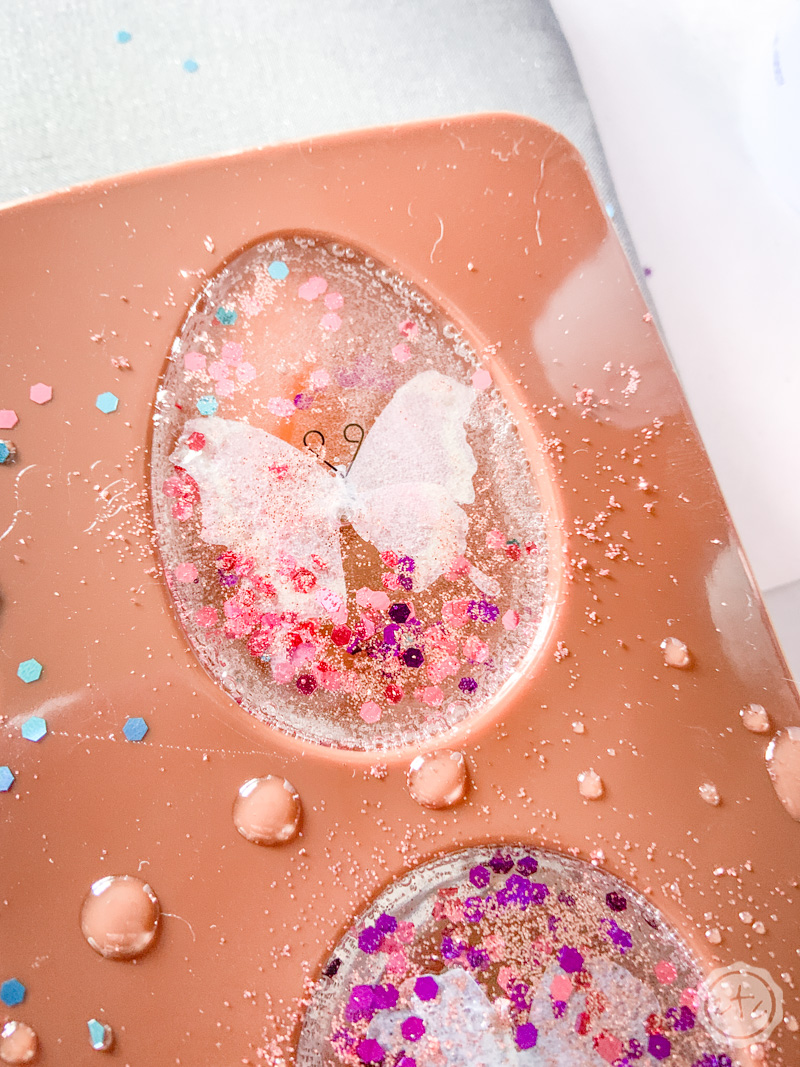
For heavier inclusions (stickers, charms, larger flowers) you’ll need to wait until the resin has dried a bit. This resin has a 30 minute dry time before you can’t work with it at all. I find that waiting about 15 minutes gives you the right amount of time where the inclusion (like the little butterfly in the picture above) will sink into the resin a tiny bit but not fall all the way to the front.
BONUS TIP: The little butterfly sticker is heavy for an inclusion but still fairly light. I find that heavier inclusions like charms really need 3 layers of resin. Scroll down to step 3.5 for the 411 on the 3 layered resin eggs.
Once you’ve added your inclusion to the first layer and it doesn’t fall through finish waiting the 30 minutes until your resin is dry.
Now it’s time to add your second layer of resin!
I typically use the little mixing cups for the second layer since it’s easier to do these one at a time… it may take you a while to arrange the second layer of an egg and you don’t want to be doing that on the clock with a full measuring cup of resin waiting.
I simply mix 10ml of part a and 10 ml of part b in a little measuring cup for 2 minutes and then pour it in the back of an egg. Take your heat gun and pop alllll the bubbles so that the second layer of resin is bubble free.
Now you can finish the egg with the rest of your inclusions. Like a larger butterfly, glitter or even more rose gold leaf!
BONUS TIP: Looking for ideas of what to include in your eggs? Here’s my list of 35 budget friendly items to include inside your resin art.

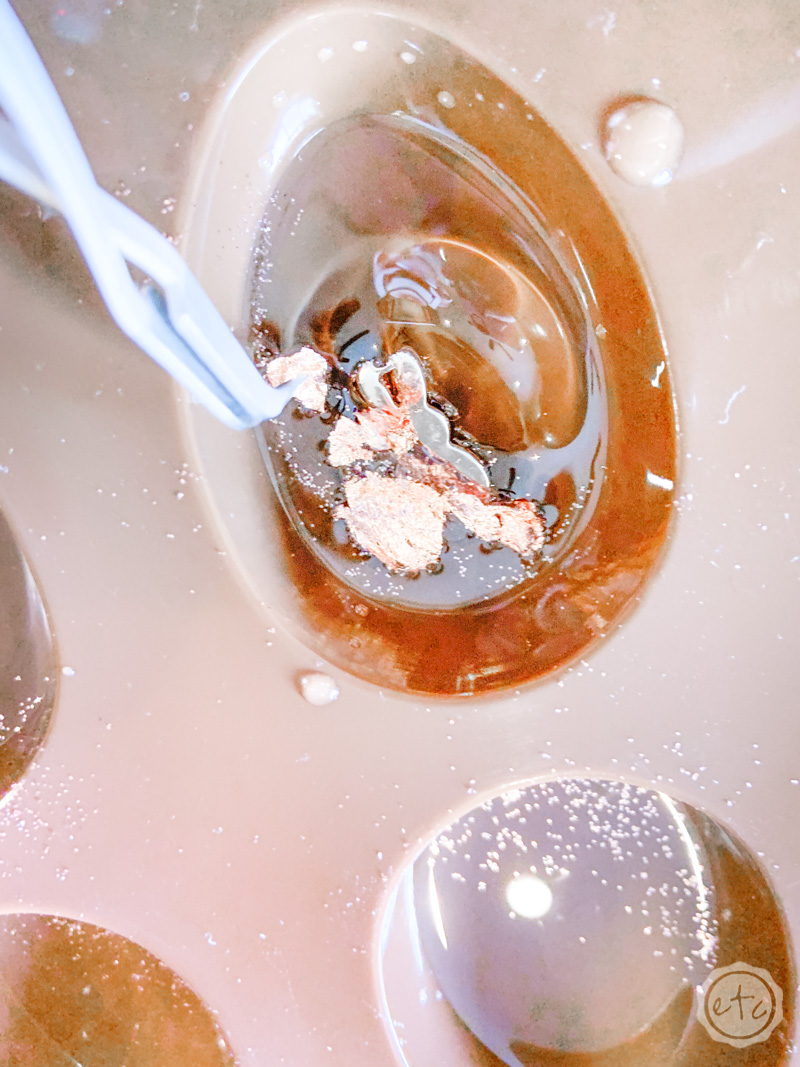
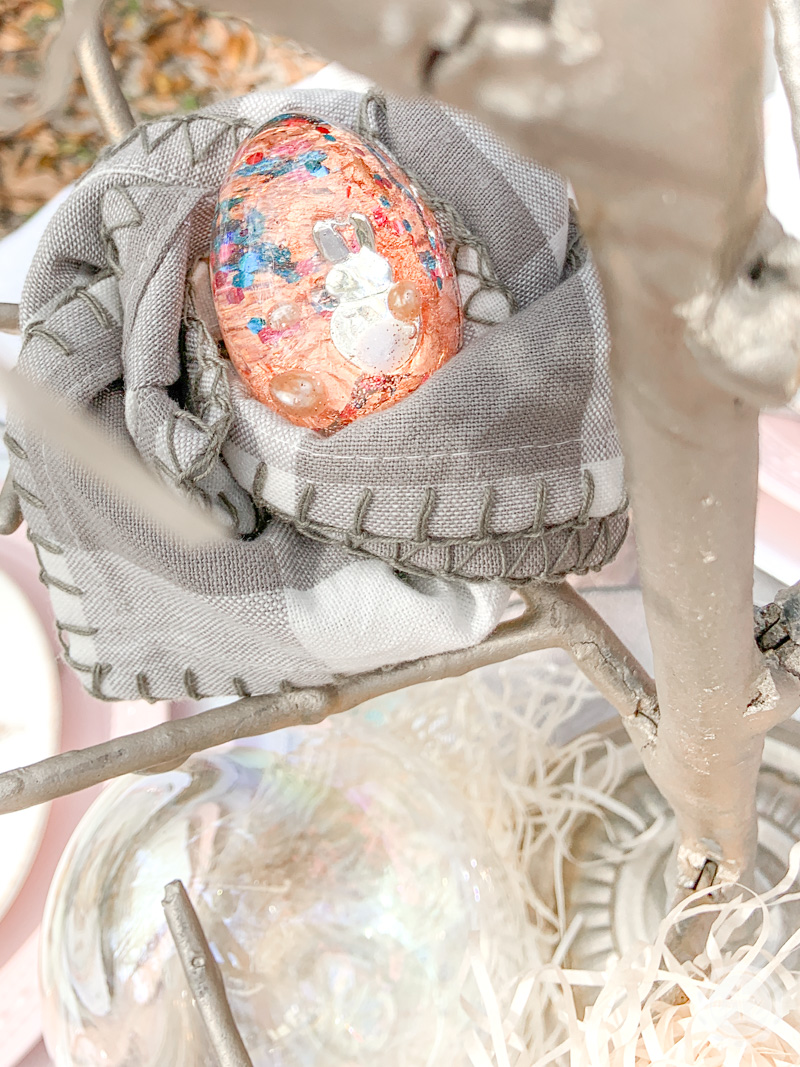
The possibilities for this are truly endless… just take a look at the first layer of this little bunny egg: a bunny charm, a few blush gem stones and rose gold leaf make for a stunning egg.
The back of this little egg looks like a mardi gras float… glitter and rose gold leaf everywhere!


Step 3.5: The 3 layered Egg
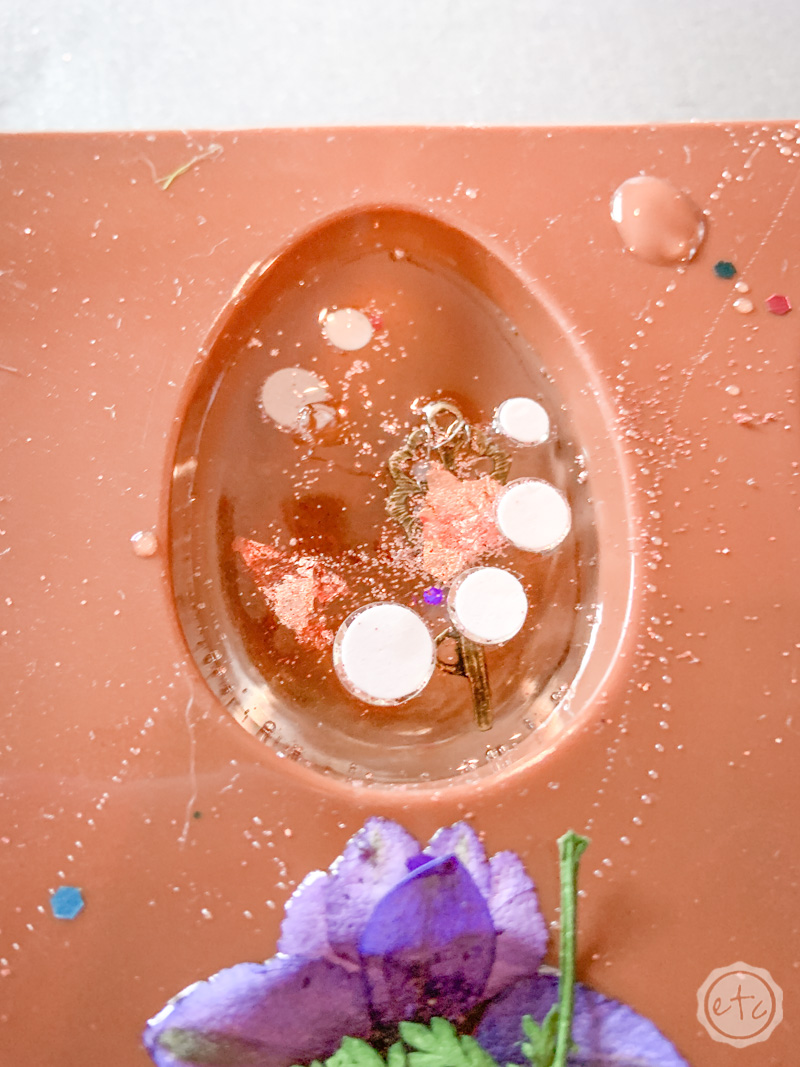
Okay y’all before we move on let’s talk heavy objects… like these little keys or even the bunny charm from the egg above. These guys are way too heavy for a new layer of resin… we really need to wait for the first layer of resin to dry before adding such a heavy piece.
So we get the 3 layered egg.
It’s a simple process. You can add a little bit of glitter or even gems to the first layer (at the edges so they don’t block the charm we’re going to add). Then let the resin dry. It takes 30 minutes for this resin to dry but that is more of a guideline than an exact science.
After 30 minutes you can add your charm… and a small layer of resin. Just enough to really cover the charm with resin and make sure it’s level in the mold. Take a look at the picture above and you’ll see what I mean. The resin is just barely covering the back of the charm and there’s still space in the mold for a third layer.
BONUS TIP: If you add a heavy inclusion to your resin tooooo soon and it falls to the front of your resin you can generally use a toothpick to fish it out. Wipe off the resin from the front (with a toothpick or Popsicle stick), wait a few more minutes and try again. A good test to see if the resin is ready is to gently poke the surface with a toothpick. If the toothpick sinks in like it’s going through water it’s not ready yet.
Now let the 2nd layer dry for 30 minutes before moving on to the 3rd layer! (If you want to be extra fancy you can add a few things to the back of the 2nd layer before it dries… like these little gemstones & rose gold leaf I added behind the charm in my second key mold).

Once your second layer is dry you can add the third layer. You should have the process down by now!
Mix your resin, pour it in, pop the bubbles with your heat gun, add inclusions, let dry.
Easy peezy!
For all the instructions once you get the hang of it resin is actually quite easy… it’s the same process over and over again simply with different inclusions or fun pieces added. I can’t wait to see what else we can add!
Looking for a list of all the fun things you can add to your resin projects? Check out my full list of amazing budget friendly items to put inside your resin art.
Once you’ve finished your eggs go ahead and set your mold in a clean, dry area with decent ventilation to cure (I picked my craft room). To fully cure will take 24-48 hours so leave these bad boys to do their thing and come back in a day or 2.

Step 4: Remove your Cured Resin Eggs
Alright, if you can hardly stand waiting it’s been about a day… and we can now check our resin eggs! Luckily this is pretty easy.
Simply start to peel the mold back from your resin egg… if the resin was mixed properly and it’s all the way cured you should see a clean release on all the edges like in the photo above.
If the egg is still tacky and does not feel smooth and dry to the touch then leave it alone and come back the next day. If the egg feels crystal clean and dry then go ahead and completely remove the mold… it should leave you with a shiny, beautiful egg!

Unfortunitely every once in a while your resin does not mix right and the ratio of part a to part b is off… if this happens the egg will never fully cure correctly and will always feel tacky. You’ll probably have to throw that egg away… which would stink.
Luckily for all the warnings I’ve never had this problem.. and hopefully neither will you!
Once you have all your eggs out of the mold you’re this close to finished. Sometimes a bit of the resin has spilled over the back of the mold leaving weird bits, bobs and pieces of resin. I simply cut these off with a pair of scissors… and sand down the edges if they aren’t smooth.
Check out the final results!


Of course, the best part about making adorable Easter Eggs is using them to decorate your Easter table!
You can see alllllll the beautiful pictures of my vintage easter tablescape here… including a few featuring these amazing eggs!


Looking for more resin projects? I’ve got you covered!


