• House Tour
    • Reveals
  • About
    • Smith Life
    • Disclosure and Privacy Policy
      • Terms and Conditions
      • Store Affiliates
  • Contact Me
    • Want a Button?
  • Shop
    • Floral Printable Planners
    • Paint eBooks and Packages
    • Wedding Binders & Extra Printables!
    • Planner Bundles
    • Planner Accessories
    • Home Decor Printables!
  • Cart
    • Bloglovin
    • Facebook
    • Instagram
    • Pinterest
    • Twitter
    • YouTube

Happily Ever After, Etc.

Creating Our Own Fairytale

  • Happily Ever After, Etc.
  • Home
  • Home Decor
    • My Home
    • Paint
    • Before and After
    • Tablescapes
    • Mood Boards
    • Furniture
  • DIY & Crafts
    • New to Cricut – Start Here
    • Cricut Projects
    • Resin
    • Scrapbooking
  • Organization & Planning
    • Cricut
    • Organization
    • Planner
  • Holidays
    • Christmas
    • Halloween
    • Thanksgiving
    • Easter
  • Wedding
    • Cricut Wedding Projects
    • Free Wedding Binder
    • Bride Bag- The Ultimate Wedding Planner

Quick and Easy DIY Christmas Tray

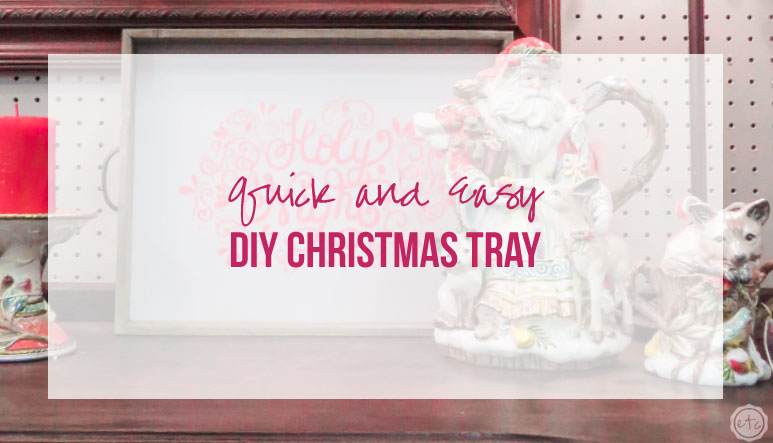
It’s week two of the Deck the Home Blog Hop and this week we’re tackling wooden projects! So many amazing signs and pretty projects… I don’t think I could pick a favorite if I tried. Of course with 26 bloggers there are way to many projects to look through anyways.

Last week we worked on fun door decor which was a bit more focused… with wooden decor our projects are all over the place! So once you tackle this little tray make sure to scroll all the way to the bottom of this post and check out 25 additional project ideas! While I’m a little partial to my own *cough cough* there are a bunch of really cute projects for all types of styles.

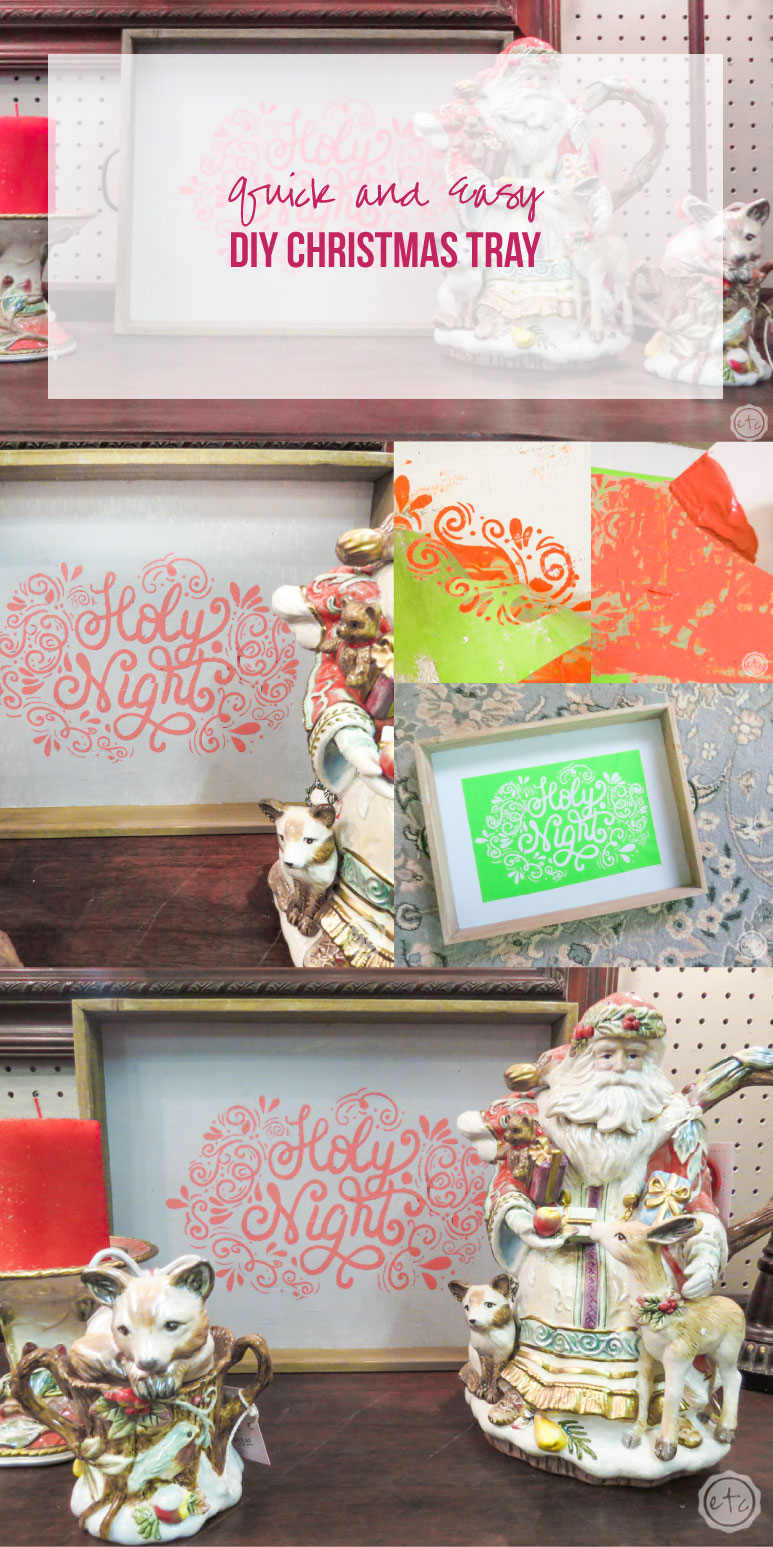
In the meantime here’s a fast stencil project that ends with a really cute tray!

Supplies:

  • Cricut Explore Air 2
  • Fine-Point Cutting Blade
  • Standard Cutting Mat (that’s the green one!)
  • Cricut Cut File
  • Stencil Vinyl
  • Transfer Tape
  • Weeding Tool
  • Wooden Tray
  • Chalk Paste
  • Scraper

Need help picking your perfect machine? I’ve got you covered!


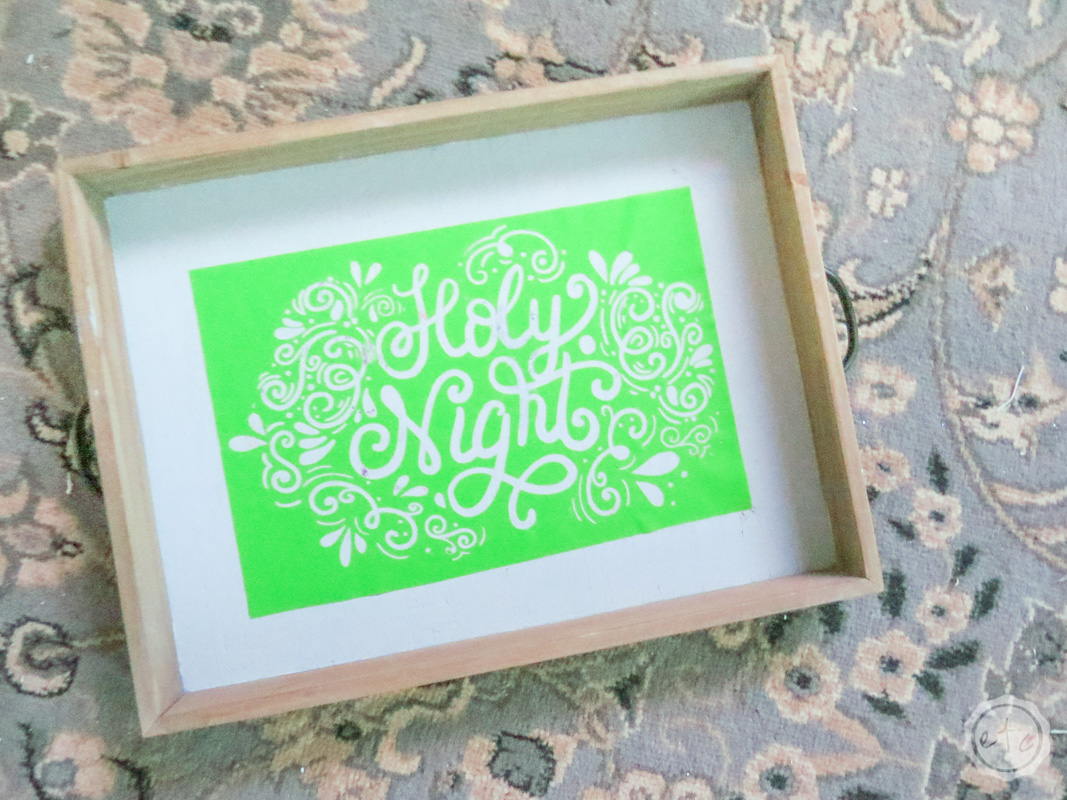
Step 1: Cut Your Vinyl Stencil

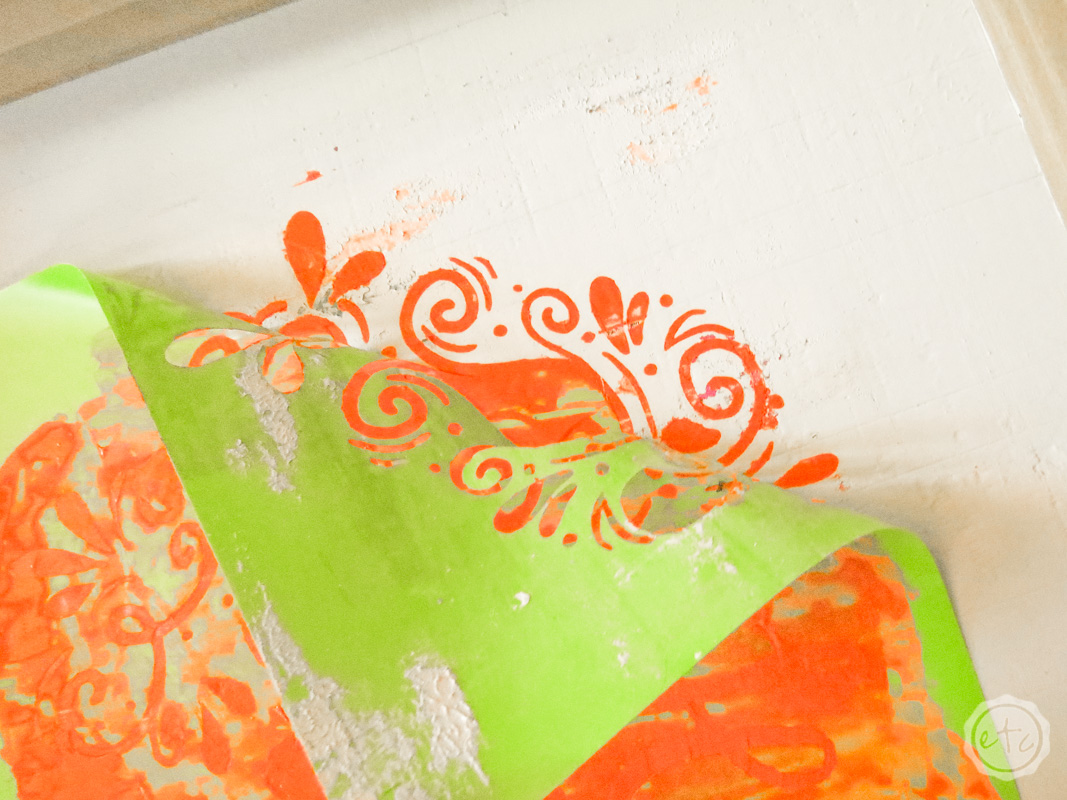
Alright y’all the very first step is to cut out your stencil. You can grab the Cricut cut file here and then send it through your Cricut easy peezy lemon squeezy! I always like to use a bright color for my stencil that will contrast from the color I’m painting (or in this case chalking?) so that I can tell where I’ve painted (chalked?) and which areas are naked.

Since we’re working on a Christmas tray I figured we’d go with a bright green!

After your stencil is cut it’s time to weed the design (or take all of the negative bits of the design off your cutting mat) and use transfer tape to apply the stencil to your tray. If you haven’t used a Cricut to cut out your design and transfer it before I have a quick tutorial for this step right here.

The hardest part of applying the stencil (for me!) is always waiting for the Cricut to finish cutting… I am the most impatient person ever.

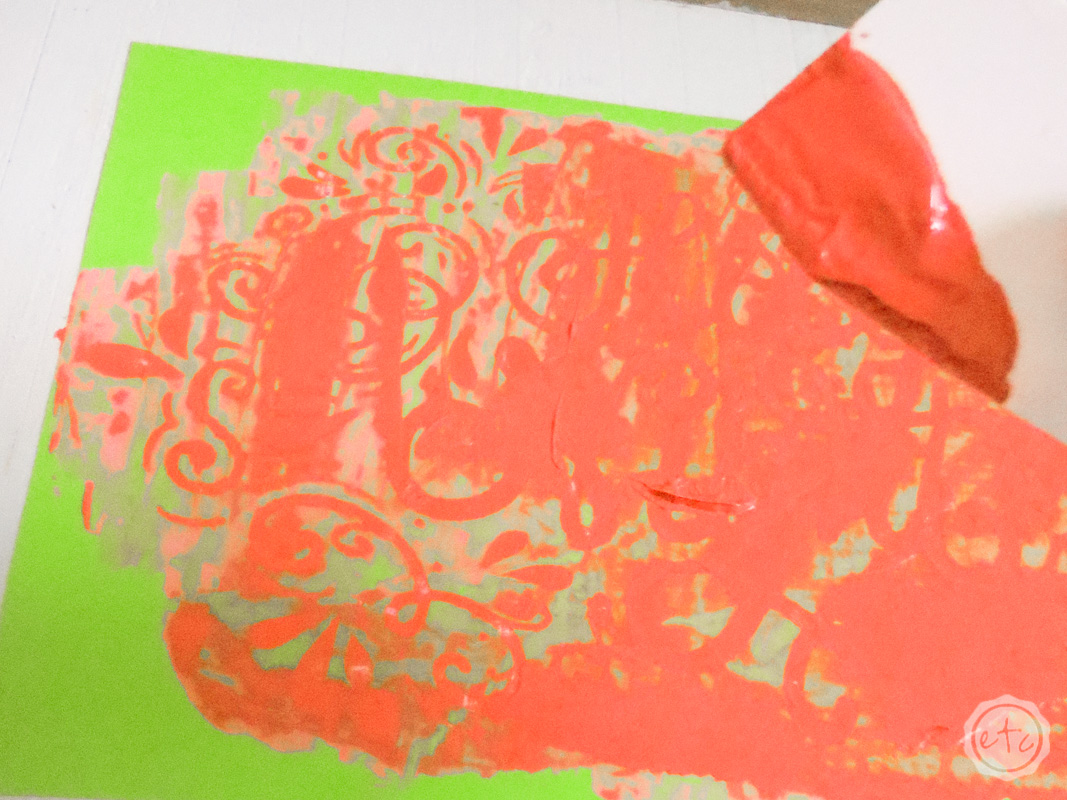
Step 2: Apply Your Chalk Paste

Now that our stencil is in place it’s time for the fun part! The chalk! If you’re painting you would paint your piece at this point but I decided to use a bit of chalk paste.

If you haven’t used chalk paste before it’s super easy… you put a little bit on your stencil and then use a hard card to squeegee it off! It’s super fun and super quick which is my favorite part.

PLUS if you don’t seal this bad boy you can easily wash it off and add a new stencil when the holidays are over.

I don’t do chalk couture or anything like that but I have a few little tubs here and there that I’ve bought for personal use. If you’re looking to try the chalk paste (and you should… it’s so much fun) I get mine from my friend Jeanie over at Create and Babble. Happy shopping!

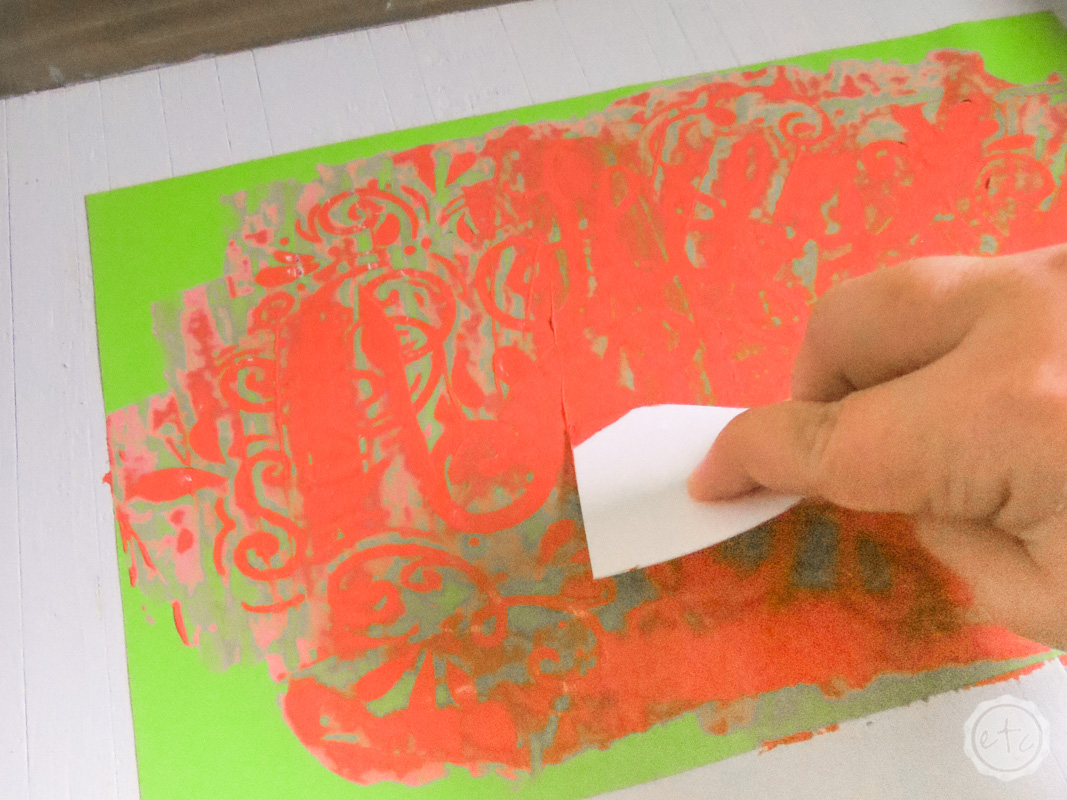
Step 3: Peel the Vinyl Stencil Off

This may be the best part!

Once you’ve put the chalk paste onto your stencil you’ll turn right around and take the stencil off! You want to remove the stencil while the paste is still wet… if you wait until the paste dries it typically gets very messy when you try to take the stencil off. The edges get jagged since they are attached to the paste still on the stencil!

So as soon as your stencil is filled in and all the excess paste is squeegeed off go ahead and lift your stencil off the design. Start on one side and slowly peel your stencil off from one side to the other!

If you have little pieces that weren’t attached to the over-all stencil (say the middle of an o) you’ll have to remove those bits separately. I just used my weeding tool and washed it afterwards… easy peezy.

Once your stencil is removed wait for the chalk to dry and then touch up if needed. Typically you shouldn’t need much (if any!) touch up but if you placed your stencil thinking the paint on your tray was dry and it wasn’t… you’ll probably have to touch it up.

Basically I decided I wanted a gray background on my tray and painted it real quick… then started my project thinking it was dry and dun dun dun.

It wasn’t.

The gray background was still wet.

It made a giant mess.

Don’t be like me… only do this project on a dry background.

Trust me.

Step 4: Enjoy!

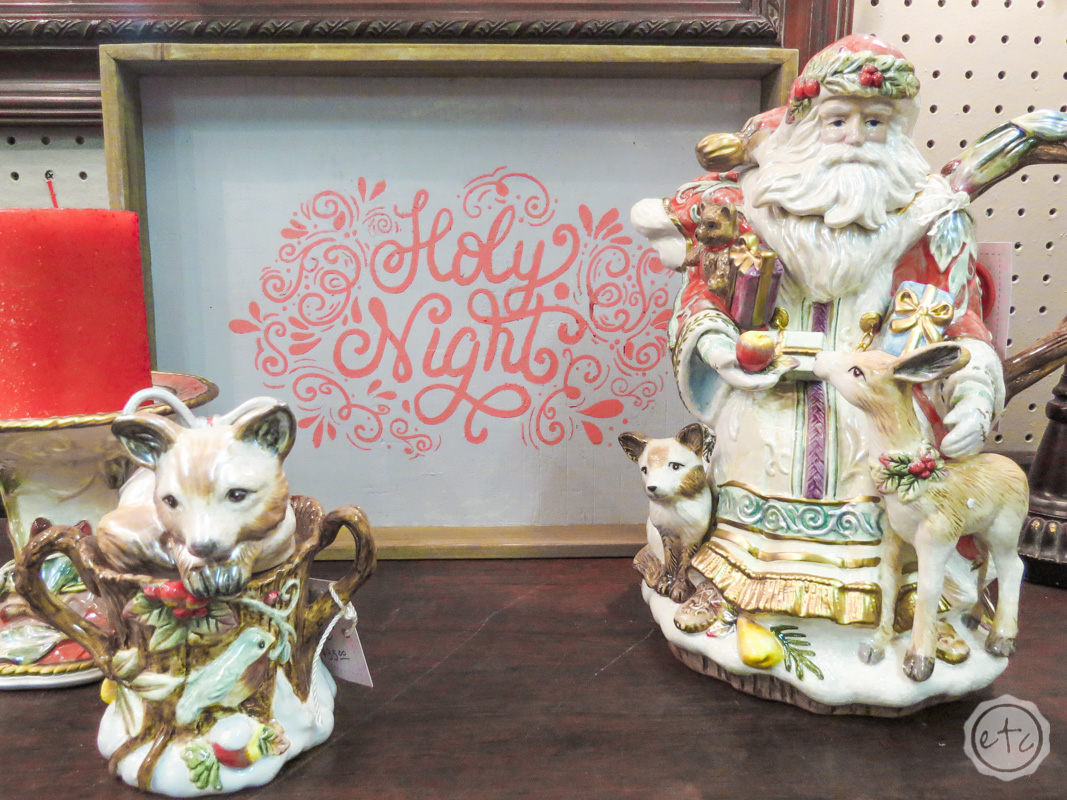
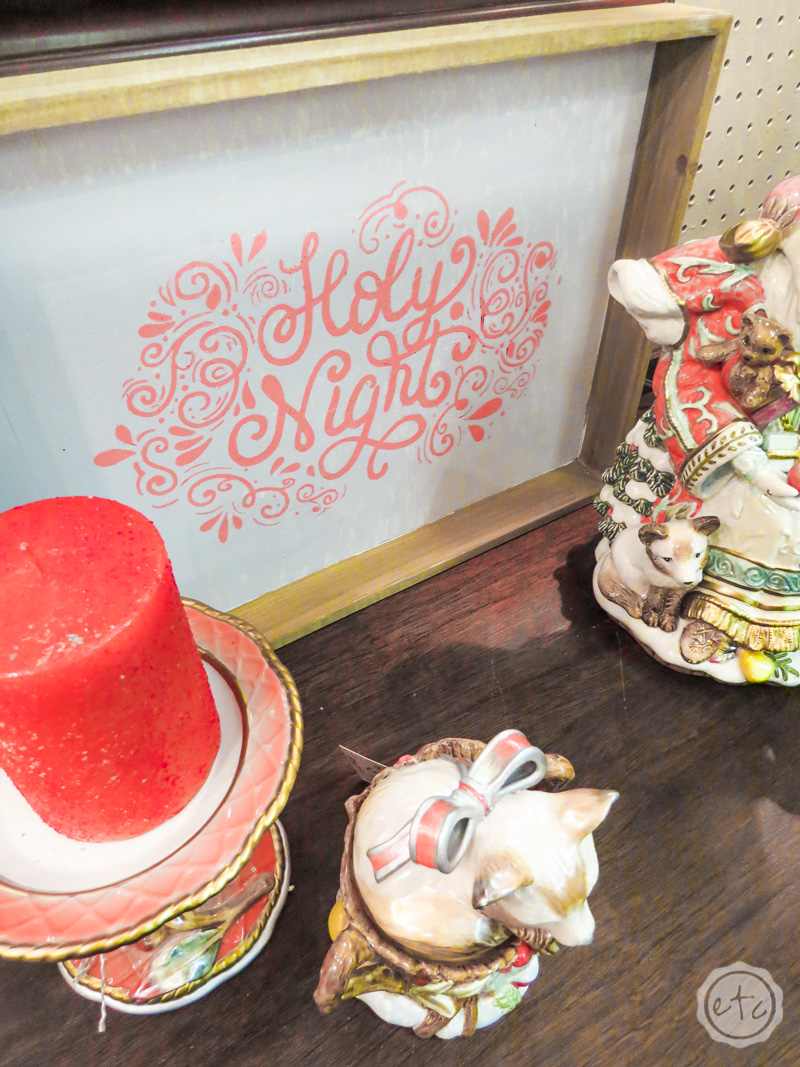
Either way it turned out A-M-A-ZING once the touch-up was finished and the chalk was dry. This was a really quick and easy project (even with my wet paint mishap!) so I imagine it would be even quicker and easier if done on a dry surface!

Worth a try anyways!

I absolutely love how it turned out!

Looking for more Christmas?! Here are the rest of my fun holiday projects from this year!

An InLinkz Link-up


Of course, I’m not alone at this fun holiday project party decor trend… don’t forget the 25 other bloggers I’ve teamed up with to bring you all kinds of fun wooden holiday decor projects! We’ll have different holiday goodness for you every Sunday for the next THREE weeks. That’s a total of five weeks of fun projects!

So here’s a few more door projects to tackle if you’re looking for inspiration!

Have fun looking through all of the projects… and don’t forget to pin this fun DIY Christmas Tray for later!

This link party is powered by Link Party Animal

https://media.justmeasuringup.com/blog/2018/10/DIY-Christmas-Blog-Hop-Horizontal-v2.jpg


Get Your FREE PDF Guide!

Don't forget to snag your free PDF Guide to buying your first Cricut!

Success! Now check your email to confirm your subscription.

There was an error submitting your subscription. Please try again.

Powered by ConvertKit
You made it through the entire post? That means you're one of my new favorite people! I'd love to be friends and see what else you would like to read about! Leave me a comment and then sign up for your very own FREE paint planner.... so that you can keep track of every single paint color with ease!
Welcome back! I'd love to be friends and see what else you would like to read about! Leave me a comment and then sign up for your very own FREE paint planner.... so that you can keep track of every single paint color with ease!

Show me some LOVE y'all:

  • Facebook
  • Pinterest
  • Twitter
  • Email

Related

«
»

Christmas, Cricut, DIY & Crafts, Holidays 24

Comments

  1. Jessica says

    November 12, 2018 at 12:06 pm

    I love how this turned out! All these projects using a Cricut makes me want one!

    Reply
    • Happily Ever After, Etc. says

      November 14, 2018 at 7:47 pm

      You should get one… and then you’ll be bombarded by all the things you want to learn! Lol! It’s so much fun to learn though.

      Reply
  2. Sarah says

    November 12, 2018 at 1:17 pm

    What a pretty tray, I really like the intricate stencil you used and the bright color.

    Reply
    • Happily Ever After, Etc. says

      November 14, 2018 at 7:49 pm

      Thanks Sarah, I was a little worried about using such an intricate stencil but it worked without a hitch! This chalk stuff worked perfectly!

      Reply
  3. Toni | Girl Just DIY says

    November 12, 2018 at 5:23 pm

    I love the swirls and color of your stencil, and that’s my favorite Christmas song. I’ve never use the Chalk stuff before but really want to try it.

    Reply
    • Happily Ever After, Etc. says

      November 14, 2018 at 7:51 pm

      The chalk stuff is so much fun to play with, it’s one of my favorite Christmas songs too! Thanks for stopping by Toni!

      Reply
  4. Lidia says

    November 12, 2018 at 8:21 pm

    This looks like a tray from HomeGoods!!!! Nicely done!

    Reply
    • Happily Ever After, Etc. says

      November 14, 2018 at 7:51 pm

      HomeGoods is my favorite! You’re so sweet! Thanks Lidia!

      Reply
  5. Kristen says

    November 12, 2018 at 9:56 pm

    Very cute! Love the design

    Reply
    • Happily Ever After, Etc. says

      November 14, 2018 at 7:52 pm

      Thanks Kristen!

      Reply
  6. Amy says

    November 13, 2018 at 2:38 pm

    This is so cute! I love the colors you used!

    Reply
    • Happily Ever After, Etc. says

      November 14, 2018 at 7:53 pm

      Thanks Amy, the red is so soft it’s a wonderful color! I’m not a huge fan of bright cherry red so it’s the perfect solution.

      Reply
  7. Kenya Rae says

    November 13, 2018 at 3:25 pm

    My gosh my cricut desire is rising exponentially seeing all of these projects! All the heart eyes…

    Reply
    • Happily Ever After, Etc. says

      November 14, 2018 at 7:54 pm

      Thanks Kenya, the problem with cricut projects is they’re like pringles… you can’t have just one!

      Reply
  8. meegan says

    November 13, 2018 at 8:57 pm

    You did a fabulous job, Betsy! I always have to do touch ups with ALL my projects.
    What a sweet way to greet your guests and family at Christmas time.

    Reply
    • Happily Ever After, Etc. says

      November 14, 2018 at 8:00 pm

      I’m the same way Meegan… I always have to do touch-ups! Thanks hon!

      Reply

Trackbacks

  1. 20+ Holiday Inspired Wooden DIY Projects - Health, Home, and Heart says:
    November 14, 2018 at 10:27 am

    […] Quick and Easy Christmas Tray from Happily Ever After Etc. […]

    Reply
  2. 5 Christmas Wood Projects You Can Do Without Tools - Gross to Grandiose says:
    November 14, 2018 at 5:49 pm

    […] and voila! I love the look of these.A little bit of chalk paste and a stencil and you can have a DIY tray of your own just like Betsy’s! I love this idea because it can not only be decor, but […]

    Reply
  3. Colorful Wood Christmas Decor - Girl, Just DIY says:
    November 15, 2018 at 2:24 pm

    […] Happily Ever After stenciled an old wooden tray with this beautiful and colorful swirly stencil and now she’s ready to serve hot cocoa all through winter. […]

    Reply
  4. 12 DIY Wood Christmas Decor Ideas - Red Cottage Chronicles says:
    November 16, 2018 at 9:31 am

    […] love the charm and versatility of this Quick and Easy Christmas Tray from Happily Ever After, […]

    Reply
  5. Easy DIY Holiday Window Decor - Happily Ever After, Etc. says:
    November 22, 2018 at 8:38 pm

    […] it’s my project for week three of the Deck the Home Blog Hop! Week one was door decor and last week we worked on wooden projects while this week you’ll find fun outdoor decor […]

    Reply
  6. 40 DIY Gift Ideas for Your Family - Happily Ever After, Etc. says:
    December 5, 2018 at 12:34 am

    […] DIY Christmas Tray […]

    Reply
  7. How to Use Cricut Stencil Vinyl for a Fun Tray Upcycle - Happily Ever After, Etc. says:
    March 14, 2019 at 11:47 pm

    […] The tray I stenciled for Christmas this year could have been crisper. The regular vinyl tends to allow bleed under the edges in a way that really steams my vegetables. […]

    Reply
  8. Fun FREE Christmas Printables - Happily Ever After, Etc. says:
    April 7, 2020 at 7:40 pm

    […] for different projects this holiday season (like the little santa beard for fun DIY pillows or the Holy Night design for a fun stenciled chalkboard tray!) so I thought now was the perfect time to round them all up in one place as easy to use […]

    Reply

Leave a Reply Cancel reply

Your email address will not be published. Required fields are marked *

sidebar betsy I'm Betsy, Home Decor Enthusiast, Yorkie Mama, Crafter, Blogger, Picky Eater, Chief Mess Maker, Antique Hoarder and Graphic Designer. You can generally find me working on (attacking with a paintbrush) the 3 bed, 2 bath home we are currently renting! Our home might not be perfect but it is ours & if you hang out long enough you'll see that what we lack in know-how we make up for in passion!
Shop My Craft Room

Shop My Home

Featured Articles

15 Fabulous Ideas to Organize your Laundry Room
25 FREE Printables For Your Home!
What to do with EXTRA Paint with Happily Ever After Etc
10 Ways to Make Your Bed EXTRA Comfy with Happily Ever After Etc.
Ready to Pick your Perfect Paint Color? We'll help you with our 6 Day FREE E-Course

Hey y’all,

Profile

I'm Betsy, Home Decor Enthusiast, Yorkie Mama, Picky Eater, Chief Mess Maker, & Graphic Designer...

A Little Note!

Many of the links on Happily Ever After, Etc. are affiliate links. If you purchase a product after clicking an affiliate link, I receive a small percentage of the sale for referring you, at zero cost to you! How awesome is that? Purchasing through affiliate links is an easy, painless way to help out your favorite bloggers. Thank you so much for your continued love and support! Read the full disclosure here!

Instagram

Load More... Follow on Instagram

Copyright © 2023 · Darling theme by Restored 316

Copyright © 2023 · Darling Theme on Genesis Framework · WordPress · Log in · Privacy Policy