


One of my absolute favorite parts of cruising is all of the fun matching shirts… I’ve made them for every. single. one. of. our. trips. My Mom loves them, if we go with a group the whole group has been ga-ga over them… they’re just a fun little sprinkle on an already fun trip!
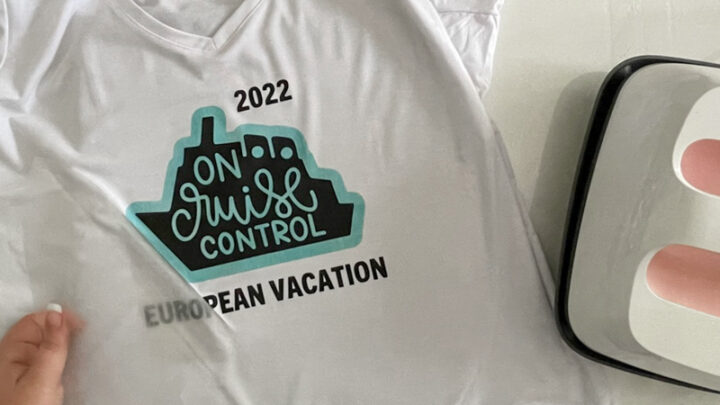
Plus by making your own shirts they can say whatever you like! Typically I’ll do a fun cruise saying like “Oh Ship, it’s a Family Trip” or “On Cruise Control” but this time I wanted a cute shirt all about the cruising ducks.
My Mom absolutely loves looking for ducks… finding them might be her favorite part of the cruise. So I decided to design a little cruise duck shirt and whip them up as a surprise for our last cruise. She was so excited!
These are a super easy iron-on project so even if you’re a beginner you can jump right in. Let’s do it.
Supplies:
- Cricut Maker 3
- Fine-Point Cutting Blade
- Cricut Standard Grip Mat (that’s the green one!)
- Black Iron-On (I used Smart materials)
- Weeding Tool
- Blank T-Shirt
- Heat Press and Mat
Check Out the FULL VIDEO Tutorial:

Step 1: Cut Your SVG Files
Ready to jump right into the project? Grab your cut files from down below and upload the SVG’s into Cricut Design Space (if you need help check out this post on how to upload SVG files into Design Space).
Then it’s time to cut! For this project I used a smart iron-on so that I didn’t have to whip out the old cutting mat… but if you need to use a cutting mat it’s back to the basics. Either load your smart iron-on into your Cricut or grab a cutting mat.
With a cutting mat we’ll want to load your iron-on onto your mat shiny side down (top down y’all… we want the clear layer to be against the mat and the actual iron-on to be on top (upside down but on top)). Then we’re good to go.
Make sure you turn the “mirror” option on so that your iron-on cuts properly and hit cut! Whether you’re rocking smart materials or a cutting mat this part is the same. Watch the magic happen before ejecting your material from the cricut… then you’re ready to roll!


Step 2: Weed Your Iron-On
Once all of your iron-on is cut it’s time to weed all of the negative spaces… easy peezy! The ducky weeds super quick and even the letters are fairly large… just make sure you watch those tiny letters on “I’m just here for” you don’t want to lose one if it’s stuck!
Hopefully your cut is clean and your excess iron-on peels right off. Then we’re off to grab our heat press!
Time to heat that baby up!


Step 3: Apply the Iron-On!
Ready for the fun part?! Time to actually put our iron-on…. on the shirt! Start by setting your easy press to 315 and 30 seconds… which is the perfect settings for t-shirts!
Then set out your t-shirt on top of your easy press mat and pre-heat the shirt. If you’re not sure what that means it’s simple… put your easy press onto the shirt without the iron-on and press down for a full cycle (30 seconds) that will warm up the shirt so that it’s ready to accept the iron-on.
Once you have your design set up straight and pretty on your shirt hit that easy press button and hold your easy press down with firm pressure for the full 30 seconds. Depending on the size of your decal you might need to to do a second round by moving your easy press down a bit (if you have the middle size easy press like you should be fine with this design).
Once you’ve gone over the entire decal on the front flip the shirt over and do the same thing from the back of the shirt (leave the protective covers on!). This way the decals are heated evenly from both sides… you’ll get great results.


Step 4: ENJOY!
Now wasn’t that a quick, fabulous project!
I tucked these into my suitcase to surprise Mom with on our cruise and she loved them! We like wearing our cruise shirt the first day on the ship to celebrate and then for at least one excursion. We wore our bright pink Greece shirts in Athens and the tour guide was able to keep track of us super easy
I kept hearing “where’s the girls with the Greece shirts” all day! Mom has a hard time keeping up sometimes so she appreciated this a lot.
So she loves the matching shirts even more now.
Of course, while we’re no strangers to wearing a cruise shirt on a ship… I was unprepared for how many comments we got on these duck shirts! People reallllly love their cruise ducks!


Looking for more Cruise DIY’s? Check Out These Projects:


Leave a Reply