

This post is sponsored by Wagner, all thoughts, opinions and bruises are mine!

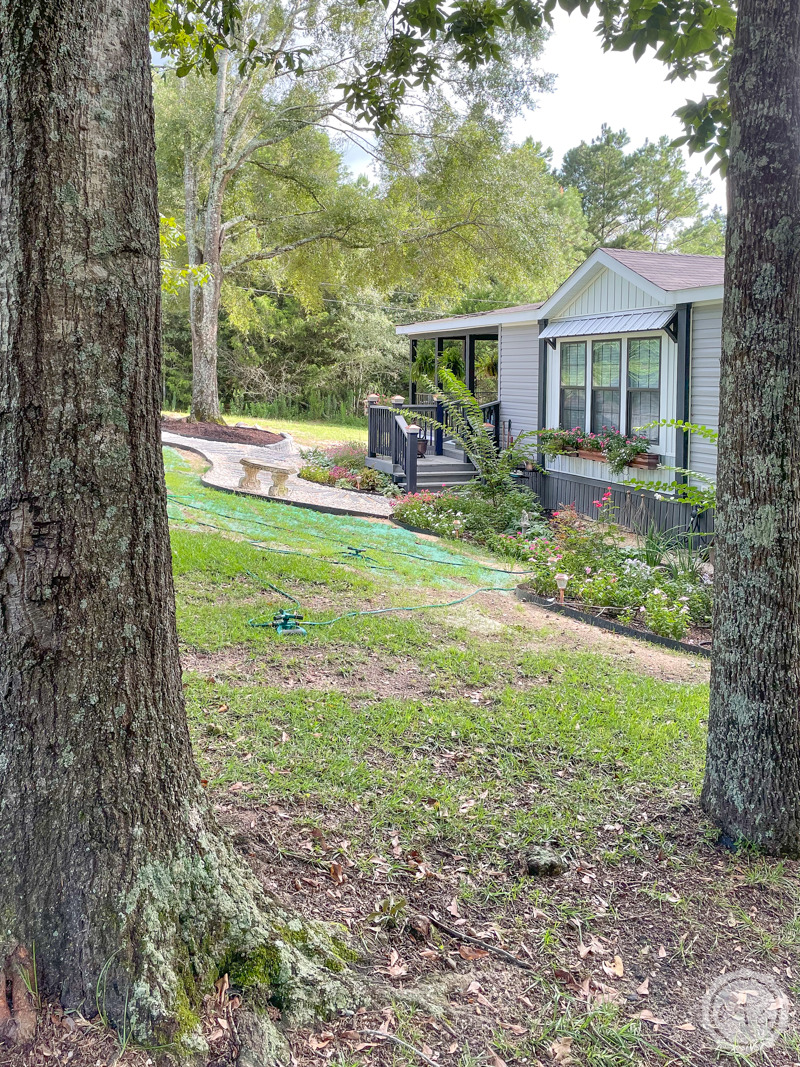
After moving into my new home 10 months ago I knew right away I was going to have a problem with my sloped, dirt filled front yard. Moving the new house into place meant allllll existing grass was gone and being on a slope rain water has been busy carving groves into my front yard for months. In order to stop the rain we needed a permanent solution to rid the yard of dirt and give the rain a specific path down the slope.
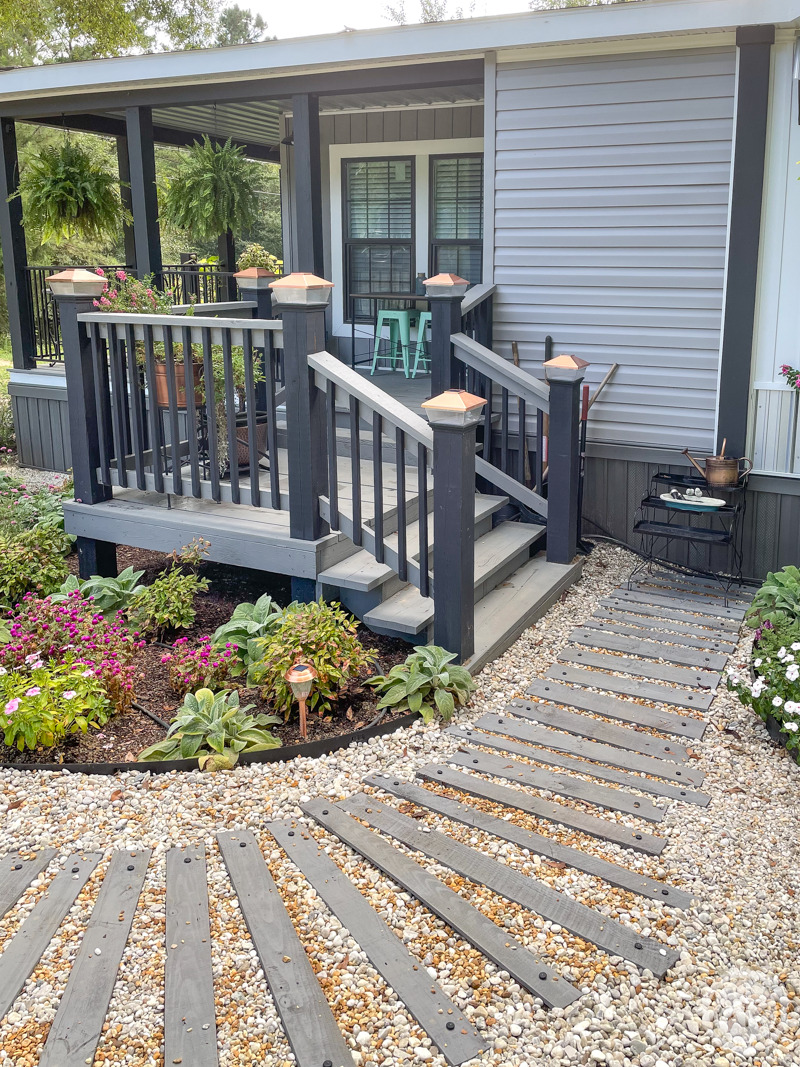
So I started with a railroad tie barrier to help guide water from the top of the slope around the house. Then came growing grass in the 600 sq ft area to the left of the front door… leaving the area directly below my front porch steps (the ones I stained in this tutorial) to become a new pathway.
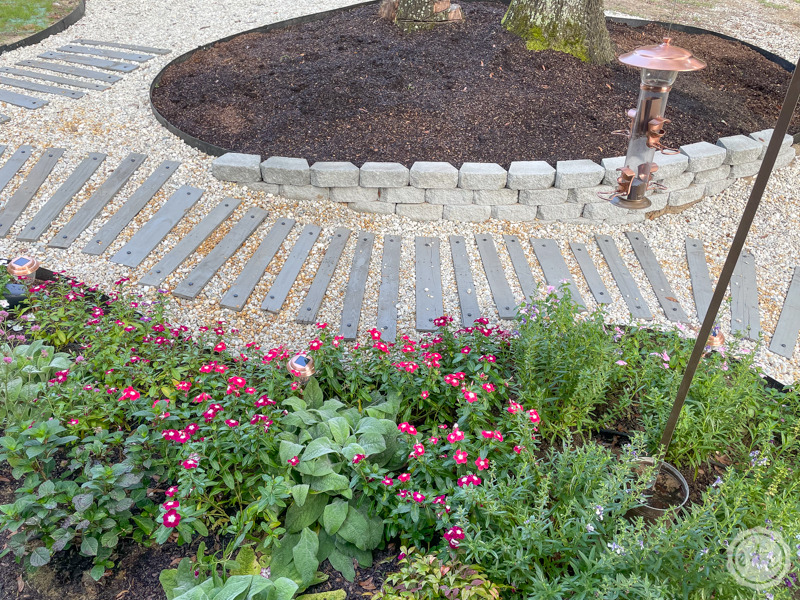
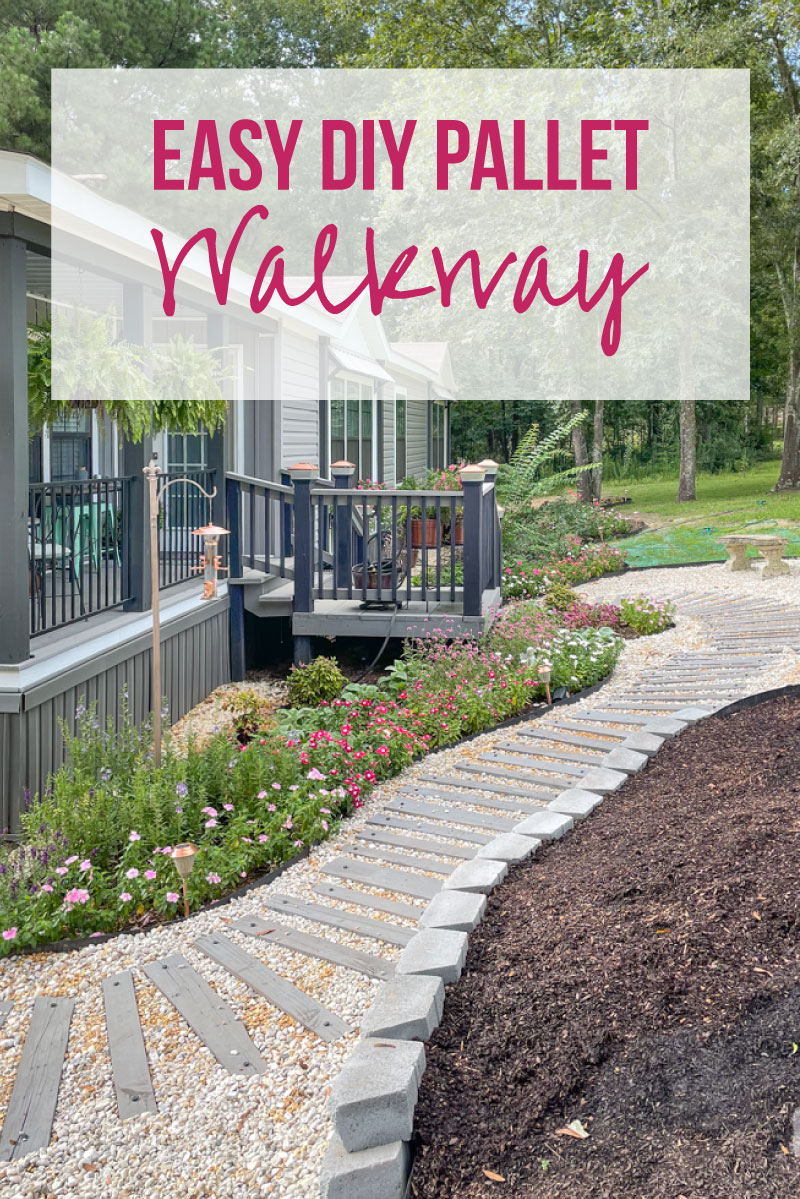
I decided to run the pathway from the front steps around the house to my fruit stock tank garden and trash can area (also… remind me to move/hide the trash can area! yuck!) with a split in the path to a new parking pad for my car. That way when I get home at night I can walk straight from my car to my front door without fear of twisting my ankle in a large rain-caused trench. Instead I’ll have a nice pea gravel pallet walkway to lead me safely inside.
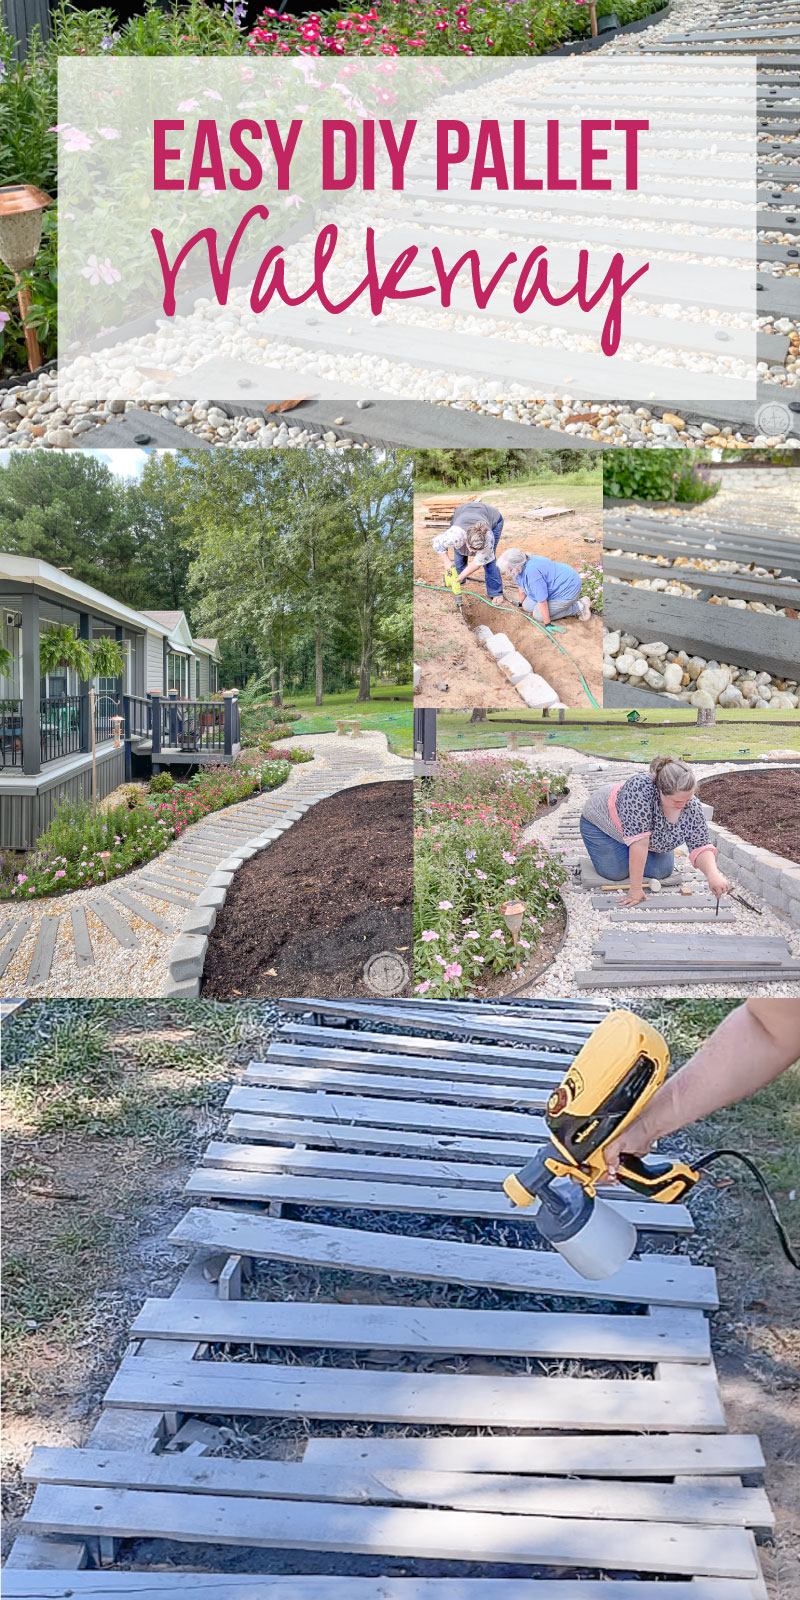
This area is actually quite large which is why I chose to fill the entire space with pea gravel and then create a pallet pathway on top of the gravel. The pallets add so much stability and they’re less expensive than the gravel so that we need less of the pricey rock and more of the in-expensive pallets. (Let’s be honest… the pallets were free, Mom and I drove around until I found a bunch behind a shop that was happy for me to haul them away).
Of course, when adding a wooden element to your path you’ll need to seal the wood or replace it when it rots from the humidity and moisture. And since I live in Alabama (humidity central!) I grabbed my little Wagner Flexio Sprayer to seal these bad boys with stain.
All in all this was a fun project that took 3 days, 1 Mom, 1 brother and one brother’s friend to complete. It was 100% worth it though… it looks absolutely amazing!
Let’s get started.
Supplies:
- Pallets (Approximately 15 boards per every 8 feet)
- Pea Gravel (1 ton for approximately every 350 square feet)
- Stain in King’s Canyon (1 gallon for approximately 100 pallet boards)
- Paint Can Pour Spout
- Wagner Flexio Paint Sprayer (this is my favorite beginner sprayer!)
- Circular Saw
- Reciprocating Saw
- Reciprocating Saw Blade for Wood with Nails
- Power Drill (large 10mm drill bit for anchoring stakes)
- Mallot
- Pliars
- Hand Tiller
- Kneeling Pad (trust me on this one)
- Shovel
- Dirt Tamper
- Hand Shovel
- Bow Rake
- Wheel Barrow
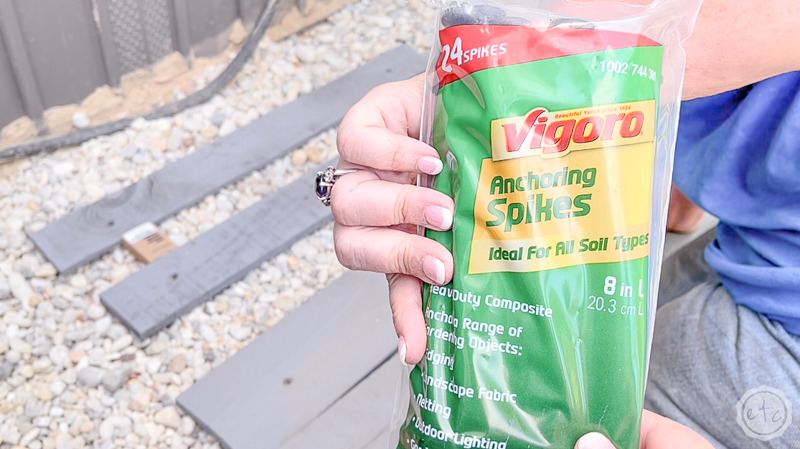
- Anchoring Spikes
- Black Edging (optional)
- Bricks for Retaining Wall (optional)
- Concrete Bench (optional but fabulous)
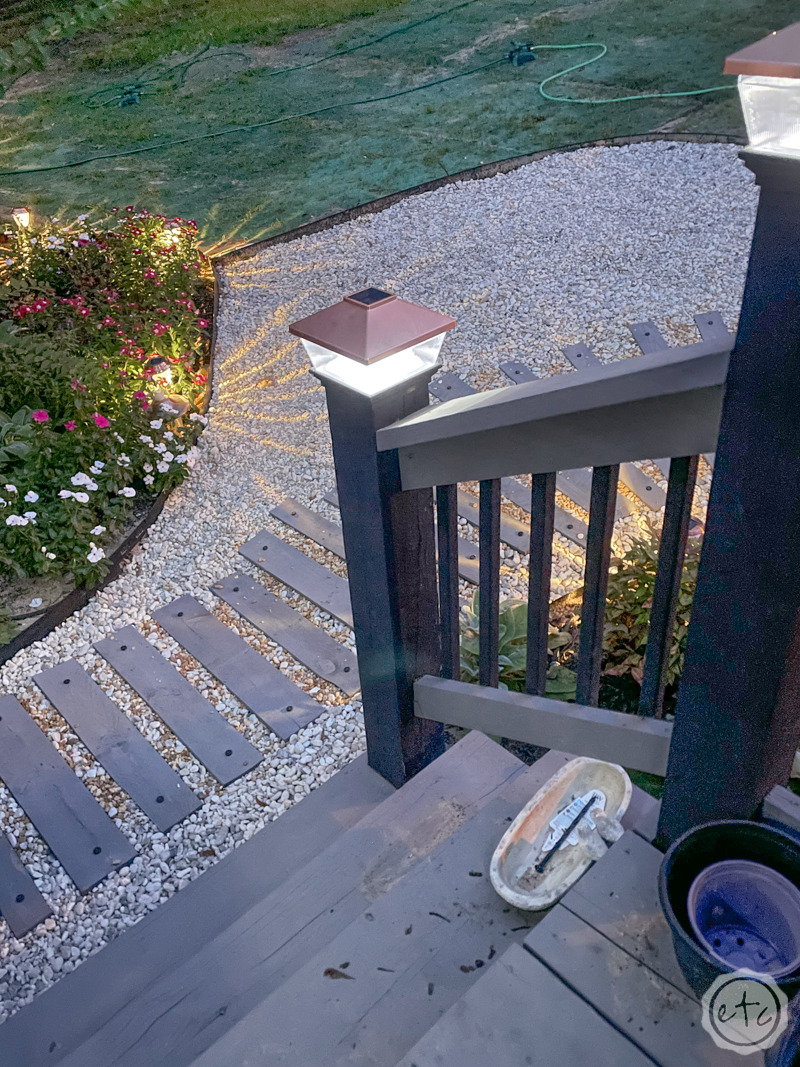
- Copper Solar Lights
- Copper Solar Post End Caps

Step 1: Remove Any Weeds
Just look at alllllllllll that dirt! It’s no wonder that my yard has been rain central! My goal is to stop the rain before it causes enough groves in my front yard to effect the foundation of my house. So first things first… before we can start pouring gravel and adding pallets to this walkway we need to prep the ground.
That starts with removing any weeds from the area we’re going to be prepping. In some cases you can use a weed killer but since I’m trying to grow grass in half of my space I skipped that in the front yard and simply tilled the ground.
That smoothed everything out and made it fairly level. Plus it pulled up all the nasty weeds! Score!
Now for the side yard…

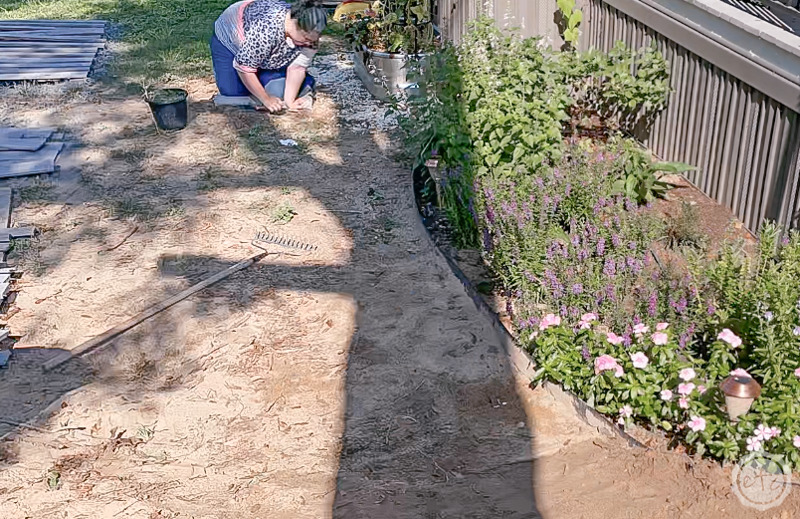
The area in front of my little stock tank garden was fairly clear until all. the. rain. we’ve had this last month. Then the weeds really took off! So instead of using a chemical by my fruit garden I grabbed a good old fashioned kneeler and my hand tiller. Then I pulled up each and every weed in my path.
Of course, I’ll either have to continue pulling weeds or use an organic weed control here… since the weeds will try to come back eventually.
Once all the weeds were gone we could move on to really smoothing out the ground.
Score!
Also… I live near an army base with a lot of helicopters… can you spot the helicopter above my house in the picture below? Pretty cool!


Step 2: Level the Ground
Now it’s time to level the ground! Since we’re doing a pallet walkway and not just a gravel walkway the ground needs to be fairly level all the way across. That way our pallet boards can sit level with the ground and not at an angle.
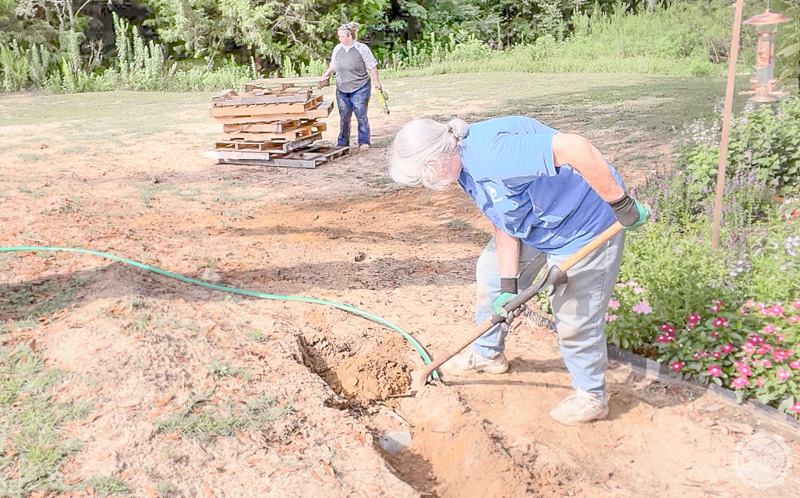
That’s fairly easy in the spaces that have been tilled but the space directly in front of the steps and the area below the tree to the left are both on a slope… which means they need to be dug down and leveled instead of just smoothed out.
In this case we (aka my brother and his friend) had to dig the ground level and remove all the extra dirt. Then they used the back of a bow rake to smooth out all the dirt that was left.
That way we knew the ground was extra level and the pallets would be perfect when we went to install the pallet boards for the walkway.


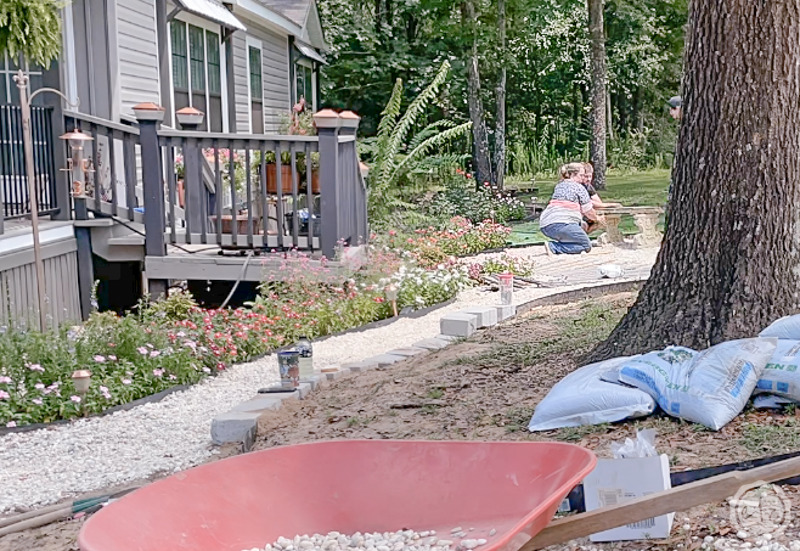
Optional Step 2A: Add Small Brick Retaining Wall
Ready for the fun part?
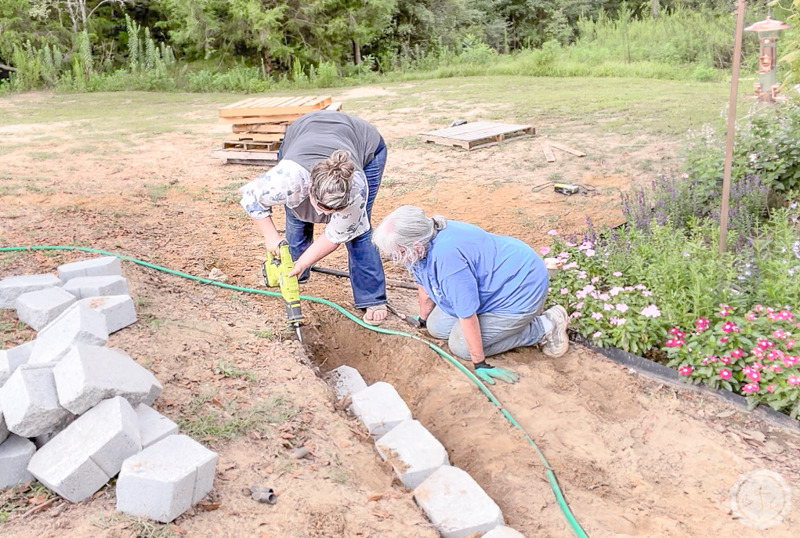
Leveling the ground on a fairly flat surface is easy… but the slope under the tree? Well it’s a pretty decent sized slope. Which means in order to level the ground we’re going to have a big wall of dirt that goes straight down into nothing.
Which might be ok but with all the rain that slope will continue to be washed away unless it’s held back by something. So for this specific slope installing a small brick retaining wall was the best solution.
Luckily Mom volunteered as tribute.
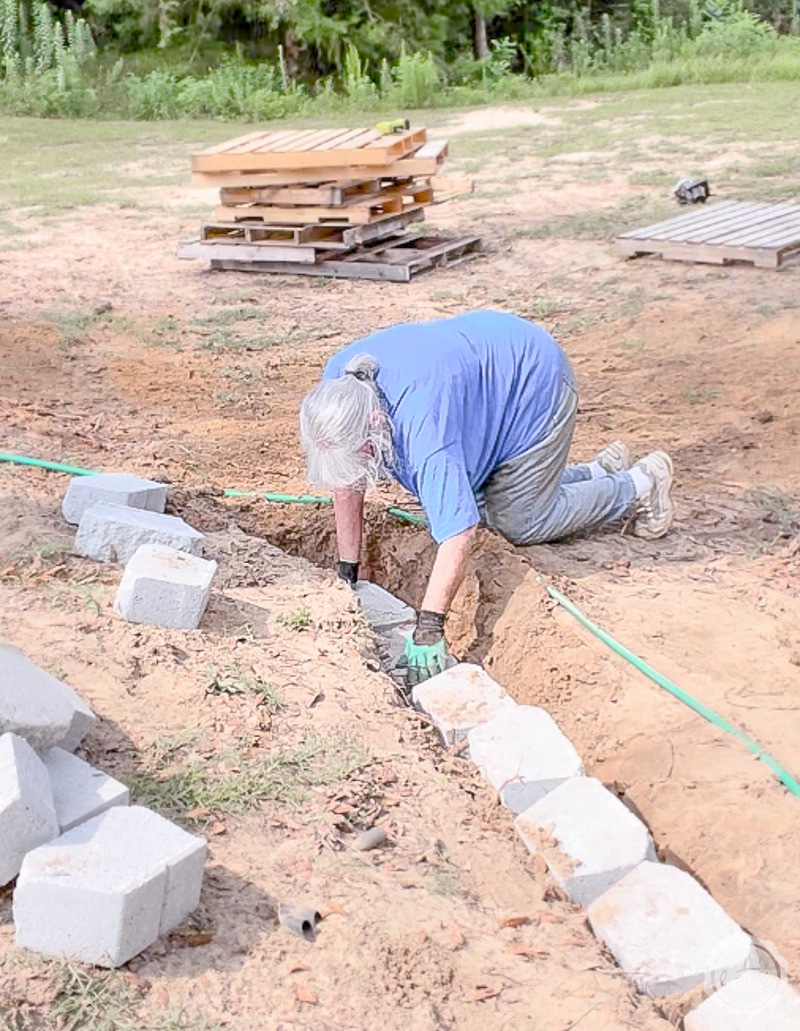
As you can see she dug straight into the slope right above where we wanted the edge of the path to be. She kept digging until she had the bottom of the new little cliff level with the bottom of the slope on the other side of the path. This ended up being about 3 bricks deep.
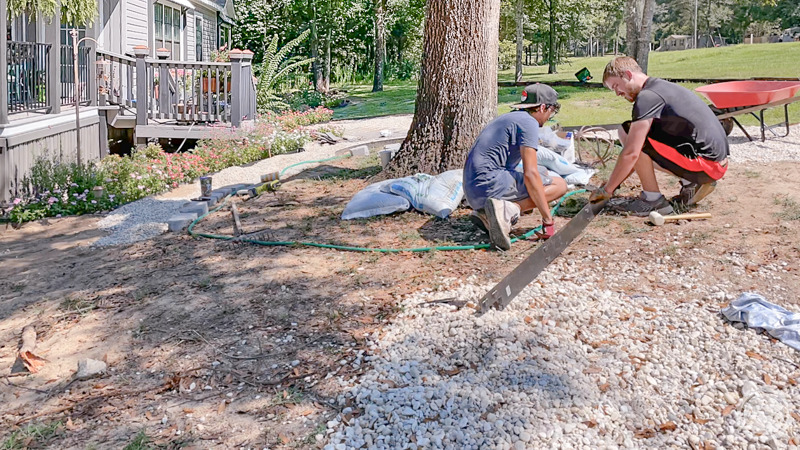
Once she had dug down deep enough she started to install the bricks… working her way down the path as she went. Since there is a tree close to this cliff I did have to take a break from my pallet work every once in a while to come saw through a root with my reciprocating saw… then it was back to installing the bricks!
Once the entire brick wall was in place we moved on to the next step: adding edging around the rest of the pathway.

Optional Step 2b: Add Edging to Contain the Pea Gravel
Another optional step here we added the same black edging around the tree as I have along the path of my garden. It’s a simple 4 inch deep black metal edging that you can pound into the ground with a stake. It’s not a necessary step (you can simply add pea gravel without an edge) but it helps to contain the pea gravel so that it doesn’t mingle with your grass, dirt or mulch.
In my case we already had edging installed along one entire side of my path since I used it to hold back the mulch in my garden. So it made sense to ring the tree and extend the edging along the border of the grass. That way the pea gravel would be easy to rake out… simply pull the pea gravel until it hits the edging!
Perfect!
Since we already have a small retaining wall along part of this area I simply tucked the ends of the black edging behind the bricks on either side. Volia! Instant edging!
Step 3: Spread Pea Gravel
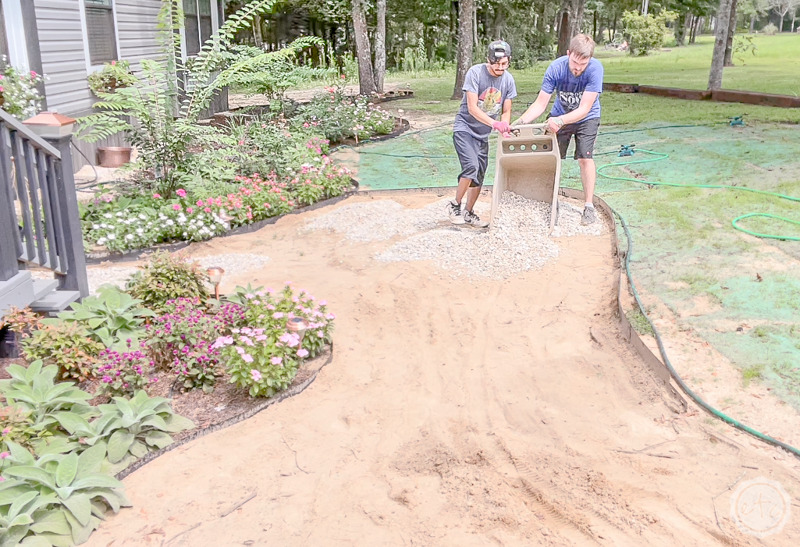
Ready for the hardest part? I had 4 tons of pea gravel brought in by dump truck to help cut down on the cost (it’s soooo much ore expensive when you purchase it in bags then if you purchase in bulk) but when you purchase in bulk you have a big pile of gravel that now needs to be distributed.
In the end price definitely wins out here so we grabbed a wheelbarrow and a few shovels and started to spread the pea gravel.
In the end it was easiest to pour piles of the gravel in each area and then spread it with the rake… until we had a nice thick layer of the gravel and had no dirt spaces showing.
Perfect darling!


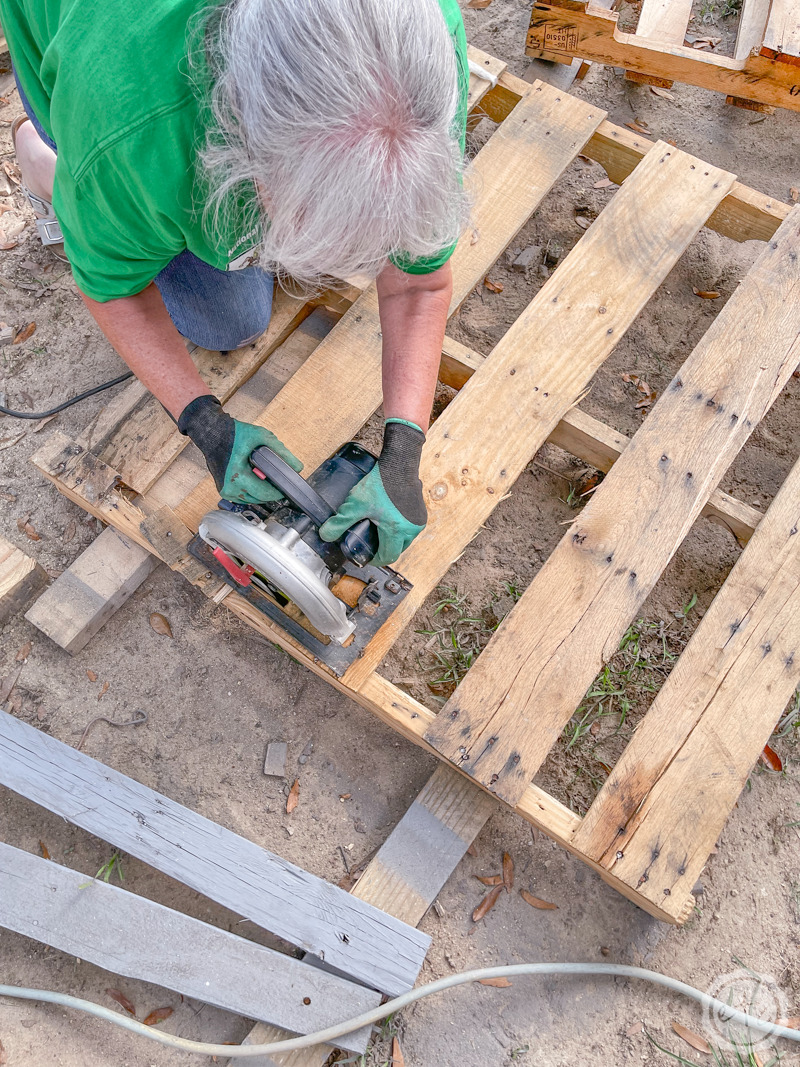
Step 4: Cut your Pallet Boards to Size
Now that we have our path ready to rock let’s move on to the pallets! I ended up using 9 pallets for this pathway and to be honest I think I’m going to grab another 5 to extend the pallet portion of the pathway a little bit. Of course, the best part of using pallet wood is that it’s free… the worst part is that you have to dissemble the pallets before you have usable pieces of wood.
I’ve torn pallets apart with a crow bar before and while it is do-able it is not fun. So keep that in mind if you want to do this project without any power tools… it’s 100% possible but it will definitely take longer.
Instead we broke out the power tools and got to work dissembling these pallets board by board.
Starting with the circular saw. We used it to cut a straight line down either side of the pallet… that removed the ends from each board and left us with the perfect length pallet pieces.
Just keep in mind that we’re working with pallet pieces here so you may accidentally cut through a nail or piece of metal. That’s ok, your circular saw can handle it but for safety sake gloves and eye protection is great here. Even without spikes it’ll help protect you from flying wood and splinters!
Better safe than sorry!

BONUS TIP: After cutting a few boards I took them over to make sure they were the right length for my path. If you have a smaller or more narrow path you might need to cut your pallet boards smaller at this step so that they’ll fit your space. Otherwise you’ll have to make a second cut later… save yourself the time and cut your boards to size now. So much easier!


Step 5: Cut through Nails on Middle Pallet Support
Once we have the ends cut through it’s time to tackle the center support! For this I grabbed my reciprocating saw and a new blade that can cut through wood with nails. Then I slipped the blade under the board and simply cut straight through those nails.
Easy peezy lemon squeezy!
Not only is this a million times faster than prying the boards up with a crowbar but you’ll have perfectly straight boards when you’re done. Nothing deformed or warped from the crowbar action.
Or at least as straight as a pallet board can get.


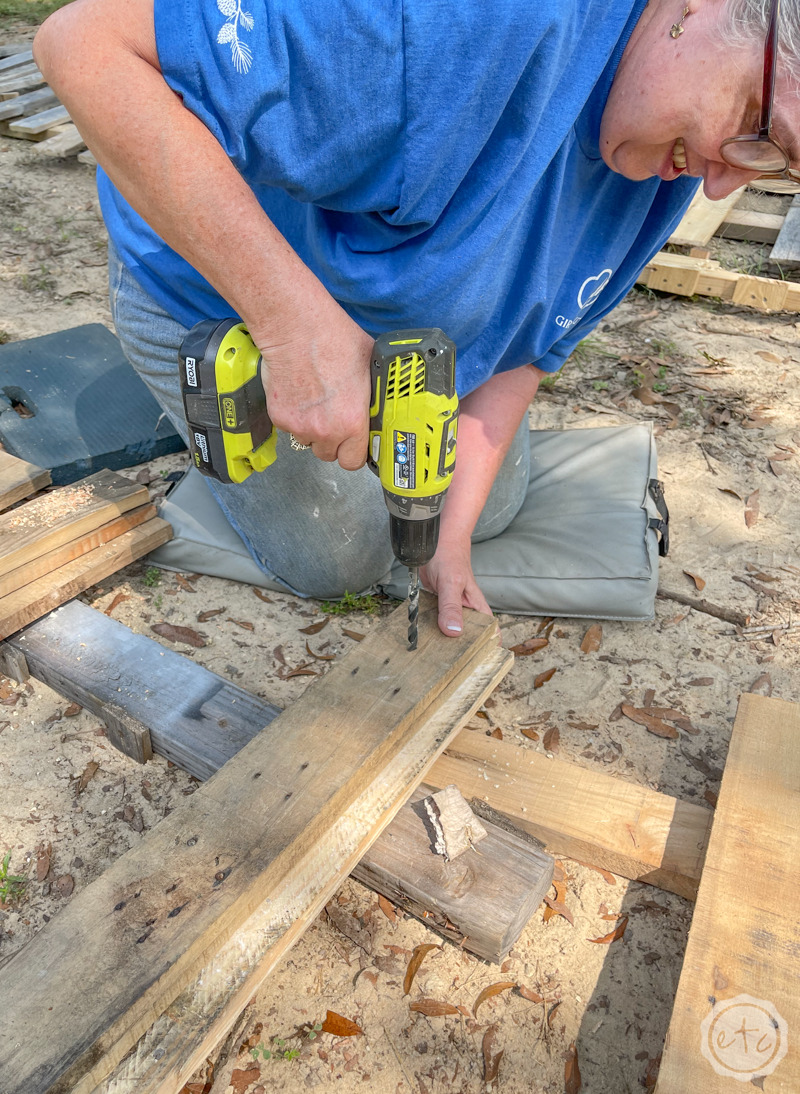
Step 6: Drill Holes in the Ends of your Pallet Boards
We’re getting close to finished with the prep work… meaning the real work is about to begin! Before we paint our boards let’s go ahead and drill a hole on either side so that we’re ready to go when it comes time to secure these babies to the ground.
The anchoring spikes I picked up are 8 inches long and 10mm around so I grabbed a 10mm drill bit and drilled each hole about 4 fingers length away from the edge. We don’t need an exact measured distance here but we want our anchoring spikes to be roughly the same distance from the edge on each board… so even if you don’t use your hand make sure you use something to measure.
Then drill, drill, drill! I found that by stacking 3-4 boards together you can power through these babies pretty fast… then I laid them out to be painted!
Also, I’m going to have to teach Mom to take pictures. I drilled over half the boards and you’d never know it since Mom’s the only one I have photos of! I won’t complain though… I’ll take help over proof any day. There is video though… stay tuned for that!
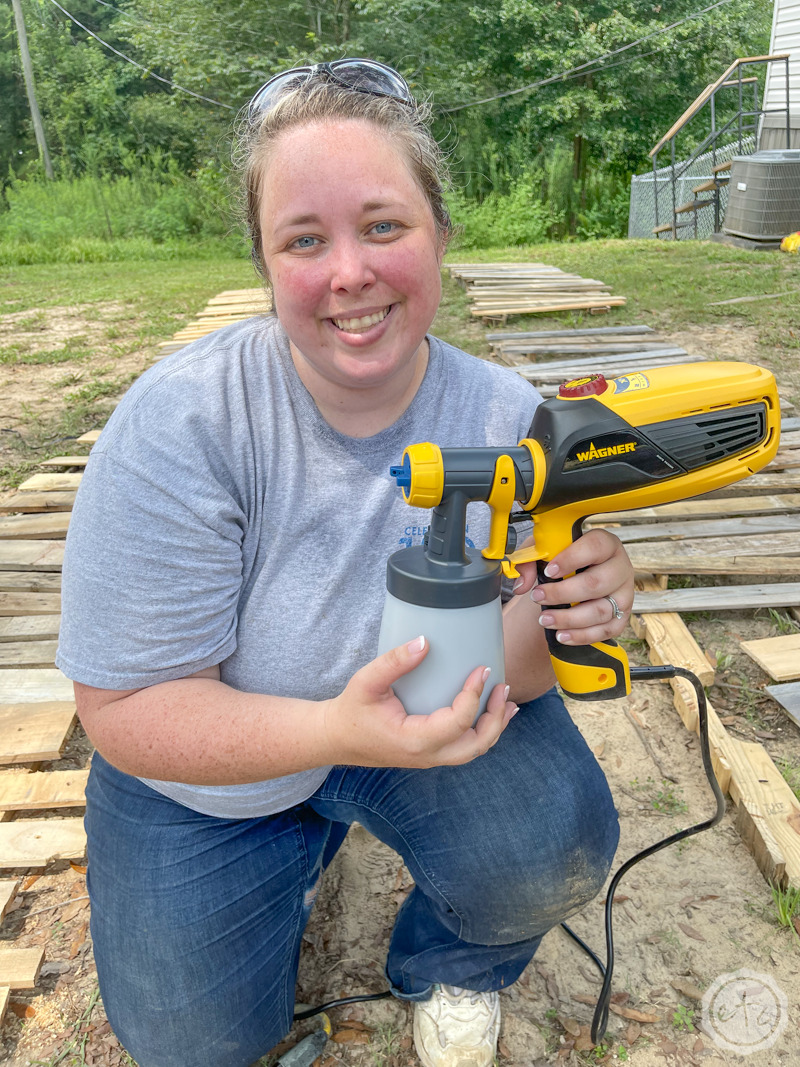
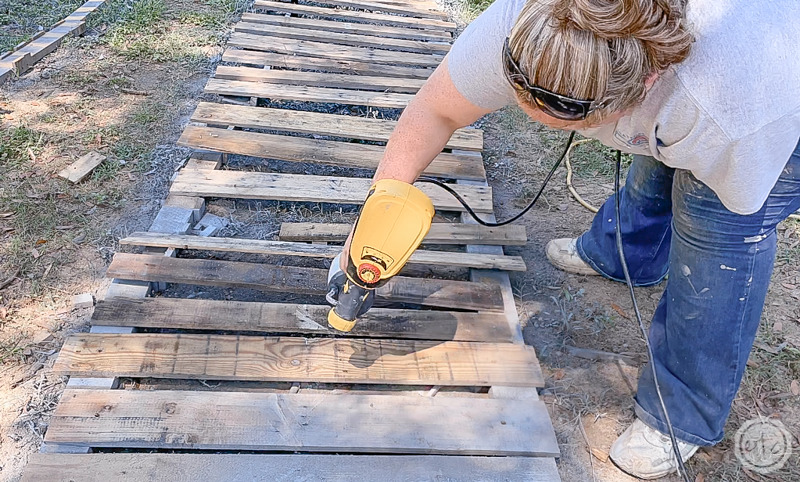
Step 7: Use a Sprayer to Stain the Pallet Boards
We’re so close to the end of this project I can taste it! Now that our boards are cut, nail free and have holes for our anchoring spikes it’s time to stain them. Of course, like with the circular saw or the reciprocating saw you could use a paint brush to stain each and every board.
Of course, a sprayer gives you better coverage and therefore better protection against mold, mildew and warping. Which is kind of important in a humid climate like Alabama (or really anywhere they’ll get wet, hello sprinklers!). Plus staining your boards will seal them against termites, carpenter ants and other bugs that are attracted to wood.
As an extra bonus (not that even coverage and better protection aren’t cool) using a sprayer saves you so. much. time. I had about 130 boards to stain for this project so Mom thought she’d jump in with a brush and help stain a few pallet boards while I was spraying.
She was only able to paint one side of 5 pallet boards in the same amount of time it took me to spray 45 boards. Which is kind of ridiculous!
If you’ve never used a paint sprayer before this Flexio sprayer from Wagner is my absolute favorite. It’s light weight and easy to use (even if you’re a total beginner), plus it comes with two tips so I can use it spray furniture, stain my front deck or stain 130 pallet boards in 2 hours.
You know… whatever floats your boat.
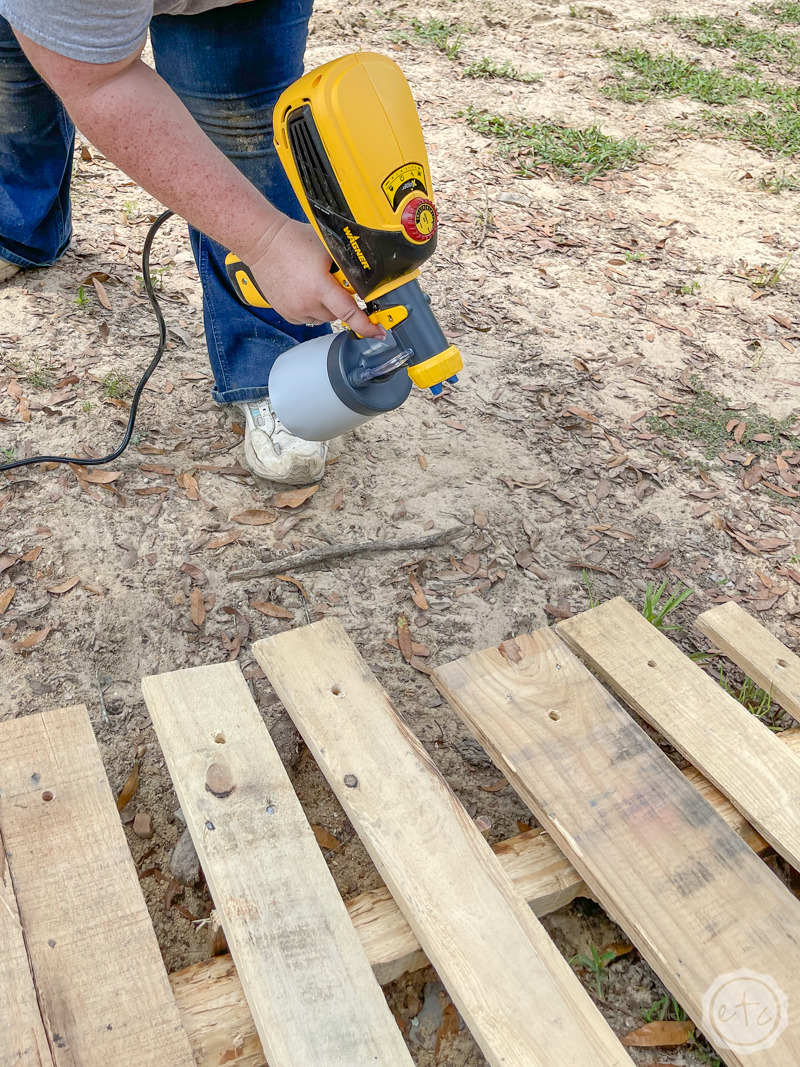

A few tips if you’ve never used a sprayer before. Fill it up with stain and set your tip to spray vertically for this project. That way you can sweep it across the boards. In a perfect situation you’ll spray with the wood grain but these pallet boards have wood grain all over the place so I sprayed from left to right since that’s how they’ll be viewed in the path.
Make sure to spray all the edges and place your boards on risers so that you’re not spraying them directly in the grass. I just used the old, cut off ends of the pallets themselves as risers… they worked perfectly!
From there you’ll hold your sprayer about 6 inches away from your board and make long sweeping motions all the way off your board whenever possible. Keep spraying and if you take a break for longer than a few minutes you might have to clean out the nozzle of your sprayer to avoid clogs.
You got this!

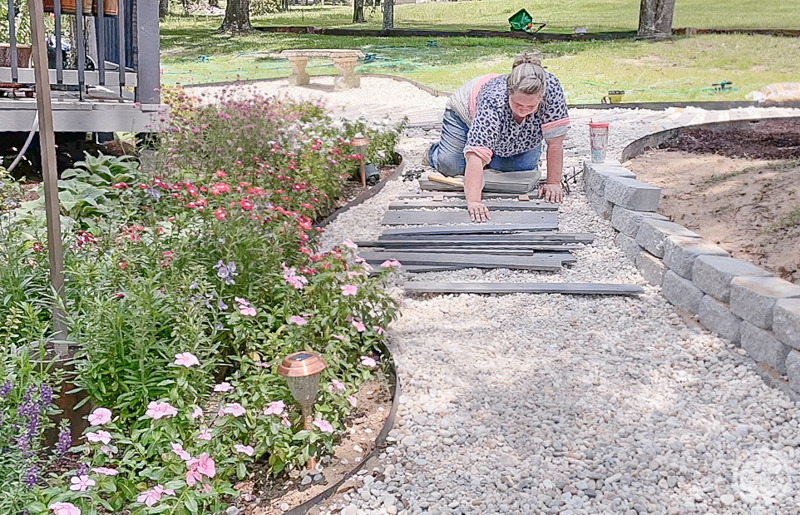
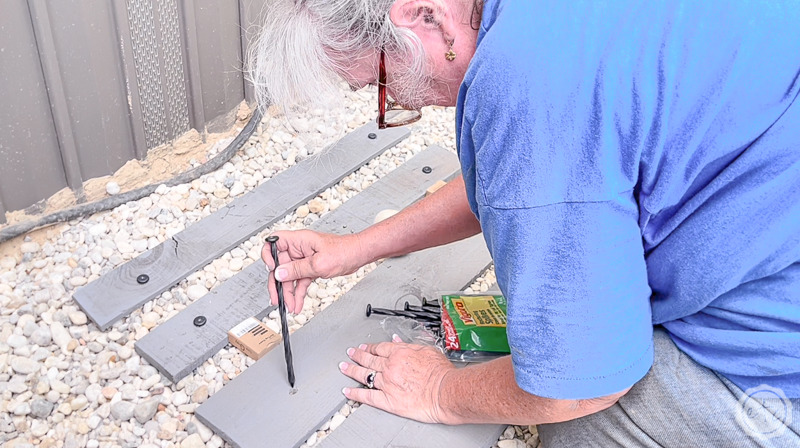
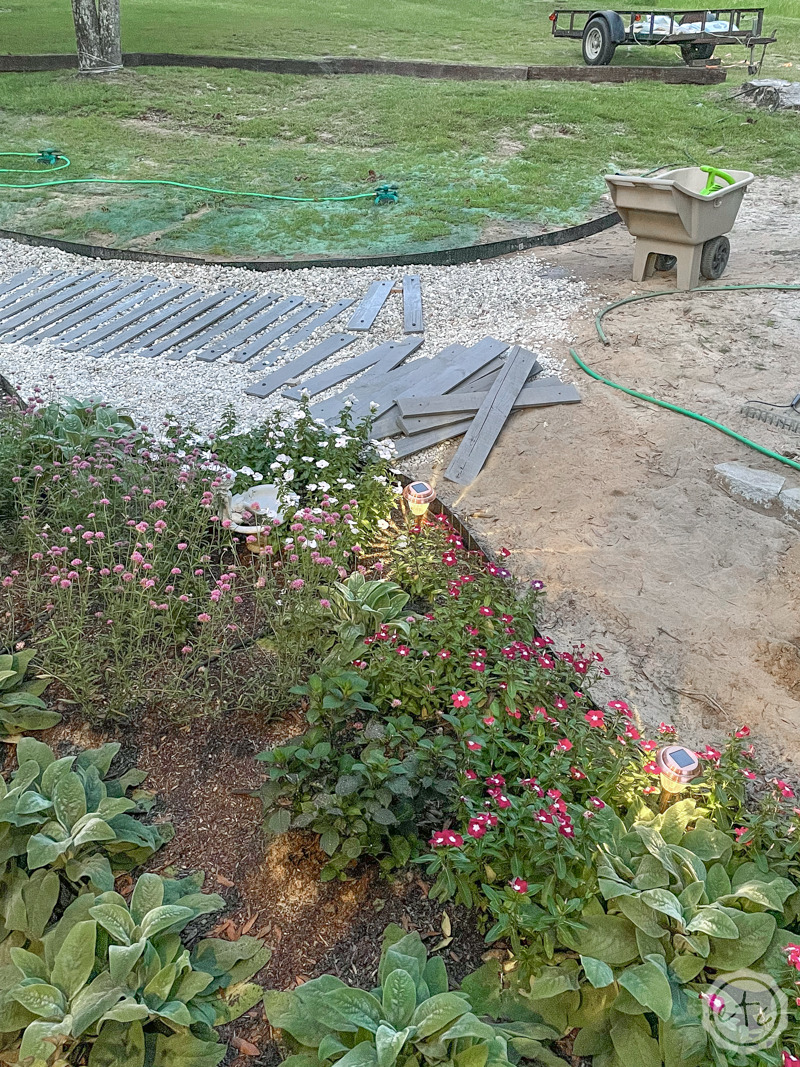
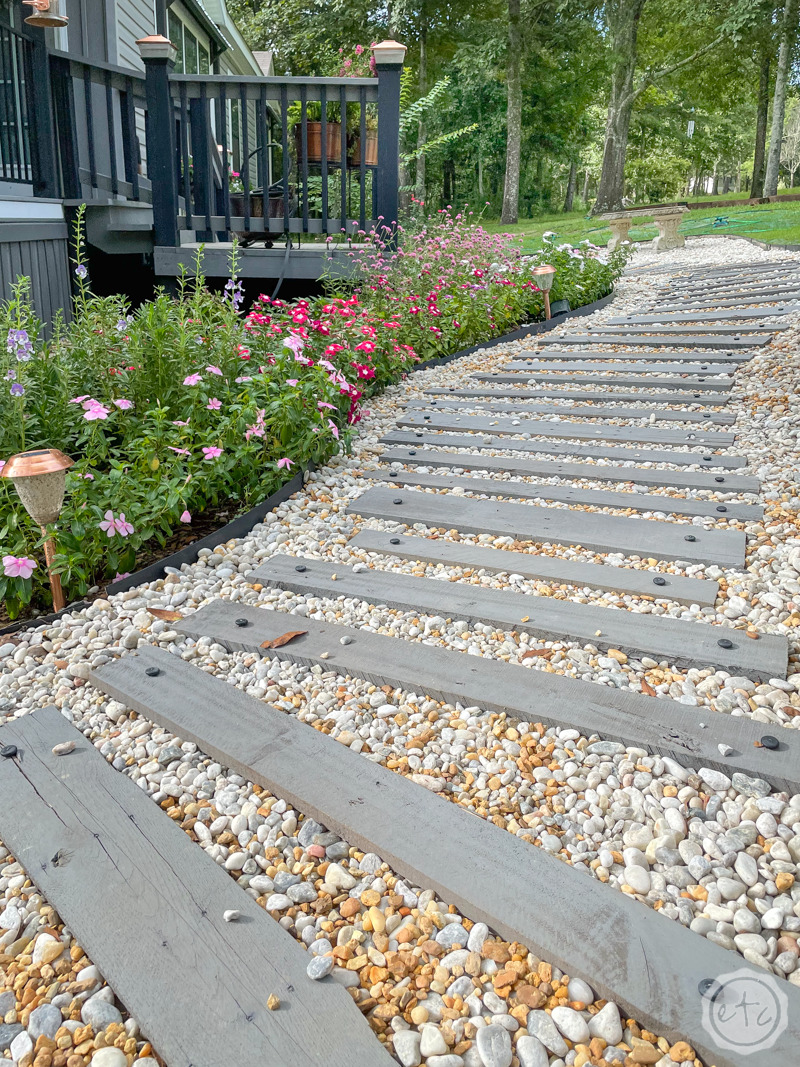
Step 8: Space Pallet Boards throughout the Path and Secure with Anchoring Spikes
This is the absolute best part… since we start to see the path take shape!!!
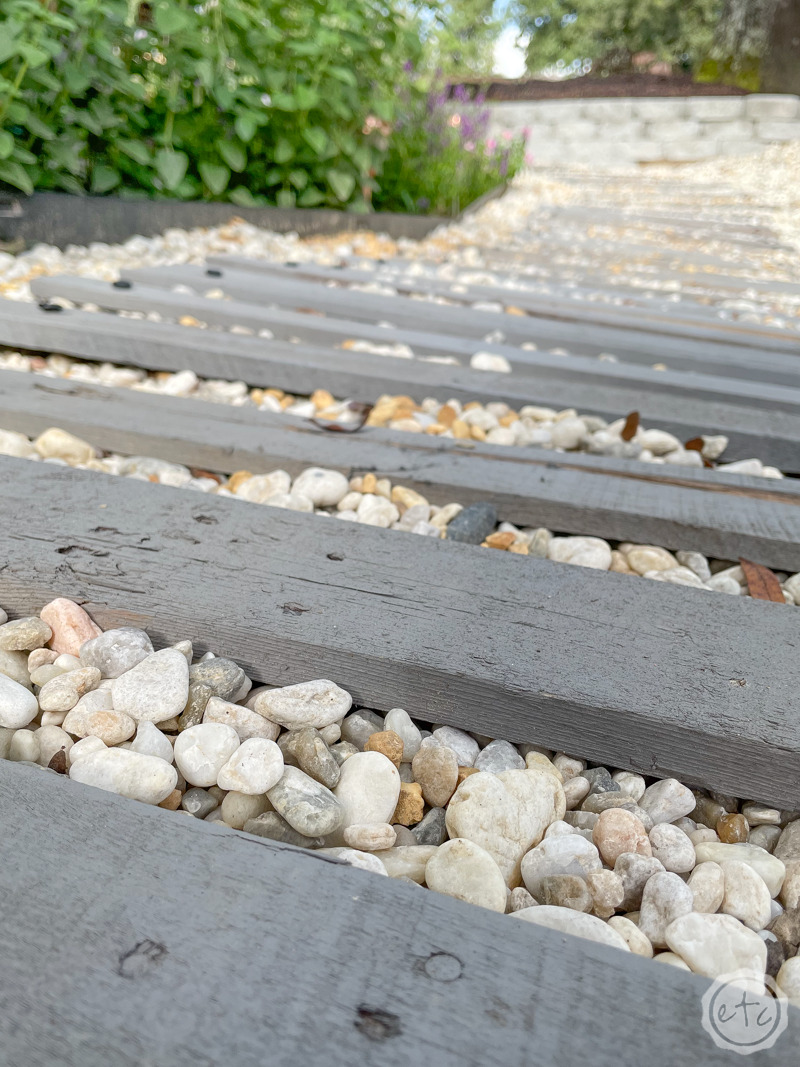
Let’s put a few pallet boards in this path shall we? I started on one end and started to lay out the boards using two cut wooden pieces as spacers. Once the boards were in place I cleared a bit of pea gravel from underneath them and made sure then were level and secure in the pea gravel.
You want the boards in the pea gravel (not on top of it) so that they’re stabilized by the pea gravel on either side.
Once each board is situation go ahead and thread an anchoring spike through the hole on either side and use your mallet to pound it into the ground… then add your spacers, add another board and just keep trucking… we’ve got 130 of these babies to get through!

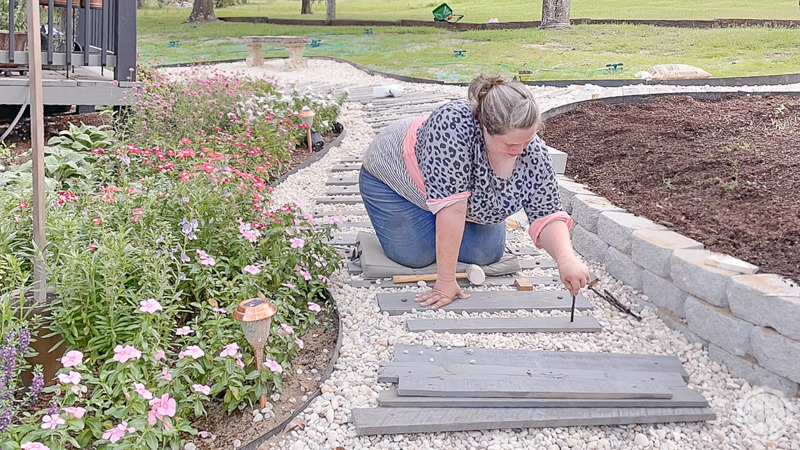
Keep in mind that all the pallet boards are different lengths so you’ll need to decide if you want to group them by length or just let them be whimsically different.
On the other hand as we go around the path some of the areas are larger and some are more narrow so keep an eye on where the path is going so you’re always centered in the space you’re working on and the space you’re working towards.
Perfect, darling!

Step 9: Add Smaller Pea Gravel In-between Pallet Boards
Once all of your pallet boards are in go ahead and grab a bit of pea gravel. You can use the larger stones that you used for the rest of the path but I decided to grab a few bags of even smaller pea gravel from the store. Then I carefully added them in-between each board so that they were really secure in their placement.
This realllly helped each board feel locked in place and the difference was notable when walking on the path.
Of course, a few of you are worried about using brown pea gravel in white and gray gravel… don’t worry these brown rocks are just wet. They are definitely white and gray but in a weird turn of events they take a few days to look that way.
Trust me, I freaked out after pouring a bunch of them by the house (to protect the mulch from the water dripping off the roof). And those piles by the house are definitely white/gray now!


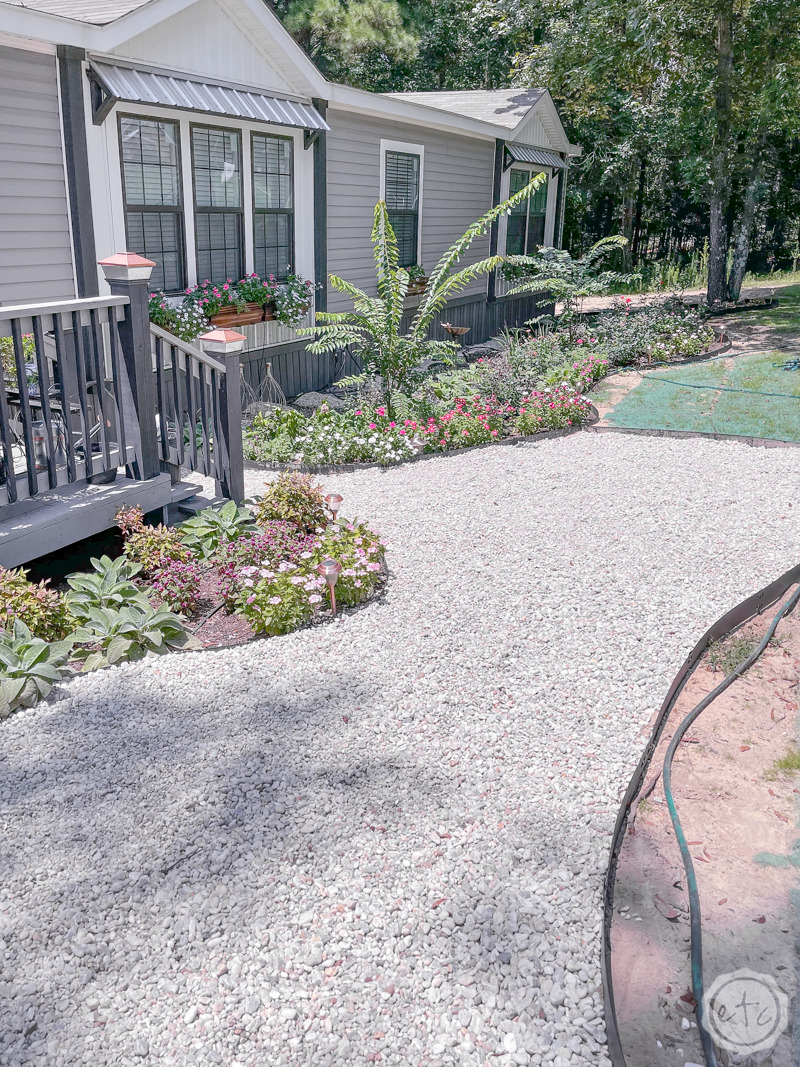
Step 10: Decorate and Enjoy!
Once you have all of your pallet boards in and the pea gravel situated you’re done! You can move on to fun things like decorating… adding statues, fountains or even a pretty concrete bench like this one! I actually found it at an Estate Sale and thought it was the perfect piece to complement this curve in the path.
I think i might find a few cute planters to flank the bench but for now… it’s so cute!
Plus IT’S DONE!! And that’s really all I ever wanted.
Ready to check it out? I am absolutely in love with how it turned out. It’s 100% better than anything I dreamed up in my head PLUS it’s sooooooo much easier to walk on. And that my friends is the goal of any project. Form and function.
It looks beautiful and it makes my life easier.
Plus maybe the rain will stop destroying my yard and making me trip in the middle of the night.
I mean, it’s worth a shot!
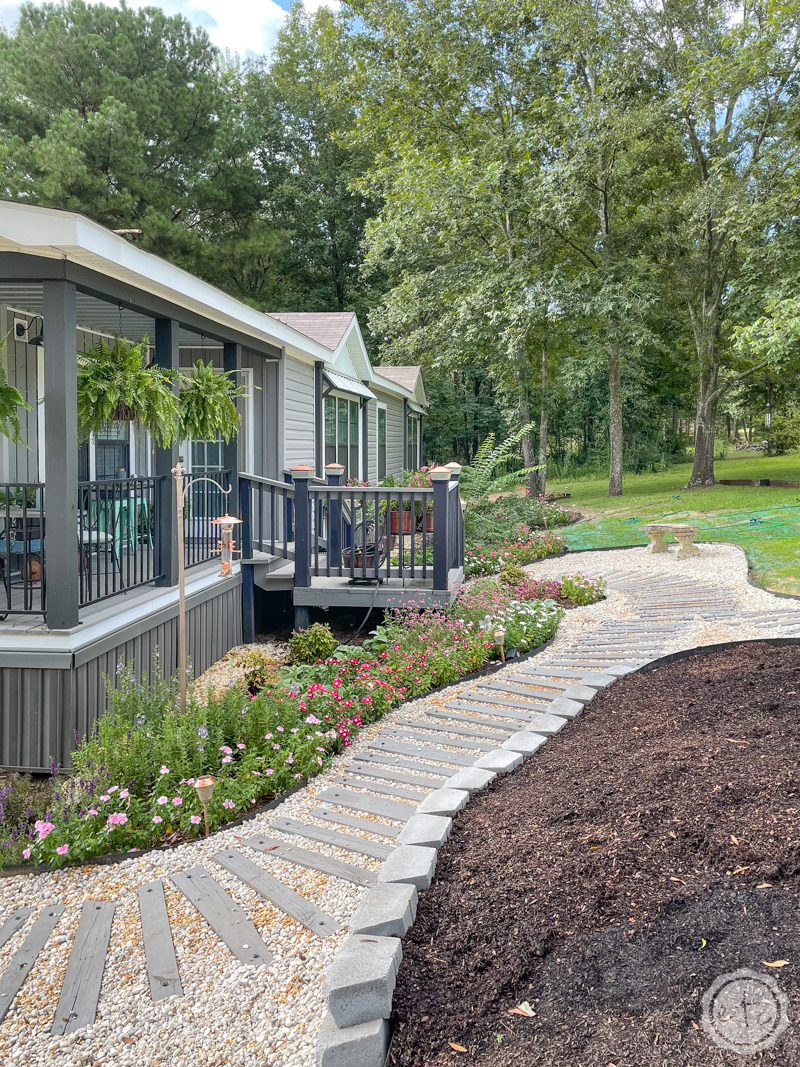

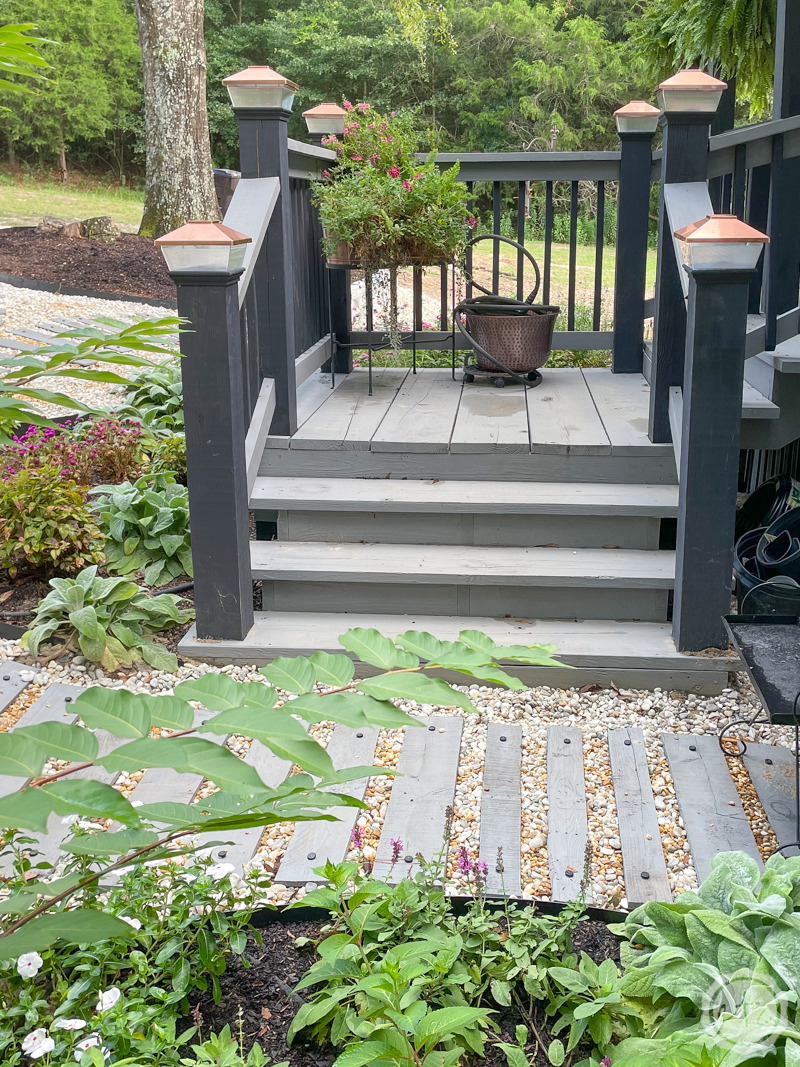
I debated what color to stain this little pallet walkway but at the end of the day I’m so glad I went with the same gray king’s canyon stain that’s on the porch. I think it really pulls the porch down and ties it to the yard.
Plus it’s a softer look than if I’d gone with black (which was the other option!). I love how the love love how gray looks with the pea gravel and the porch… I’m proud of most of my projects but this one turned out so much better than expected.


Just look how far this little house has come! It’s been 10 months since I moved in and I can’t believe how much has happened in the meantime… although I’m kind of exhausted after this particular project. I think I’ll take a break before jumping into the next one.
Leave me a comment down below with what I should tackle next!

Want to follow my journey to purchase my new home? Check out every post from the beginning:


Leave a Reply