• House Tour
    • Reveals
  • About
    • Smith Life
    • Disclosure and Privacy Policy
      • Terms and Conditions
      • Store Affiliates
  • Contact Me
    • Want a Button?
  • Shop
    • Floral Printable Planners
    • Paint eBooks and Packages
    • Wedding Binders & Extra Printables!
    • Planner Bundles
    • Planner Accessories
    • Home Decor Printables!
    • Cart
    • Bloglovin
    • Facebook
    • Instagram
    • Pinterest
    • Twitter
    • YouTube

Happily Ever After, Etc.

Creating Our Own Fairytale

  • Happily Ever After, Etc.
  • Home
  • Home Decor
    • My Home
    • Paint
    • Before and After
    • Tablescapes
    • Mood Boards
    • Furniture
  • DIY & Crafts
    • New to Cricut – Start Here
    • Cricut Projects
    • Resin
    • Scrapbooking
  • Organization & Planning
    • Cricut
    • Organization
    • Planner
  • Wedding
    • Cricut Wedding Projects
    • Free Wedding Binder
    • Bride Bag- The Ultimate Wedding Planner

DIY Ocean Aluminum Sign with Infusible Ink and your Cricut Maker

Hey y'all,

Did you know you can put infusible ink on aluminum? It’s an amazing little trick that let’s you make amazing signs… plus all your friends will want to know “how did you do that?!”

The best part? Adding infusible ink to aluminum is actually realllllly easy… it just looks complex! Even if you’ve never opened your Cricut before and this is your very first project I promise you can do this. It’s that easy.

Ready to get started?

Looking for more project ideas? When you’re done with this project you can make this aluminum pineapple sign that reads “Be a pineapple. Stand tall, wear a crown and be sweet ” or this “Crafting is Happiness” Sign. How to Put Infusible Ink on Aluminum Enjoy!

Supplies:

  • Cricut Maker
  • Fine-Point Cutting Blade
  • Strong Grip Cutting Mat (that’s the purple one!)
  • Cricut Easy Press 9 x 9
  • Easy Press Mat
  • Cricut Aluminum Blank
  • Cricut Infusible Ink
  • Heat Resistant Tape
  • Essential Tool Set
  • “Ocean” SVG (FREE at the Bottom of this post)

DIY Ocean Aluminum Sign

Ready to take the leap but not sure which machine is right for you? Check out my Explore Air 2 and Maker comparison before pulling the trigger. I go over the pro’s and con’s of each machine and even have an easy to read check list of each machine’s features so you can decided which cutting machine is perfect for you.

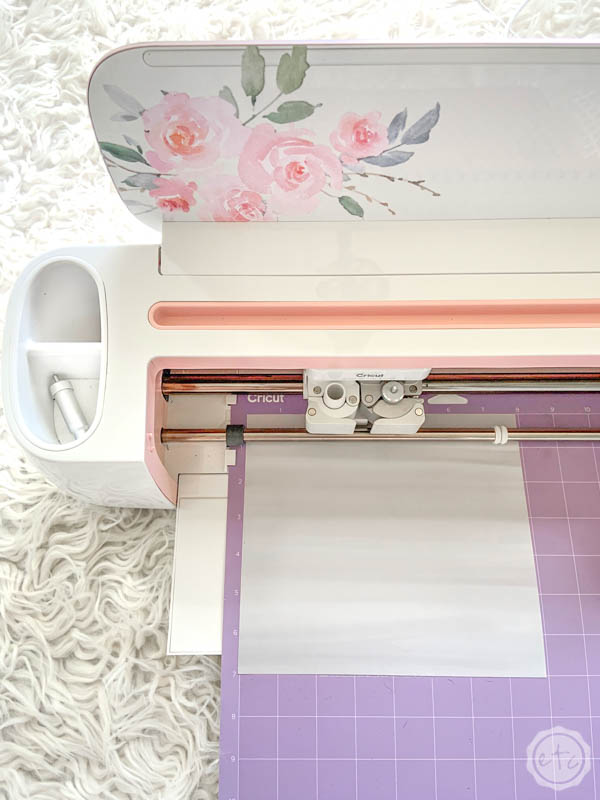
Step 1: Cut your SVG Cut File

First things first… go ahead and upload your SVG’s to cricut design space. If you’ve never done that before it’s super simple but you can follow along with the steps here.

This particular SVG comes in two parts since we’re going to be cutting out two different colors of infusible ink. You’ll upload both SVG’s and they’ll layer perfectly over each other in Cricut Design Space.

Now we can easily change the “everything” layer to blue and the “the ocean is” layer to green. Not only does this make it easy to see the different layers but it tells the Cricut that we are going to cut these colors on different mats.

Perfect!

Once you have that ready to go you can click make it! Remember that you’ll need to mirror the design for infusible ink… and that infusible ink sheets are ink so make sure to handle them with clean dry hands to avoid messing up the ink.

I loaded one mat with the light green infusible ink sheet from the brushed sunset pack, and one mat with the light blue sheet. Feed them into the machine when it indicates and you’re good to go.

Beautiful darling!

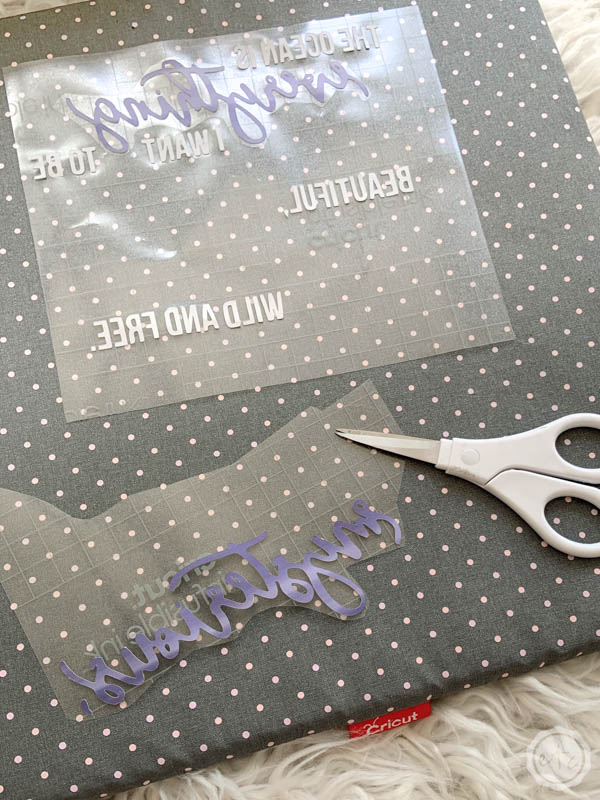
Step 2: Weed your Design

Now that our design is cut out we need to weed both of our infusible ink sheets. Normally we would use a weeding tool but in this case a weeding tool would be to harsh on the infusible ink.

Instead use your fingers to remove all the negative space in between the letters… don’t forget the spaces in the o’s and e’s!

Ready to rock?

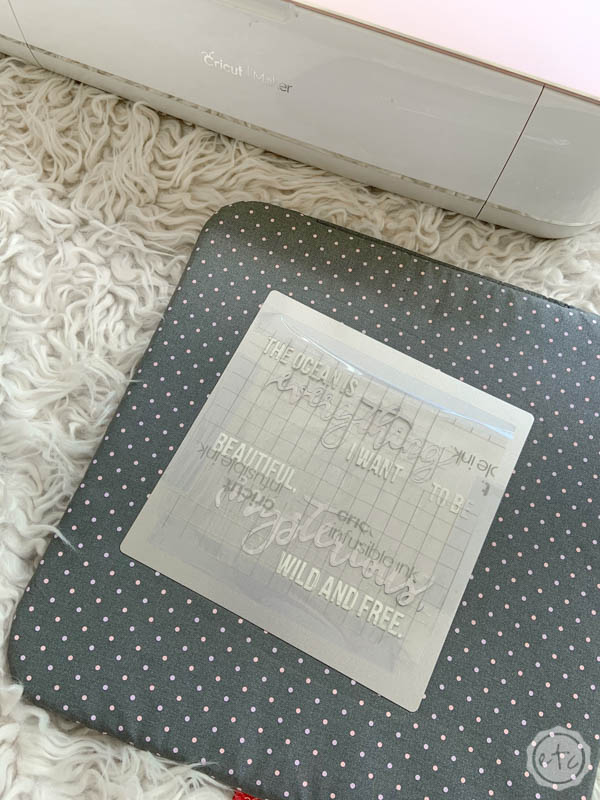
Now that you have your two infusible ink sheets weeded and ready to go we need to combine those two sheets into one. Unlike iron on you cannot heat infusible ink multiple time. You get one shot at this so you need to put both layers of your infusible ink on the same transfer sheet.

I find it easiest to do this by carefully cutting around the transfer sheet of the top layer (in this case the blue sheet with the “everything” and “mysterious” words on it). Once both words are cut out you can use the grid of the transfer sheet to carefully lay the words in the proper places on the larger transfer sheet.

Since the transfer sheet is sticky the “everything” and “mysterious” words will stick to the larger piece and now all of your words are on the same transfer sheet! Handy hun?

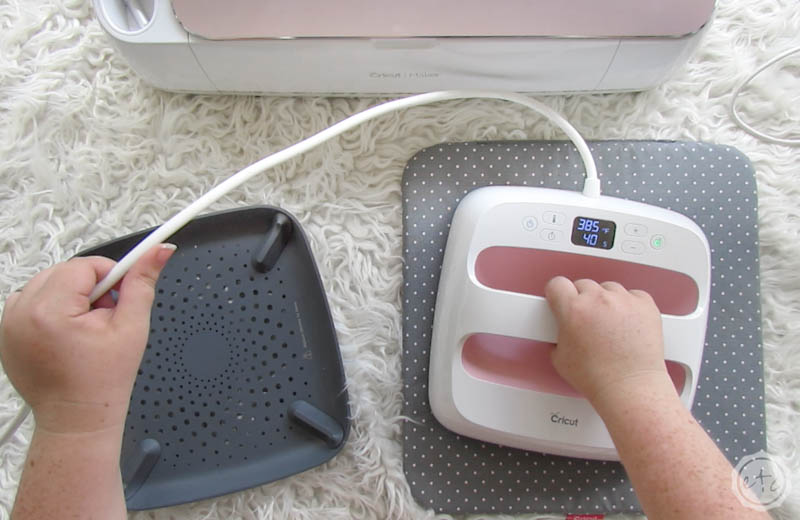
Step 3: Prep your Aluminum for Heat

First step to getting your aluminum ready? Firing up your easy press! It will take a minute for your easy press to heat up so go ahead and set it to 385 degrees and 40 seconds then leave it to get warm.

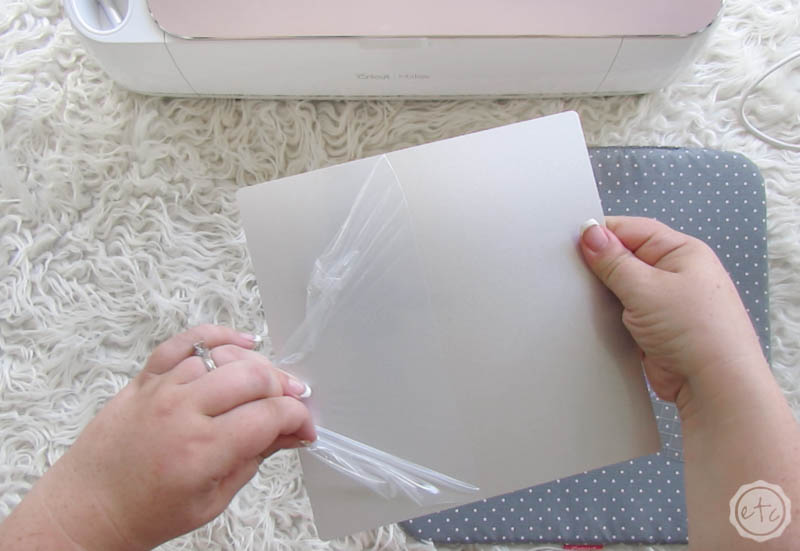
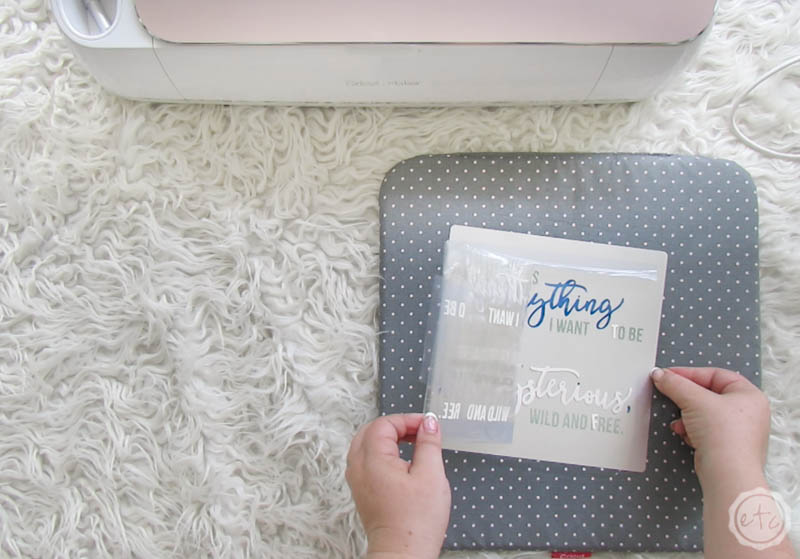
In the mean time you’ll want to peel the protective cover off your aluminum sheet. There will be a clear cover on the top portion of your aluminum sheet (this is the side you can put your infusible ink on!) and a gold clear plastic on the back.

You want to peel both protective covers off and then place your aluminum down on your easy press mat with the proper, infusible ink receiving side up.

Now firmly smooth the infusible ink transfer sheet into place in the middle of your aluminum piece and use a bit of heat resistant tape to hold it in place.

You don’t want all that ink to shift while it’s being applied!

Step 4: Heat up the Ink

Now it’s time actually apply your design… now that the infusible ink is taped in place and your easy press is warm carefully pick the easy press up and set it down on top of your aluminum sheet.

You want to be careful not to move your easy press too much while it’s working since any bumps along the way will give your project hazy lines and a foggy outline.

Just make sure to lift your easy press straight up and set it straight down and you’ll be fine.

Hit the cricut button and let it sit (you don’t need to apply pressure!) for the full 40 seconds). Then lift the easy press straight up!

At this point you’ll see that the transfer sheet has started to lift off the aluminum and little bits of color are visible under the transfer sheet… resist the urge to peel up the protective film just yet.

We just heated this aluminum to 385 after all… it’s hot!

Give the entire piece 5-10 minutes to cool off and then you can remove the protective transfer sheet to reveal your design.

Like always the ink is dull and subtle when in infusible ink form… now that it’s been heated you can see the full vibrancy of the color.

Look how pretty it is!

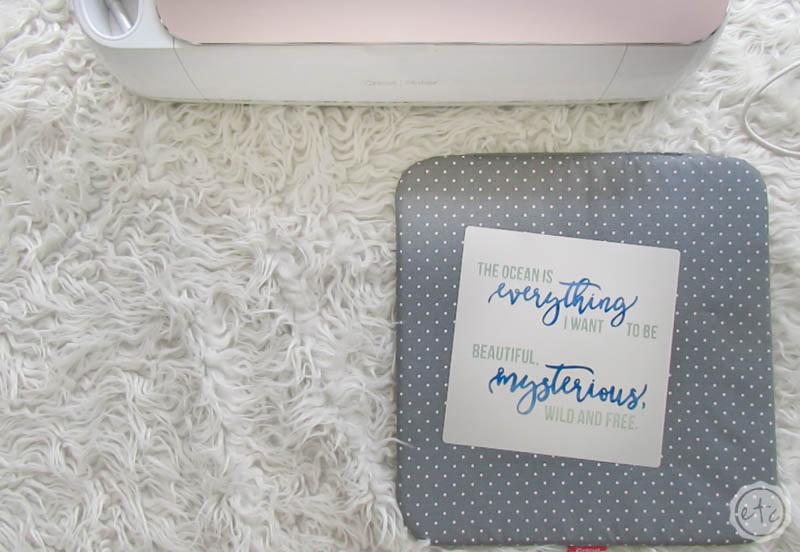
I absolutely LOVE how it turned out!

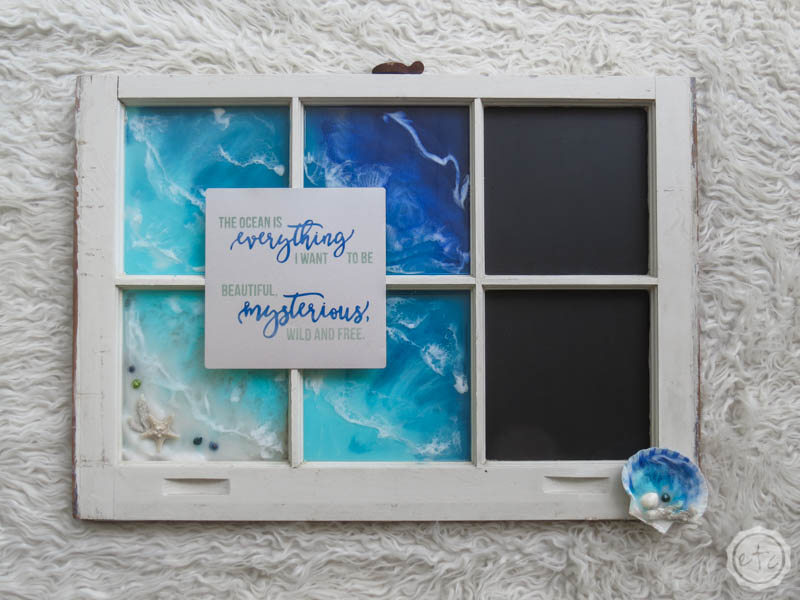
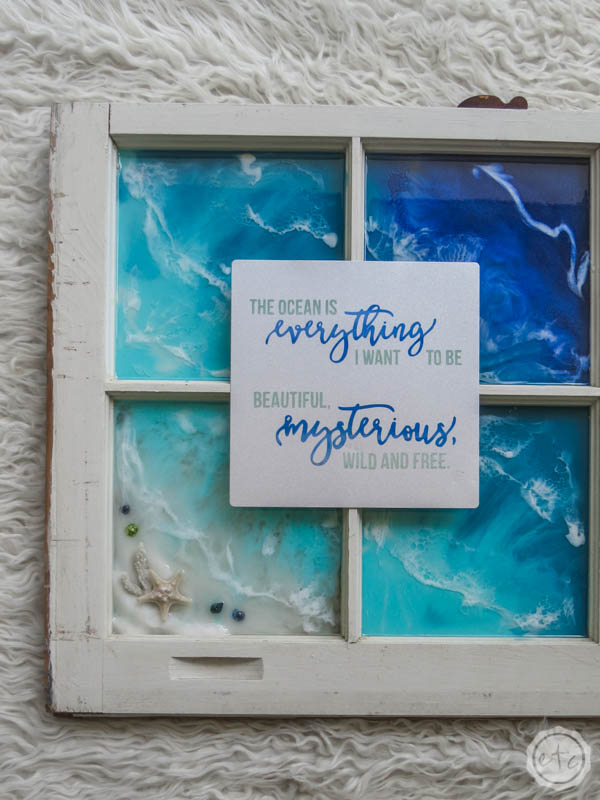
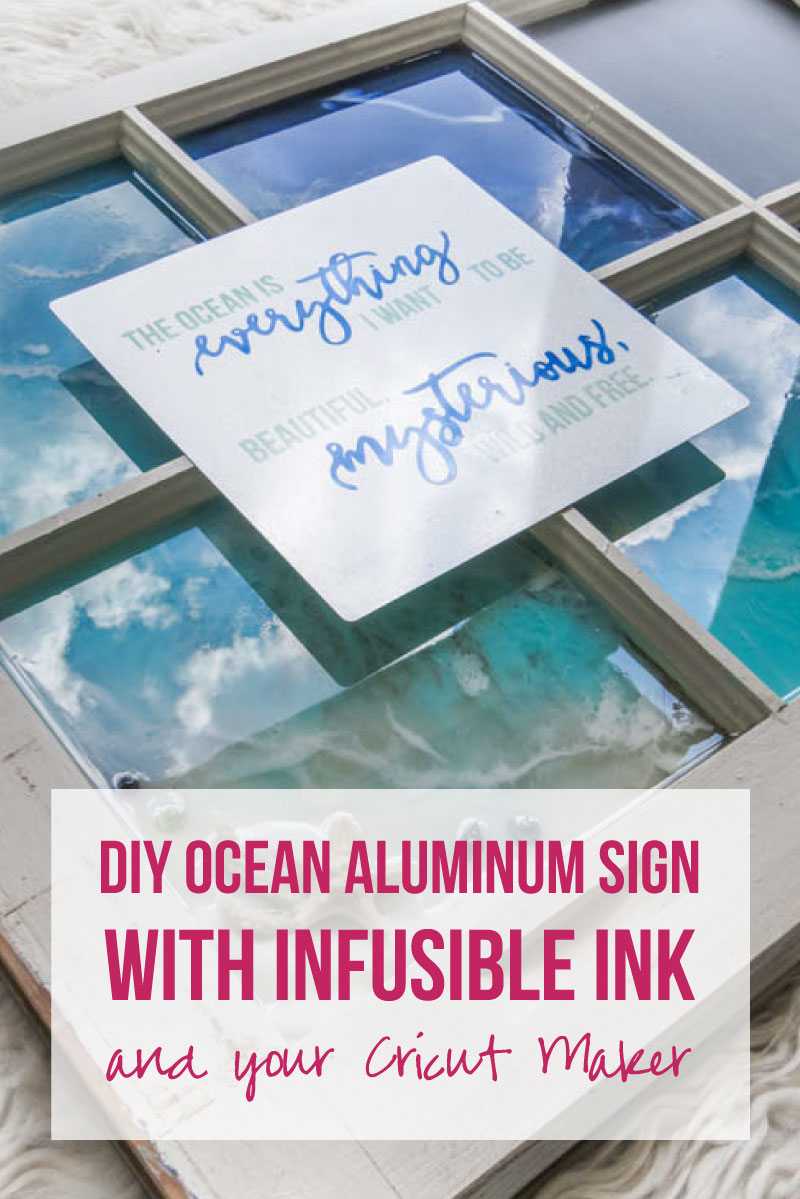
Of course, you can use your aluminum sign for anything you like but I love adding mine to larger projects. In this case our little aluminum sign because the centerpiece of a larger resin chalkboard.

Check it out!

BONUS: This little sign is part of a larger project! Follow along if you want to make each project:

How to Make Ocean Waves | Ocean Themed Aluminum Sign | Ocean Wave Sea Shell | Ocean Wave Chalkboard Window

Looking for more Cricut Projects? I’ve got you covered!

You are invited to the Inlinkz link party!

Click here to enter
You made it through the entire post? That means you're one of my new favorite people! I'd love to be friends and see what else you would like to read about! Leave me a comment and then sign up for your very own FREE paint planner.... so that you can keep track of every single paint color with ease!
Welcome back! I'd love to be friends and see what else you would like to read about! Leave me a comment and then sign up for your very own FREE paint planner.... so that you can keep track of every single paint color with ease!

Show me some LOVE y'all:

  • Facebook
  • Pinterest
  • Twitter
  • Email

Related

«
»

Cricut 1

Trackbacks

  1. DIY Ocean Wave Chalkboard on an Antique Window - Happily Ever After, Etc. says:
    September 5, 2020 at 8:42 pm

    […] Aluminum Sign with Infusible Ink Message (Follow the tutorial here) […]

    Reply

Leave a Reply Cancel reply

Your email address will not be published. Required fields are marked *

sidebar betsy I'm Betsy, Home Decor Enthusiast, Yorkie Mama, Crafter, Blogger, Picky Eater, Chief Mess Maker, Antique Hoarder and Graphic Designer. You can generally find me working on (attacking with a paintbrush) the 3 bed, 2 bath home we are currently renting! Our home might not be perfect but it is ours & if you hang out long enough you'll see that what we lack in know-how we make up for in passion!
Shop My Craft Room

Shop My Home

Featured Articles

15 Fabulous Ideas to Organize your Laundry Room
25 FREE Printables For Your Home!
What to do with EXTRA Paint with Happily Ever After Etc
10 Ways to Make Your Bed EXTRA Comfy with Happily Ever After Etc.
Ready to Pick your Perfect Paint Color? We'll help you with our 6 Day FREE E-Course

Hey y’all,

Profile

I'm Betsy, Home Decor Enthusiast, Yorkie Mama, Picky Eater, Chief Mess Maker, & Graphic Designer...

A Little Note!

Many of the links on Happily Ever After, Etc. are affiliate links. If you purchase a product after clicking an affiliate link, I receive a small percentage of the sale for referring you, at zero cost to you! How awesome is that? Purchasing through affiliate links is an easy, painless way to help out your favorite bloggers. Thank you so much for your continued love and support! Read the full disclosure here!

Instagram

The number one question people ask when they watch The number one question people ask when they watch my new home tour on YouTube? Why is there so much clutter... um excuse me I like stuff! The second question? How did you frost the doors? Don’t worry... I wrote out the whole process, check out the step by step tutorial on the blog!
With Christmas fast approaching I’m having secon With Christmas fast approaching I’m having second thoughts... about taking down my holiday decorations! I absolutely love all the blush and rose gold this year and think I might have to add more pink to my every day decor. Until then maybe it will just stay Christmas at the Smith house! Tutorials for both the “Merry Christmas” resin sign and the “Dear Santa” Cricut sign are in my profile! #pinkchristmas #pinkchristmastree #pinkchristmasdecor
Well y’all Christmas is coming up quick... which Well y’all Christmas is coming up quick... which means I need to get a move on with all that wrapping! I got a jump start this morning after whipping up a few little resin light bulbs! Check out the full tutorial over on the blog if you’d like to wrap your presents with a few resin goodies this year... and tell me in the comments below. Are you finished wrapping or (like me) are you still getting started? #pinkchristmas #pinkchristmasdecor #resinchristmas #giftwrappingideas
Ready for another fun and easy resin project? Thes Ready for another fun and easy resin project? These little Christmas trees are the perfect beginner level project so if you’ve never done resin before don’t let it intimidate you!! Grab your heat gun and jump in... I’ll walk you through it! Check out the full blog post for these little guys on the blog (link in profile!)
If you haven’t joined Michelle at @weekendcraft If you haven’t joined Michelle at @weekendcraft SVG membership then WHAT ARE YOU WAITING FOR?! I am obsessed with all the cute svg’s and y’all she is doing a live craft night every month to walk you through making one of her designs... and the first craft night is tomorrow! She’ll be making this “Merry everything and Happy always” SVG and it’s so cute! You don’t want to miss it! See you there! 

(Also who noticed the sneak peek at my new kitchen?!)

#cricutsvgfiles #christmassvg #cricutsled
Well y’all I’m getting this close to unpacked Well y’all I’m getting this close to unpacked in my new house!! And since I’m a blogger Christmas is going up! So here’s the question... do you want a 1 month house update or do you want to wait for the Christmas tour? #lulamaefarmhouse #rosegoldchristmastree #newhouse
Well it’s still a work in progress but I finally Well it’s still a work in progress but I finally have a house!! They have to put it together and do all the detailing before I get keys... but we’re in the end game now! Check out my stories for a sneak peek at the moving process... full YouTube video coming soon!
#ad how amazing did these little fall coasters tur #ad how amazing did these little fall coasters turn out?! Plus I absolutely love the matching tray! The best part? This is such a quick and easy resin project... a silicone mold, a little resin and your trusty heat gun and I promise you can make this baby!! Link in profile for the tutorial!! #fallresin #resinforbeginners #cheetahprint
Okay... is it bad if you just want to make coaster Okay... is it bad if you just want to make coasters in the same mold with the same technique but different colors?? They turn out soo differently! Just a sneak peek of my fall coasters and the blush ones I made last year!
Happy #nationaldogday to the fur babies that are ( Happy #nationaldogday to the fur babies that are (literally) behind (beside... or underneath!) all Of my projects! These sweet little cuddle muffins make everything better 😊🐶😘
GIVEAWAY CLOSED Our winner is @kamikvega Check you GIVEAWAY CLOSED
Our winner is @kamikvega Check your inbox girl, this little machine is headed your way! Thanks to everyone who participated... I can’t wait to see where we go from here!

🥳📦🥳 GIVEAWAY🥳📦🥳
If you have loved all of the Cricut projects I make here is your chance to win a Cricut Joy of your very own! If you’re ready for a little craftiness (maybe a little time to relax) then this giveaway is for you! I’m teaming up with a few of my cavities crafty bloggers so that one of you can win your very own mini crafting machine. Good Luck!!!!

TO ENTER GIVEAWAY:
1.) Follow
@creativeramblings 
@weekendcraft 
@craftylumberjacks 
@this.is.tisa 
@justcallmehomegirl 
@happilyeverafteretc
@lovebird_heartworks 
2.) Like this post
3.) Tag a friend in the comments.
.
.
.
Hurry! Giveaway ends Saturday 8/29/20 at 11:59PM PST. Winner will be notified via Direct Message. Share or tag a friend who'd love to win a Cricut. .
.
.
This contest is in no way affiliated with or sponsored by Instagram or Cricut. To enter you must have a U.S shipping address.
A little peek into the fun summery Tablescape I pu A little peek into the fun summery Tablescape I put together for a little garden party! Want to check out the full table? Wondering where to find all the pieces... click the link in my profile for all the details!
#ad Did you know you can put infusible ink onto al #ad Did you know you can put infusible ink onto aluminum? It's sooooo simple... honestly it's one of the easiest projects I've ever done. Even if you've never used your Cricut before you. can. do. this. I'll show you how every step of the way! Follow along with the full tutorial video over on YouTube! The best part? These little aluminum signs look amazing as part of a larger project! Check out how I added mine to a larger resin wave project on the last slide! @officialcricut #cricutcreated https://lnk2.io/wvMllZf
Okay so It’s no secret that I’ve been obsessed Okay so It’s no secret that I’ve been obsessed with resin for a while now but this week I’ve been playing around with resin waves! Including this tiny resin sea shell! Check out the link in my profile for the full tutorial!
After a lot of struggle, loss and frustration I am After a lot of struggle, loss and frustration I am finally dotting the i’s and crossing the t’s on my next chapter. Yesterday I went and signed the million and one papers to close on my new house! I cannot wait to share the moving (and decorating) process with all of you... next step: keys! #firsttimehomebuyer #newhouse
Load More... Follow on Instagram

Copyright © 2021 · Darling theme by Restored 316

Copyright © 2021 · Darling Theme on Genesis Framework · WordPress · Log in · Privacy Policy

loading Cancel
Post was not sent - check your email addresses!
Email check failed, please try again
Sorry, your blog cannot share posts by email.