
Today we are pouring the cutest resin bumble bee mold you’ve ever seen… he’ll be the star of the show over on my new Bumble Bee Farm sign! I can’t wait to put all the piece together but first we have to actually make this little guy.
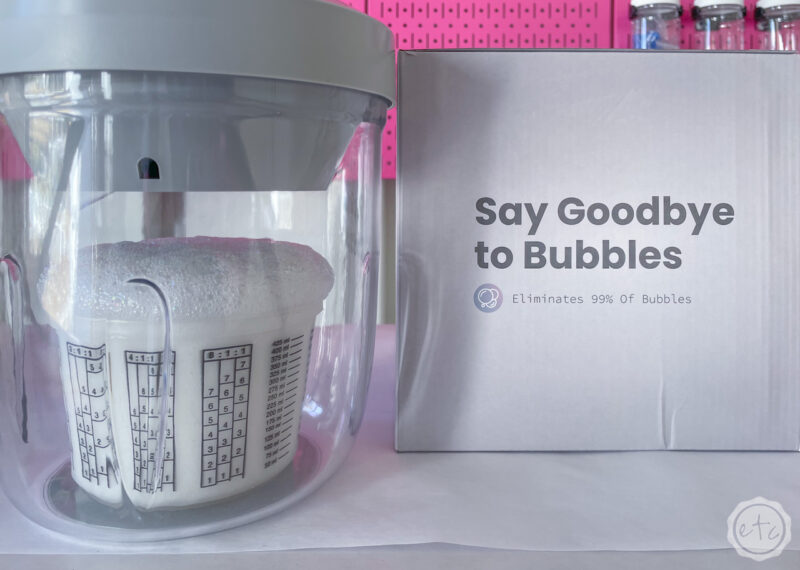
Which should be easy (even though it’s a fairly deep mold) because we’re testing out my newest toy. The Resiners AirLess Lite Bubble Removing machine (say that five times fast!). It’s a tiny pressure pot that removes 99% of bubbles from your resin… leaving it crystal clear and ready to go.
I want this little guy to have clear wings with iridescent flakes in them so the crystal clear part is super important.
I’m always getting bubbles in my pieces so I’m hoping this really does the trick. Then they’re either trapped in the finished piece leaving it less than crystal clear or floating to the surface leaving divots in the smooth top layer. I’m honestly not sure which is worse.
Let’s get started so that we can test this baby out.
Supplies:
- Total Boat Makerpoxy Epoxy Resin
- Bumble Bee Mold
- Resiners AirLess Lite
- Respirator/Mask (resin graded filters)
- Gloves
- Wagner HT400 Heat Gun
- Freezer Paper
- Silicone Mat
- Baking Pan
- Heart Shaped Silicone Mixing Cup
- Small Mixing Cups
- Silicone Measuring Cup/Larger Mixing Cups
- Reusable Silicone Stir Sticks
- Toothpicks
- Paper Towels
- Yellow and Black Craft Paint
- Iridescent Flakes
Just getting started with resin? Download my free resin supply list and make your first project today!

Step 1: Mix your Resin
Ready to get this party started? I’m using MakerPoxy for this little bee since it’s easy to work with and can be poured deep enough for this little bee without needing to get out the thickset resin.
It’s a 1:1 ratio resin which means you’ll use 1 part a to 1 part b… for this project we need about 100ml so we’ll put 50ml of a and 50ml of b into a mixing cup. Then slowly stir your resin for 3 minutes… make sure you’re scraping the sides and bottom of your container to thoroughly mix all parts of the mixture together. Then let it sit for a couple of minutes so that as many bubbles as possible can rise to the surface.
We don’t need multiple colors today so once you’ve mixed your resin you can add your iridescent flakes and stir them in. Make sure to stir slowly as the iridescent flakes add a bunch of air and therefore air bubbles.
Yikes.
Once the flakes are stirred in we’ll grab our new toy! AirLess Lite here we come! We’re going to be footloose and bubble free!

Bonus Tip: If you’ve never mixed resin before it’s not nearly as intimidating as you’d think! I’ll walk you through all the steps here in my How to Mix Resin for Beginners Tutorial.


Step 2: Place your Resin in the AirLess Lite
Okay y’all… moment of truth. I read all the instructions and this baby seems pretty easy to use. You’ll want to use room temperature resin (NOT cold… but that’s normal for all resin projects. Don’t mix cold resin y’all.)
Go ahead and place your resin inside the chamber and close the lid. The instructions tell you to leave about half your container of resin empty so there’s room for the bubbles to expand… so keep that in mind when mixing everything.
Another tip? The lid does not screw on but fits snuggly down over the empty chamber… don’t ask me how long it took me to figure that out. Then it’s easy peezy lemon squeezy… plug in the cord and hit the button on top of the machine.
The AirLess Lite will run for 15 minutes and you can literally watch the bubbles come to the surface of the resin and pop. Which is pretty darn cool! Once the machine is done there’s a little tab right under the power cord you can pull to release the pressure and pop any remaining bubbles!
Let everything sit for a minute and you should be good to go! No more bubbles for this girl!
The instructions do say that if you have more bubbles than normal you can run the machine a second time to release more bubbles… but keep in mind you need to pour your resin before it cures so don’t wait tooo long.
Overall I was very happy with this little guy… he popped so many bubbles that the iridescent flakes added into the resin and made my life a lot easier. There’s no way my heat gun could have popped all of those bubbles down inside the resin.
Plus I like that it’s little and cute and fits perfectly on the shelf on my pegboard! I thought I might need to move the shelves around but it was the perfect size! If you want to see this baby in action watch the video up top… I made sure to get all the angles.
Ready to pour the resin?


Step 3: Pour your Resin
Let’s pour!
Now that we’ve removed allllll the bubbles we need to pour carefully so we don’t get new ones! Make sure your cup is up higher than your mold and then pour your resin in a thin stream down into your mold.
Make sure to cover every bit of your little bee and fill the entire mold up to the top! I used my heat gun to pop any bubbles that were created by pouring and then I set this guy aside (under a cover) to cure for 24 hours.
Don’t forget the cover! Even if you use a cardboard box it’s worth it to keep the flies and dog hair from settling in your resin. Don’t ask me how I know.
But if you need help removing hair from resin you can find that tutorial here.


Step 4: Un-Mold your Bumble Bee
This is usually my favorite part but that bubble machine was a lot of fun! Let’s crack this baby open!
Start by pulling the silicone away from the resin on the very edge… then slowly pull it down the sides and off the bee completely. If your mold is like mine the bee will release pretty easily.
But it will have a matte finish since these bees were made for baking and not resin.
Resin molds have a glossy finish and leave your resin super shiny. Baking molds are completely useable for resin but you’ll need to topcoat them to add back in that shine… which is perfectly fine here since I want to paint a few yellow and black stripes anyways!


Step 5: Paint your Resin
Now that our bee is completely cured let’s give him some color! I could have painted the mold with mica powder before we started or even added craft paint to the mold before we began but I thought that would be a little hard considering the shape of the mold.
Instead I’m going to use craft paint to paint the black antennas and the black and gold stripes. With a tiny brush and a little patience this isn’t a hard process. Just go slow and remember it will look worse before it looks better. The first layer of paint on resin always looks like a streaky mess!
After 2-3 layers it will look perfect!
Just make sure to let it fully dry before we add our resin topcoat.


Step 6: Top Coat your Bumble Bee
Ready for the finishing touch? Let’s shine this baby up and make those wings crystal clear!
You’ll only need a bit of resin for this… maybe 10ml? So I typically mix resin for another project and just use a bit for my topcoat first. BUT you could easily mix 10ml of resin to topcoat a small resin piece if needed.
Make sure you’re wearing gloves and add a bit of resin to your bee… then use your gloved fingers (or a silicone brush) to thoroughly spread resin over the entire piece. Don’t skip any of the wings, get in between the antennas… the whole bee needs to be covered in resin so you don’t have any matte spots or un-cured areas.
Then set your bee on a silicone sheet to cure and you’re good to go! Make sure to cover him though… a piece of hair in the very topcoat layer would be awful.


Step 7: Add your Bee to your Sign!
We are ready for the finishing touches! I used a bit of hot glue to permanently attach my little bee to his forever home. The spot of honor on this adorable sign!
He’s just so cute!
This is a design I’ve used before… on a much larger scale to paint the surface of a kitchen table. And while it has a little vinyl bee design I could have cut out I wanted a three dimensional bee for this sign. There’s just something about an actual bee vs a flat vinyl bee that can make a sign really pop.
I LOVE how it looks.
And the crystal clear, iridescent wings are the best part.
You will DEFINITELY be seeing the Resiner AirLess Lite again… I’ve found a new secret weapon in my resin arsenal.
Enjoy the pretty finished pictures… I’m off to stare lovingly at my bee.


Pssst… if you want to check out my metal pegboards you can see them being put up here. I absolutely love them and the shelves make the perfect place to put some of my resin tools. I still need to organize everything (they literally just went up… this is the first project I’ve done in my shed!) but the AirLess Lite is definitely staying on this shelf.
It’s the perfect fit!


Leave a Reply