
I don’t know about y’all but after a long winter I am sooooo ready for spring! Luckily this little bumble bee farm sign is the perfect touch of summer long before the days turn sunny. We’re going to get started with a fun SVG that’s ready for the bees!
We’ll start by cutting vinyl and then add our cutest little resin bumble bee as a focal point! If you want to make your own resin bumble bee you can follow the instructions here or you can skip the resin all together and cut your bumble bee out of vinyl.
Whatever floats your boat!
Ready to get started?
Supplies:
- Cricut Maker 3
- Cricut Roll Holder (for smart vinyl)
- Fine-Point Cutting Blade
- Cricut Standard Grip Mat (that’s the green one!)
- SVG Cut Files (FREE at the bottom of this post).
- Bright 360 Floor Lamp
- Weeding Tool
- Scraping Tool
- Smart Vinyl
- Transfer Tape
- Acrylic Ruler
- Round Wood Sign Blank
- Local Honey SVG

Step 1: Upload your SVG
First things first… we need a design to work with! I’m using the same Local Honey design I used for this large table. It was so cute! I loved it and have wanted a smaller version for ages… so I grabbed the same SVG and decided just to *ahem* adjust it a little.
Since my SVG was already in Cricut Design Space from the last time I used it I just grabbed it from my library but you should upload it to your library first. If you need help with that here’s a little tutorial on how to upload SVG’s to Cricut Design Space… it’s really simple.
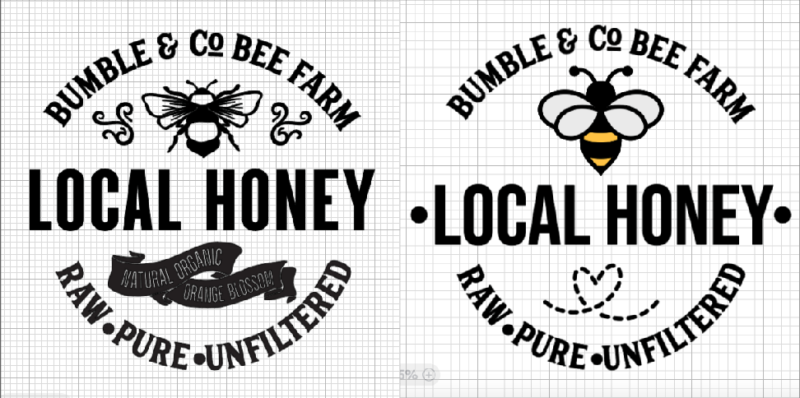
Then I deleted the bee design as well as the lower banner that reads “natural, organic, orange blossom” and replaced them with simpler designs from the Cricut Access Library… since I’m using a simple resin bee I wanted to see what that design would look like… and with the simpler bee up top I decided on a simpler heart shaped swirl on the bottom.
Of course if you don’t want to use resin at all you could cut the design exactly as it’s meant to be (the design on the left) or adjust it with the cricut access images like I did (the design on the right) and cut those. Either way you could cut your sign completely out of vinyl and skip the resin all together but the resin is going to be so cute!


Step 2: Cut your Vinyl
Now that our design is ready we’re going to start cutting allllll the pieces! I turned the bumble bee layer off since we’re not cutting that portion of the design and then welded alllllll of the black images together into one layer.
This will take a bit more vinyl to cut but it’s much easier than trying to line everything up if you let it cut out one word at a time.
Since I used smart vinyl I didn’t need a cutting mat so I was able to load my vinyl, select my material and hit cut. If you’re using regular vinyl go ahead and load your cutting mat with enough vinyl for the entire 11″ design.
Then hit go and watch the magic!


Step 3: Weed your Vinyl
Ready for the most satisfying part? Weeding the entire design!
Grab your weeding tool and remove all the extra vinyl… the inside of the o, the tiny inside part of the e… any part of the letters or design you don’t need.
Then carefully remove all the extra vinyl from around the design… this takes a minute but it’s not hard. Just go slow so you don’t rip any vinyl and make sure you’re removing the negative portions of the design (and not portions you’ll later need).
At the end of the weeding process your vinyl should look exactly like your design in Cricut Design Space.


Step 4: Use Transfer Tape to Move your Vinyl
Now it’s time for the magic! Grab a roll of transfer tape and cut a piece large enough to cover the entire design. Then carefully line it up with your design and lay it down over the entire piece… smoothing it out from the center to eliminate as many bubbles or wrinkles as possible.
Ideally you’ll line the graph lines up on the transfer tape with your words so that everything’s straight and you can use the graph lines to make sure everything is straight when you apply your piece to your sign.
Once everything is straight and smoothed out grab your scraping tool and really bond the transfer tape to the vinyl… scrape the entire front and then flip it over and scrape the entire back. Then carefully remove the transfer tape and the vinyl should come with it… leaving the blank white carrier sheet behind.
This is another part of the process where you want to go slow… if any letters aren’t attached go over them with the scraper and then try again! Otherwise you run the risk of leaving a letter behind or worse… ripping it!
With these larger designs I’ll sometimes cut the carrier sheet and remove it halfway through the project so it’s no longer in my way. But that’s completely optional.
Once the carrier sheet is gone you can lay your design down on your wooden sign and smooth the vinyl into place! Then remove the transfer tape leaving the vinyl behind on the sign… transfer complete!


Step 5: Enjoy!
I love how this turned out! It’s so cute and I love the simplicity of it! The little resin bee is going to push it over the top into complete cuteness BUT if you’ve decided to go with a vinyl bee you’re all set… just layer your yellow vinyl on top of the black and you’re good to go.
One cute vinyl bumble bee for your bumble bee farm sign!


Get Your FREE PDF Guide!

Don't forget to snag your free PDF Guide to buying your first Cricut!


Leave a Reply