• House Tour
    • Reveals
  • About
    • Smith Life
    • Disclosure and Privacy Policy
      • Terms and Conditions
      • Store Affiliates
  • Contact Me
    • Want a Button?
  • Shop
    • Floral Printable Planners
    • Paint eBooks and Packages
    • Wedding Binders & Extra Printables!
    • Planner Bundles
    • Planner Accessories
    • Home Decor Printables!
  • Cart
    • Bloglovin
    • Facebook
    • Instagram
    • Pinterest
    • Twitter
    • YouTube

Happily Ever After, Etc.

Creating Our Own Fairytale

  • Happily Ever After, Etc.
  • Home
  • Home Decor
    • My Home
    • Paint
    • Before and After
    • Tablescapes
    • Mood Boards
    • Furniture
  • DIY & Crafts
    • New to Cricut – Start Here
    • Cricut
    • Resin
    • Scrapbooking
  • Organization & Planning
    • Organization
    • Planner
  • Holidays
    • Christmas
    • Halloween
    • Thanksgiving
    • Easter
  • Wedding
    • Cricut Wedding Projects
    • Free Wedding Binder
    • Bride Bag- The Ultimate Wedding Planner

How to Turn Your Antique Double Bed into a Queen

Hey y'all

I am soooo excited! I have been waiting to write this post ever since I read Miss Mustard Seed’s post about her new guest bed! Here’s what she says:

One reason we had just a metal frame for our own queen bed for so long is that I couldn’t find an antique bed frame that would fit a queen mattress and I couldn’t find a new bed that had the antique look I was going for. (I know you can sometimes convert a full to a queen, but I haven’t heard many success stories with that.)

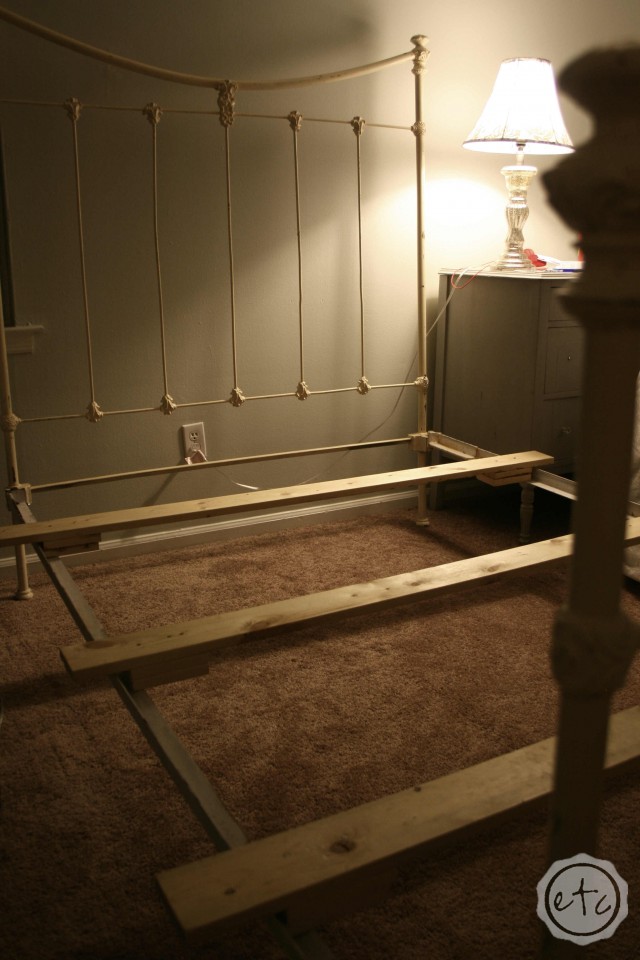
Well my friends you are about to hear a success story! My mom bought this double size antique cast iron bed frame for me straight out of college. So that means I have been sleeping on my antique double bed for almost 5 years.  We took it home and set it up in our guest room… I hadn’t moved out yet and we wanted to see how it looked. We knew right away that if we wanted it to work we would have to find a way to convert the rails to a queen size… a double just wouldn’t cut it.

So we did some research. A Queen size bed is both longer and wider than a double… so in order for the conversion to work the rails have to become longer to support the added length… and you have to be okay with a little overhang. The Queen size mattress will be a tad bit wider than your headboard and footboard. Luckily I really haven’t had a problem with it!

So what exactly are the steps? Well friend, I’m glad you asked!

UPDATE: Want to see this little bed after 10 years of use? I update it here!

How to Turn Your Antique Double Bed into a Queen | Happily Ever After, Etc.

Step One!

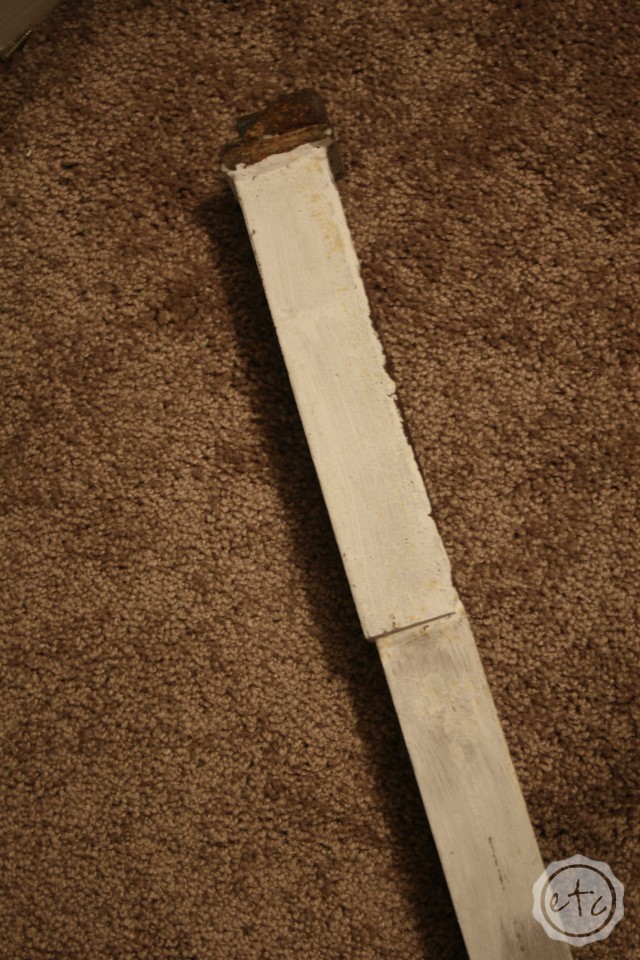
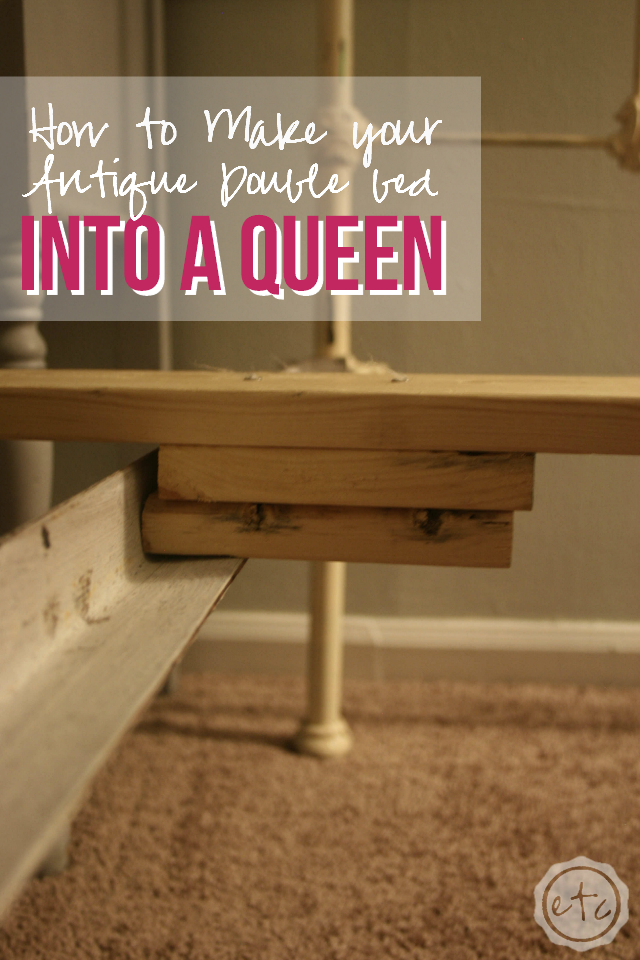
Longer rails! In order for the larger mattress to fit your bed rails have to be about 6 inches longer. See where the seam is on the rail above? That’s where the extention was welded on. If you are an expert antique cast iron welder then don’t bother asking me for tips… go lengthen those rails! If you happen to be in the 99.9% of the population that doesn’t know how to lengthen cast iron (that would be me!) it’s ok! We did a quick google search for extended queen bed rails and were able to find a gentlemen who specializes in this sort of thing. That was five years ago so I don’t remember exactly where he was… but he shipped the rails to us in Colorado so you don’t have to be local! Score!

Of course if your little brother is helping you put your bed together and doesn’t realize you can’t use a hammer to put cast iron rails into cast iron pin holes… you may need a second set of rails! Did you catch that?! If you use a normal hammer to put your rails together THEY WILL BREAK!! Take it from me and use a rubber mallet! It’s not worth it!

Luckily fate was on my side and I happened across a pair of already extended rails at an antique store for a very good price. Someone must love me.

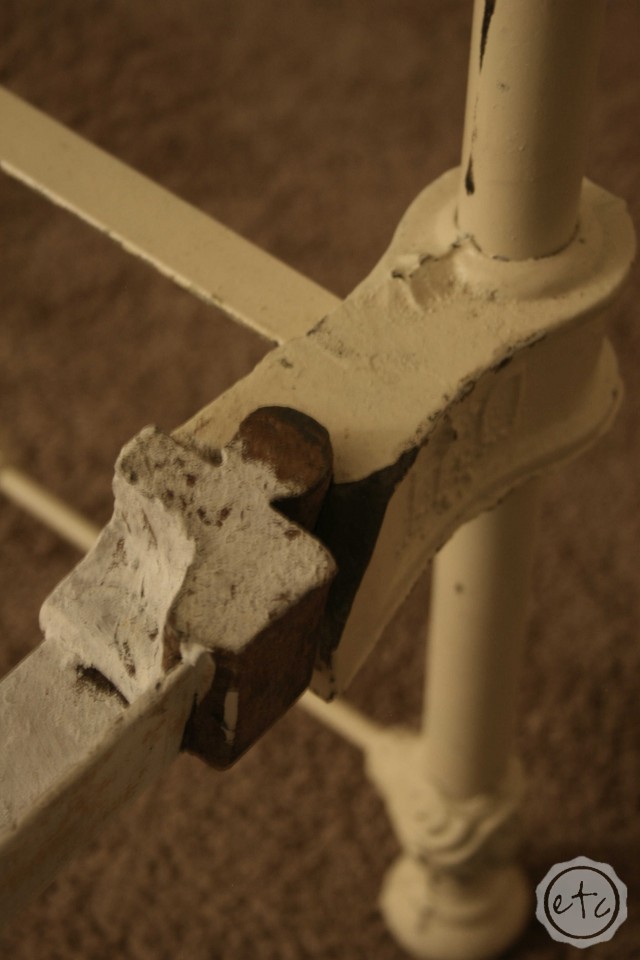
See the point where the rails fit into the joint? Do not hit those with a hammer! USE A RUBBER MALLET! I don’t want what happened to me to happen to you! Learn by my mistakes grasshopper.

How to Turn Your Antique Double Bed into a Queen | Happily Ever After, Etc.

Step Two!

We made the bed longer… now we have to make it wider. Mainly because our larger mattress will not fit down into the rails like a double size mattress would. This part is easy… all we need is a couple two by fours! Cut three pieces as wide as your mattress… then cut 12 smaller pieces… nail them together like so.
How to Turn Your Antique Double Bed into a Queen | Happily Ever After, Etc.

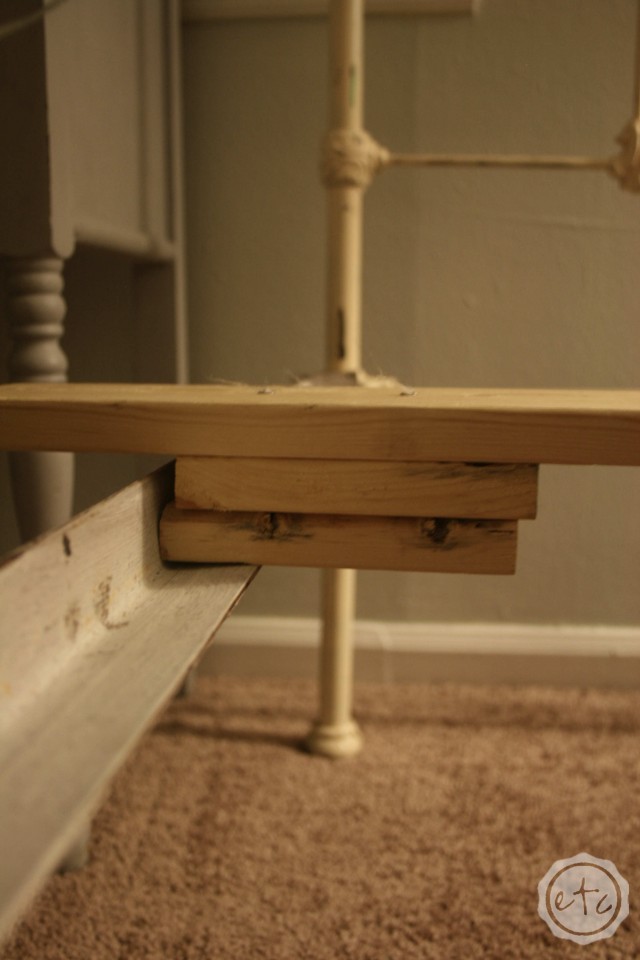
Now your mattress has a great platform to sit on top of!

Side note: Make sure your boards are only as long as your mattress… I thought it would be a good idea to make mine a bit longer so the bed had room to slide. Not a good idea. I have permanent bruises on my legs from hitting those darn boards in the middle of the night. They are not 3am potty run friendly.

How to Turn Your Antique Double Bed into a Queen | Happily Ever After, Etc.

And that’s it! Now you have an antique QUEEN bedframe! Slap your queen mattress on top and take a nap. Heavenly isn’t it?

How gorgeous is this spring home tour by Happily Ever After, Etc.?

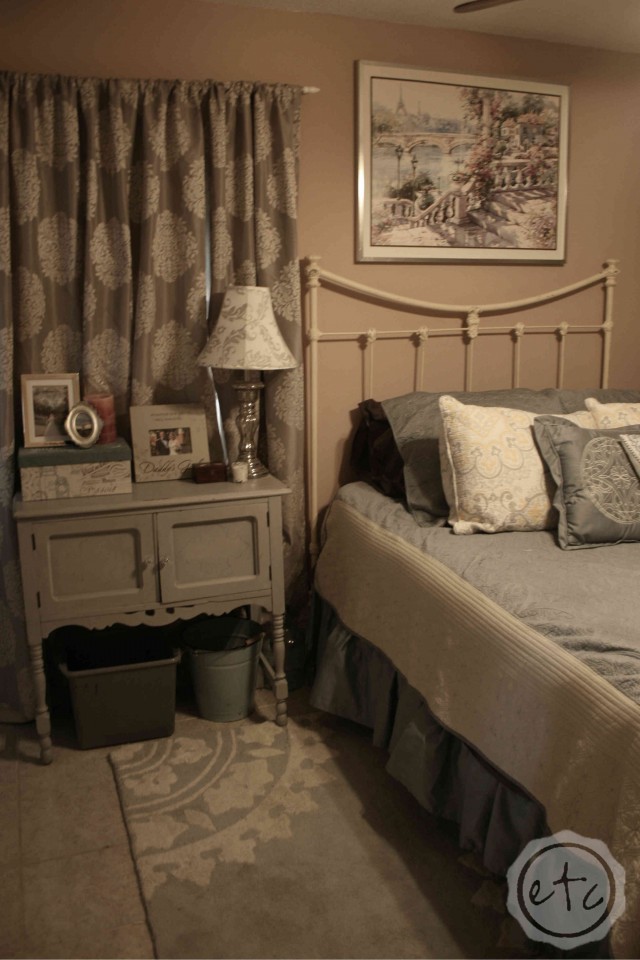
So tell me… could you tell my bed was converted?

How to Turn Your Antique Double Bed into a Queen | Happily Ever After, Etc.

P.S. Did you catch the sneak peek into our new bedroom at the new house?!

P.P.S. DIY Lamp Transformation… How to Color Transparent Glass and How to Accessorize your Nightstand

You made it through the entire post? That means you're one of my new favorite people! I'd love to be friends and see what else you would like to read about! Leave me a comment and then sign up for your very own FREE paint planner.... so that you can keep track of every single paint color with ease!
Welcome back! I'd love to be friends and see what else you would like to read about! Leave me a comment and then sign up for your very own FREE paint planner.... so that you can keep track of every single paint color with ease!

Show me some LOVE y'all:

  • Click to share on Facebook (Opens in new window) Facebook
  • Click to share on Pinterest (Opens in new window) Pinterest
  • Click to share on X (Opens in new window) X
  • Click to email a link to a friend (Opens in new window) Email

Related

«
»

Before and After, Furniture, My Home 62

Comments

  1. Joyce Brewer (@MommyTalkShow) says

    June 15, 2015 at 7:32 am

    I’m in awe since I’m not craft at all. You did an amazing job!

    Reply
    • Happily Ever After, Etc. says

      June 16, 2015 at 10:20 am

      Thank you Joyce! It was kind of a crazy project! We had already bought the bed so we had to make it work!

      Reply
  2. Sue Lau says

    June 15, 2015 at 4:31 pm

    I think this is a great idea for a bed frame someone may have had that a queen didn’t fit into a room, but then move to a larger place. The frame could be easily upsized and recycled without having to buy a larger one. A penny saved is a penny earned!

    Reply
    • Happily Ever After, Etc. says

      June 16, 2015 at 10:22 am

      It’s always nice to make what you have work instead of buy a new one! Thanks for stopping by Sue!

      Reply
  3. Jessica says

    June 16, 2015 at 9:24 am

    this is something I will definitely be pinning! I love vintage/antique beds so I know this will come in handy.

    Reply
    • Happily Ever After, Etc. says

      June 16, 2015 at 10:18 am

      Thanks for stopping by Jessica! I love my antique bed, hope you find a beautiful one!

      Reply
      • Hugh says

        November 23, 2021 at 9:29 pm

        Resent gifted two and considering the stretch to queen on one, Thanks for the info

        Reply
  4. Sabina says

    June 16, 2015 at 11:11 am

    It’s semi-unrelated to this, but next year at college I’ll have a full size bed but I only have a twin size comforter. I decided the twin would look strange with no fabric hanging off the side, so I searched for a new comforter. The one I love only comes in a queen–luckily too big is better than too small! Nice work with your conversion.

    Reply
    • Happily Ever After, Etc. says

      June 16, 2015 at 6:11 pm

      Thanks for stopping by Sabina! Kudos on having a full size bed in college! I was stuck in a twin all four years, haha! I totally agree, too much overhang is way better than not enough… in fact I like to buy my comforters big on purpose that way there’s plenty of overhang… otherwise my hubby and I fight over the covers all night!

      Reply
  5. Jessica says

    June 16, 2015 at 1:15 pm

    Beautiful bed frame, and such an informative post!

    Reply
    • Happily Ever After, Etc. says

      June 16, 2015 at 6:11 pm

      Thanks Jessica! I’m glad you like it!

      Reply
  6. Homestead Wishing says

    June 16, 2015 at 3:33 pm

    Cute idea, thank you!

    Reply
  7. Sam Gould says

    June 16, 2015 at 5:38 pm

    Wow, so clever. I love being able to restore and reuse things especially those items you love and have an attachment to. The bed looks great!

    Reply
    • Happily Ever After, Etc. says

      June 16, 2015 at 6:12 pm

      You’re so sweet! I think restoring is the best… the craftsmanship in the past was so much better! Thanks for stopping by!

      Reply
  8. Kelly says

    June 18, 2015 at 10:42 pm

    What a fantastic idea! My husband and I have been saying we need a much larger bed – this looks totally do-able. Visiting from the Pretty Pintastic Party!

    Reply
    • Happily Ever After, Etc. says

      June 19, 2015 at 10:28 am

      Thanks for stopping by Kelly! It’s definitely a great way to get a larger bed with the same frame!

      Reply
  9. Life as a Convert says

    June 19, 2015 at 3:59 pm

    This is a great idea. It allows one to keep a “too small” bed and make it work.

    Reply
    • Happily Ever After, Etc. says

      June 20, 2015 at 2:20 pm

      I agree! And I really think it looks just fine!

      Reply
  10. Mary says

    June 23, 2015 at 11:28 am

    Great idea. This is the way beds are made in Europe. Just a ton of wood pieces on the bottom. And if one breaks j ust replace it. Very clever idea!

    Reply
    • Happily Ever After, Etc. says

      June 23, 2015 at 8:49 pm

      I never thought of that… but you’re so right! Europeans have all the good ideas!

      Reply
  11. Ak Brown says

    June 28, 2015 at 1:17 pm

    GENIUS!!! is all I have to say lol great job!

    Reply
    • Happily Ever After, Etc. says

      June 30, 2015 at 6:07 pm

      Thanks Ak! I love how it turned out… and after almost 5 years it’s still holding strong!

      Reply
  12. Veronika Dalton says

    September 30, 2015 at 3:33 pm

    I really wish I had the skills to DIY this. I want the antique look for my bed frame, but I’ll have to buy one and just save our frame for my daughter to use someday. Cool post, though – that frame looks great!

    Reply
    • Happily Ever After, Etc. says

      June 30, 2018 at 11:25 pm

      It’s really more ordering than DIYing but I completely understand… as much as I love this bed it will probably move to a guest room or daughters room down the road when we upgrade to a king sized bed. In the meantime Queen is so much better than a Double!

      Reply
  13. KimberlyGayeta says

    November 27, 2015 at 3:42 am

    Excellent job Betsy! I think you did great! I love the idea but I’m kinda hesitant if I wanna try this, i am afraid I’ll just mess up. lol. Anyways, thank you for sharing! 🙂

    Reply
    • Happily Ever After, Etc. says

      November 27, 2015 at 6:57 am

      Thanks hon, you’re so sweet! It’s super easy… Not much to mess up! If you cut your two by fours wrong just get a new board!

      Reply
  14. Mimmy says

    January 1, 2016 at 1:30 am

    Memory foam is something that we have wanted to invest in for some time now, and we might be able to do so this Christmas. Some of the prices we have seen are ridiculous, but around 549, like what you have listed here for a queen, seem like a good deal. Thanks for listing more information about foam mattresses, as well as their prices.

    Reply
    • Happily Ever After, Etc. says

      June 30, 2018 at 11:32 pm

      It was a great deal… we just bought another one for my brother when he needed a new mattress. We loved that mattress for over 10 years and it was so comfy. We did get rid of it when we moved houses and upgraded to a Sleep Number Bed though which I am OBSESSED with. Good luck with your new mattress!

      Reply
  15. Dorothea says

    January 6, 2016 at 5:37 am

    “How to Turn Your Antique Double Bed into a Queen” is awesome. The antique bed is transformed into a new bed, even the mattress fitted well.

    Reply
    • Happily Ever After, Etc. says

      June 30, 2018 at 11:26 pm

      Thanks! I think it was a pretty easy solution to making the bed into a queen. The mattress looks fairly decent as well.

      Reply
  16. Bunk Bed Girl says

    January 25, 2016 at 9:53 pm

    I loove the antique bedframe. What a great project and the story!

    Reply
    • Happily Ever After, Etc. says

      January 26, 2016 at 6:34 pm

      Isn’t it a great bed?! You’re such a sweetheart! Thanks for stopping by!

      Reply
  17. Elsie Cole says

    February 2, 2016 at 2:31 pm

    This is such a cool and unique idea. It is amazing that you were able to turn this double bed into a queen sized bed! How did you go about figuring out how to do this? This is definitely something that I would want to try out in my own home one day!

    Reply
    • Happily Ever After, Etc. says

      February 2, 2016 at 11:05 pm

      My mom actually taught me how to do it… I have no idea how she learned it! Crazy the kinds of things parents teach us! 😉 Thanks for stopping by Elise! Good luck if you try this in the future!

      Reply
  18. Rony Sharma says

    December 27, 2016 at 1:14 am

    nice idea to share with us. thanks admin

    Reply
  19. Nan Whybark says

    December 31, 2016 at 4:27 pm

    I have a very similar frame, full size and very short. It’s been in the family over 50 years and I hate to part with it. Thanks for the ideas! My guests will appreciate sleeping in a larger bed for sure! BTW- how much did the welder charge you for lengthening the sides pieces?

    Reply
    • Happily Ever After, Etc. says

      January 2, 2017 at 9:03 pm

      Nan,

      Thanks so much for stopping by! It sounds like you have the perfect bed for this little trick… what a wonderful bit of family history! It was over 5 years ago that I had these rails lengthened so I don’t remember exactly but I feel like it was in the ballpark of $100. Good Luck!

      Reply
  20. Vikki says

    January 23, 2017 at 6:18 pm

    I called a metal fabricator here n town. They extended my rails for $40. Your wood setup is not supporting much and it putting strain on the rails. Cut the boards to fit into the grooves and add legs underneath. Then buy L brackets to extend out 3″ on each side. screw them on and viola your box bring is going nowhere

    Reply
    • Happily Ever After, Etc. says

      January 23, 2017 at 6:23 pm

      Thanks for the opinion Vikki! My wood setup has been working wonderfully for almost 10 years now without any strain on the rails so I love it. I can see how additional legs would add support but no more than an extra leg would provide support to a double sized bed using the rails as intended. I love that you took the time to read the entire post though, I appreciate your comments! Have a great night hon!

      Reply
  21. Bonnie Bryce says

    May 24, 2017 at 11:40 pm

    Awesome j0b!!! Thank you so much for the detailed instructions. I just bought an Antique Mahogany 4 Poster bed and wanted to put my Queen mattress on it. Yeah, now I can. Thank you. Great job!

    Reply
  22. Debbie says

    June 27, 2017 at 10:43 pm

    Thanks for your post, very clever and not too hard for a non-handy person! Did you install a box spring and mattress, or leave the box spring off altogether?

    Reply
    • Happily Ever After, Etc. says

      June 28, 2017 at 6:37 am

      We used a low profile box spring so it’s pretty trim! Thanks for stopping by Debbie!

      Reply
  23. Lisa says

    June 30, 2018 at 8:13 am

    Great job. I would like to see a pcture that includes both sides of the bed. This would give me a better idea of how much wider the mattress appears on the frame. I’m considering converting a waterfall wood bed and am concerned about the finished esthetic.

    Reply
    • Happily Ever After, Etc. says

      June 30, 2018 at 11:22 pm

      Hi Lisa, Thanks so much for your comment. I actually did a post last year where you can see both sides of the bed with the mattress and linen on the bed. Let me know what you think! Good luck with your bed!

      Reply
  24. Katherine McGregor says

    July 31, 2018 at 5:42 pm

    Hi, This is great BUT I have wood rails and would love to make the full fit a queen. Any ideas?

    Reply
    • Happily Ever After, Etc. says

      August 3, 2018 at 12:37 am

      If you have wood rails the same concept should work you will just want to build the new rails on top of the wooden rails you already have. Good luck!

      Reply
  25. Laura Himmer says

    August 1, 2018 at 5:03 am

    Great, Here you have mentioned the easiest way to turn your antique double bed into a queen that really help people like me who can not afford a new queen size bed. Keep sharing this kind of informative idea with us.

    Reply
  26. Mary Parmer says

    January 6, 2019 at 8:08 pm

    This os such an interesting idea! Does the mattress slide along without any edges on the wood?

    Reply
    • Happily Ever After, Etc. says

      January 9, 2019 at 10:50 pm

      Not anymore than a traditional bed! I had no problems with it sliding for years when using it by myself… once we added the hubby it did slide a little over the course of a month since he plops on everything… but not on a daily basis.

      Reply

Trackbacks

  1. Pretty Pintastic Party #59 - House of Fauci's says:
    June 18, 2015 at 8:03 pm

    […] the fun of fixing up their first house and all the projects that come along. She recently posted How to Turn Your Double Bed into a Queen. Show Betsy some love by following on Pinterest, Facebook, and/or Instagram. Now on to the […]

    Reply
  2. Pretty Pintastic Party #59 - The TipToe Fairy says:
    June 19, 2015 at 1:01 am

    […] the fun of fixing up their first house and all the projects that come along. She recently posted How to Turn Your Double Bed into a Queen. Show Betsy some love by following on Pinterest, Facebook, and/or Instagram. Now on to the […]

    Reply
  3. Pretty Pintastic Party #59 - Coffee With Us 3 says:
    June 19, 2015 at 1:02 am

    […] the fun of fixing up their first house and all the projects that come along. She recently posted How to Turn Your Double Bed into a Queen. Show Betsy some love by following on Pinterest, Facebook, and/or Instagram. Now on to the […]

    Reply
  4. The Pretty Pintastic Party #59 - Annie's Noms says:
    June 19, 2015 at 1:02 am

    […] the fun of fixing up their first house and all the projects that come along. She recently posted How to Turn Your Double Bed into a Queen. Show Betsy some love by following on Pinterest, Facebook, and/or Instagram. Now on to the […]

    Reply
  5. The Pretty Pintastic Party #58 | The Take Action WAHM says:
    June 19, 2015 at 1:02 am

    […] Every week we will have a fabulous co-host! Our co-host this week is Betsy from Happily Ever After Etc.  Betsy blogs about home decor and DIY… She’s a newlywed gal and blogs about the fun of fixing up their first house and all the projects that come along. She recently posted How to Turn Your Double Bed into a Queen. […]

    Reply
  6. Pretty Pintastic Party - Gloriously Made says:
    June 19, 2015 at 1:04 am

    […] the fun of fixing up their first house and all the projects that come along. She recently posted How to Turn Your Double Bed into a Queen. Show Betsy some love by following on Pinterest, Facebook, and/or Instagram. Now on to the […]

    Reply
  7. Pretty Pintastic Party 06/19 - An Alli Event says:
    June 19, 2015 at 1:06 am

    […] the fun of fixing up their first house and all the projects that come along. She recently posted How to Turn Your Double Bed into a Queen. Show Betsy some love by following on Pinterest, Facebook, and/or Instagram. Now on to the […]

    Reply
  8. The Pretty Pintastic Party #59 | The Take Action WAHM says:
    June 19, 2015 at 1:15 am

    […] Every week we will have a fabulous co-host! Our co-host this week is Betsy from Happily Ever After Etc.  Betsy blogs about home decor and DIY… She’s a newlywed gal and blogs about the fun of fixing up their first house and all the projects that come along. She recently posted How to Turn Your Double Bed into a Queen. […]

    Reply
  9. Pretty Pintastic Party says:
    June 19, 2015 at 5:27 am

    […] the fun of fixing up their first house and all the projects that come along. She recently posted How to Turn Your Double Bed into a Queen. Show Betsy some love by following on Pinterest, Facebook, and/or Instagram. Now on to the […]

    Reply
  10. The Pretty Pintastic Party - Happily Ever After, Etc. says:
    June 24, 2015 at 7:40 pm

    […] How to Turn Your Antique Double Bed into a Queen […]

    Reply
  11. June Round-Up! - Happily Ever After, Etc. says:
    September 14, 2015 at 3:50 pm

    […] How to Make Your Antique Double Bed Into a Queen – I am soooo excited! I have been waiting to write this post ever since I read Miss Mustard Seed’s post about her new guest bed! My mom bought our double size antique cast iron bed frame for me straight out of college. So that means I have been sleeping on my antique double bed for almost 5 years.  We took it home and set it up in our guest room… read more! […]

    Reply
  12. Pretty Pintastic Party - Linkup 59 - Suburban Wife, City Life says:
    August 30, 2016 at 8:56 am

    […] the fun of fixing up their first house and all the projects that come along. She recently posted How to Turn Your Double Bed into a Queen. Show Betsy some love by following on Pinterest, Facebook, and/or Instagram. Now on to the […]

    Reply
  13. Pretty Pintastic Pinterest Party June 19, 2015 says:
    June 8, 2017 at 6:44 am

    […] the fun of fixing up their first house and all the projects that come along. She recently posted How to Turn Your Double Bed into a Queen. Show Betsy some love by following on Pinterest, Facebook, and/or Instagram. Now on to the […]

    Reply

Leave a Reply Cancel reply

Your email address will not be published. Required fields are marked *

sidebar betsy I'm Betsy, Home Decor Enthusiast, Yorkie Mama, Crafter, Blogger, Picky Eater, Chief Mess Maker, Antique Hoarder and Graphic Designer. You can generally find me working on (attacking with a paintbrush) the 3 bed, 2 bath home we are currently renting! Our home might not be perfect but it is ours & if you hang out long enough you'll see that what we lack in know-how we make up for in passion!
Shop My Craft Room

Shop My Home

Featured Articles

15 Fabulous Ideas to Organize your Laundry Room
25 FREE Printables For Your Home!
What to do with EXTRA Paint with Happily Ever After Etc
10 Ways to Make Your Bed EXTRA Comfy with Happily Ever After Etc.
Ready to Pick your Perfect Paint Color? We'll help you with our 6 Day FREE E-Course

Hey y’all,

Profile

I'm Betsy, Home Decor Enthusiast, Yorkie Mama, Picky Eater, Chief Mess Maker, & Graphic Designer...

A Little Note!

Many of the links on Happily Ever After, Etc. are affiliate links. If you purchase a product after clicking an affiliate link, I receive a small percentage of the sale for referring you, at zero cost to you! How awesome is that? Purchasing through affiliate links is an easy, painless way to help out your favorite bloggers. Thank you so much for your continued love and support! Read the full disclosure here!

Instagram

Follow on Instagram

Copyright © 2026 · Darling theme by Restored 316

Copyright © 2026 · Darling Theme on Genesis Framework · WordPress · Log in · Privacy Policy