• House Tour
    • Reveals
  • About
    • Smith Life
    • Disclosure and Privacy Policy
      • Terms and Conditions
      • Store Affiliates
  • Contact Me
    • Want a Button?
  • Shop
    • Floral Printable Planners
    • Paint eBooks and Packages
    • Wedding Binders & Extra Printables!
    • Planner Bundles
    • Planner Accessories
    • Home Decor Printables!
    • Cart
    • Bloglovin
    • Facebook
    • Instagram
    • Pinterest
    • Twitter
    • YouTube

Happily Ever After, Etc.

Creating Our Own Fairytale

  • Happily Ever After, Etc.
  • Home
  • Home Decor
    • My Home
    • Paint
    • Before and After
    • Tablescapes
    • Mood Boards
    • Furniture
  • DIY & Crafts
    • New to Cricut – Start Here
    • Cricut Projects
    • Resin
    • Scrapbooking
  • Organization & Planning
    • Cricut
    • Organization
    • Planner
  • Wedding
    • Cricut Wedding Projects
    • Free Wedding Binder
    • Bride Bag- The Ultimate Wedding Planner

How to Repair Damaged Veneer Furniture

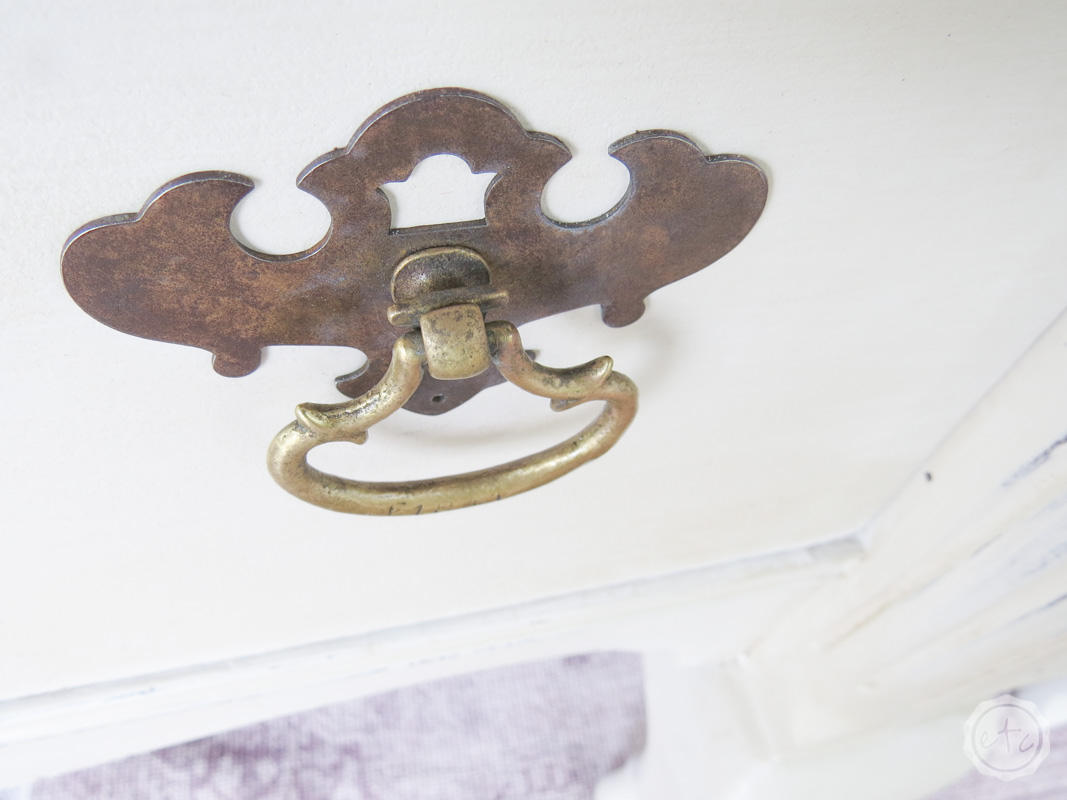
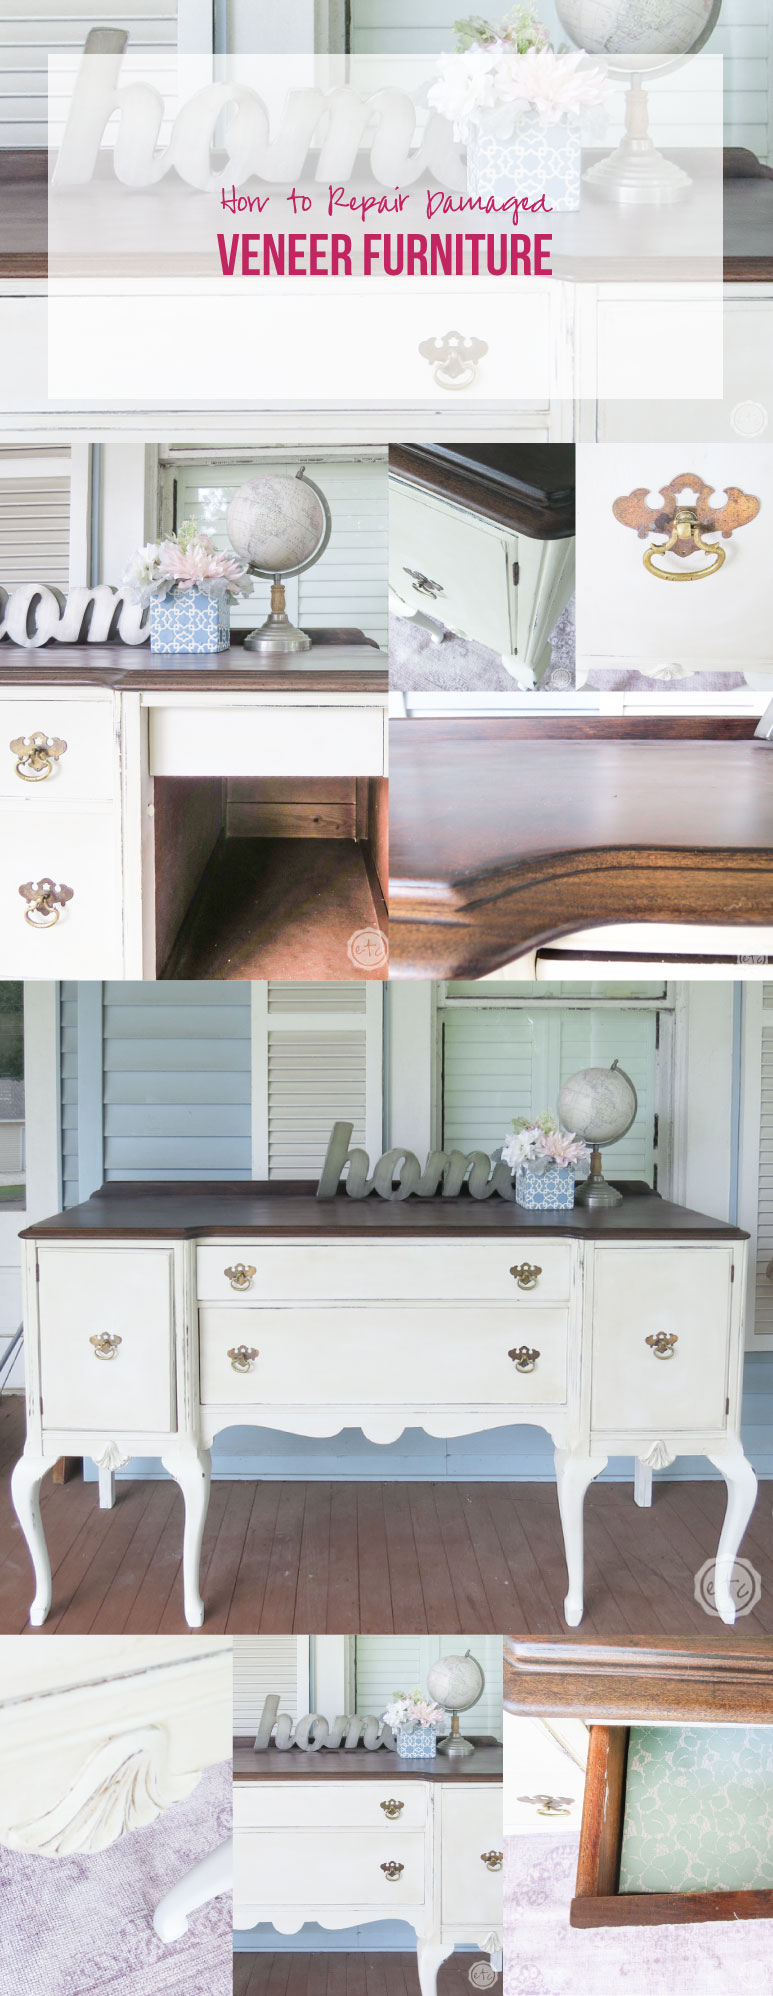
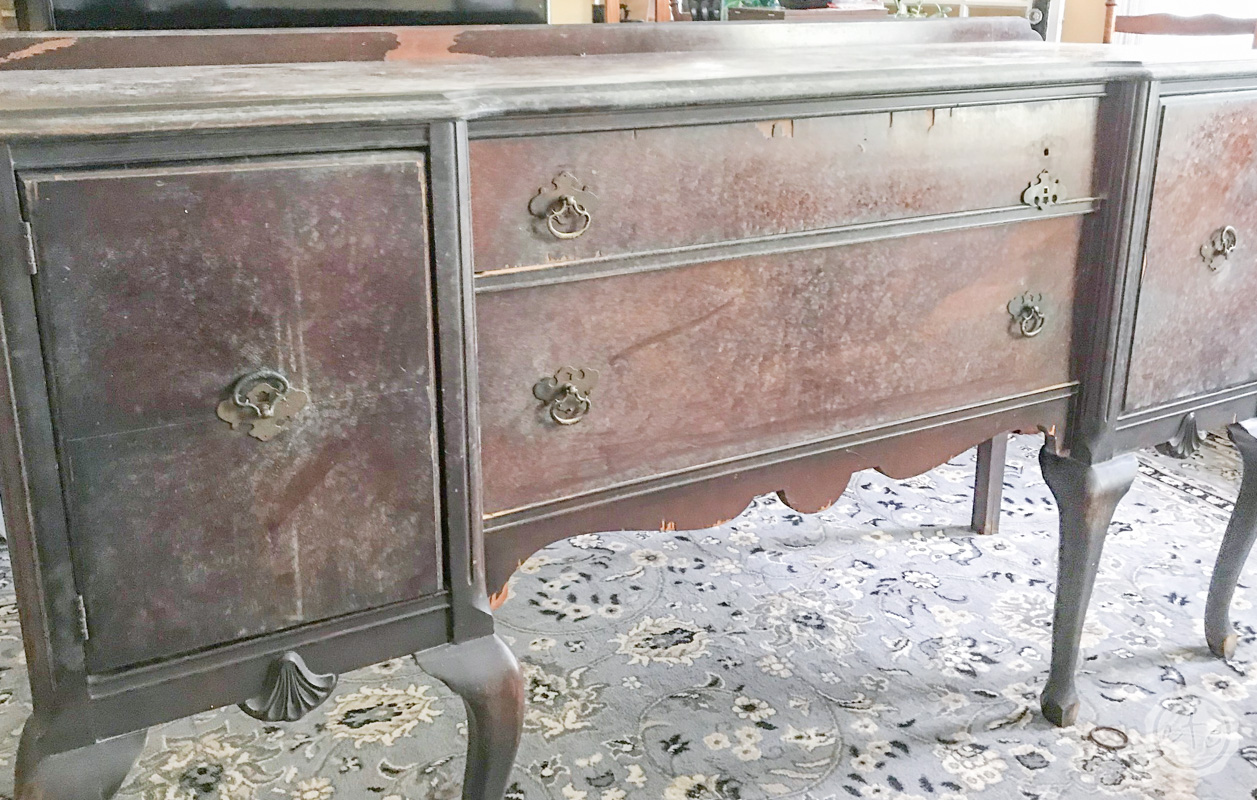
Okay y’all sometimes you have a beautiful piece of furniture from the beginning… and sometimes you have to work for it. This was definitely one of those “have to work for it” kind of times. My Mom actually picked up this buffet and then asked “you know how to repair veneer right?!”

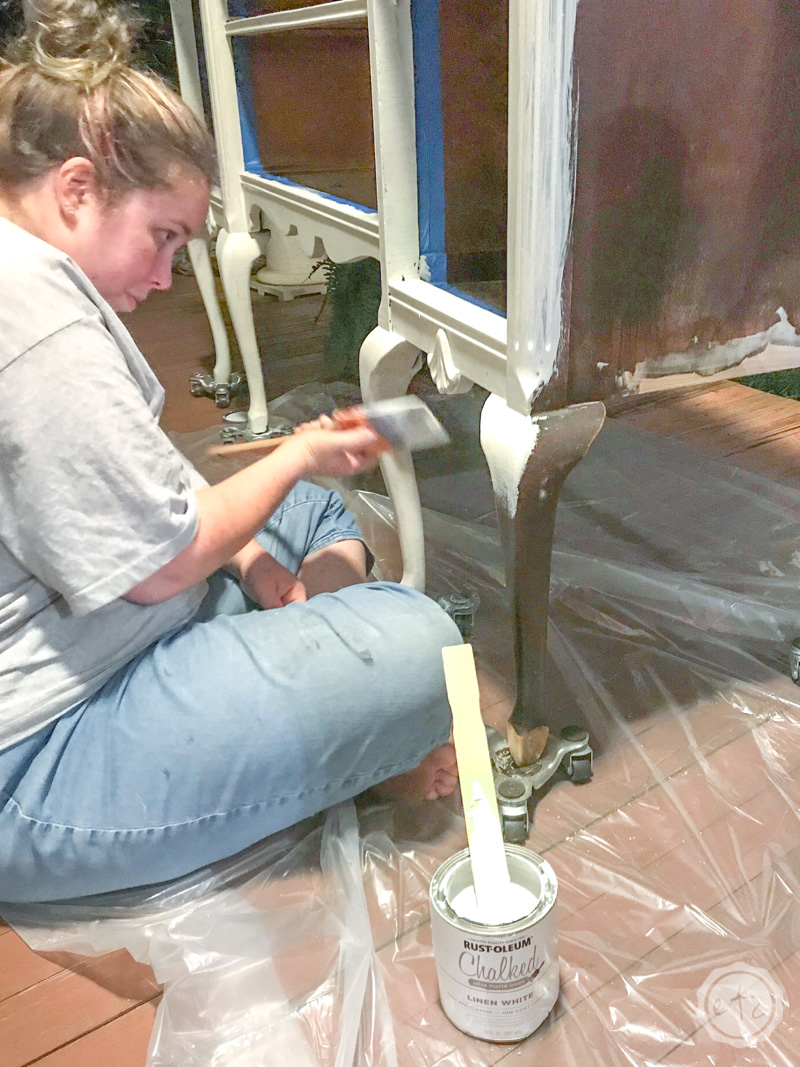
Luckily I do know how to repair veneer… unluckily this piece took several days to fix and Mom’s not quite as handy with the camera as I would like… so you’ll have to hang in there through some of these photos.

There’s a realllllly good one of me painting the fixed veneer late late at night that you just won’t want to miss!

We wouldn’t want to skip ahead though… let’s start at the beginning.

Step 1: Start by Cleaning!

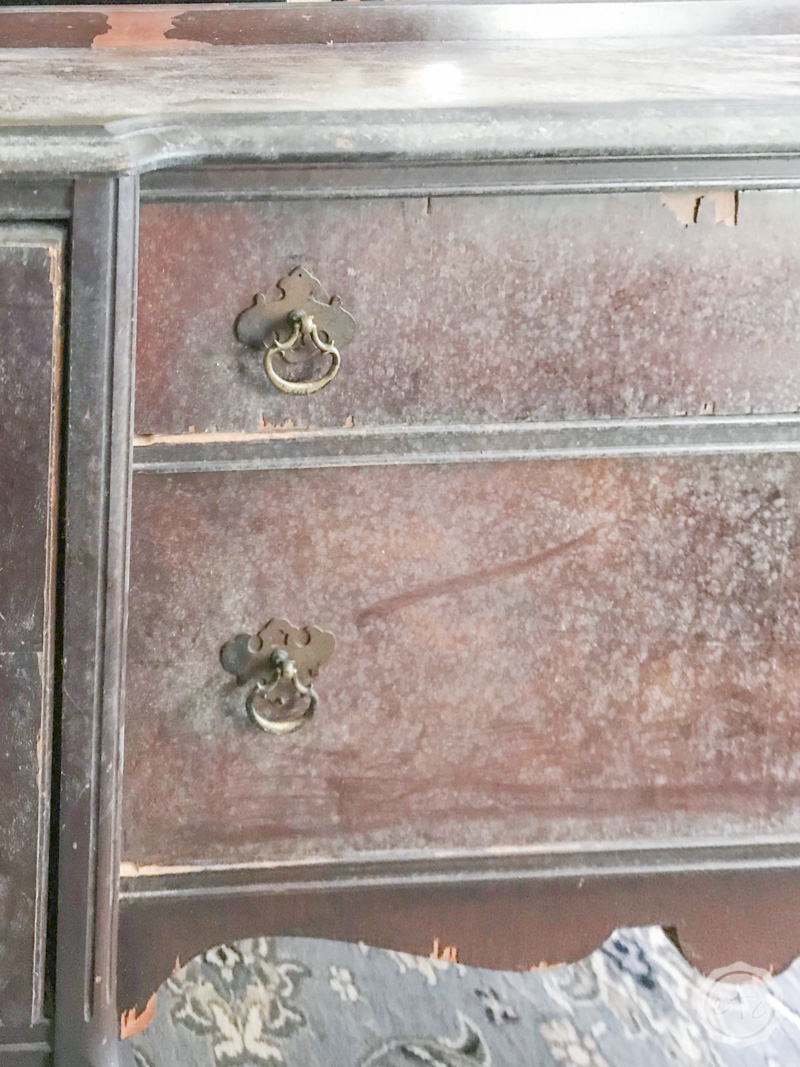
This piece was just a little moldy after sitting outside for quite a while so the very first step was to clean the entire piece. Wipe it down with soap and water before wiping this baby down with a lint free rag.

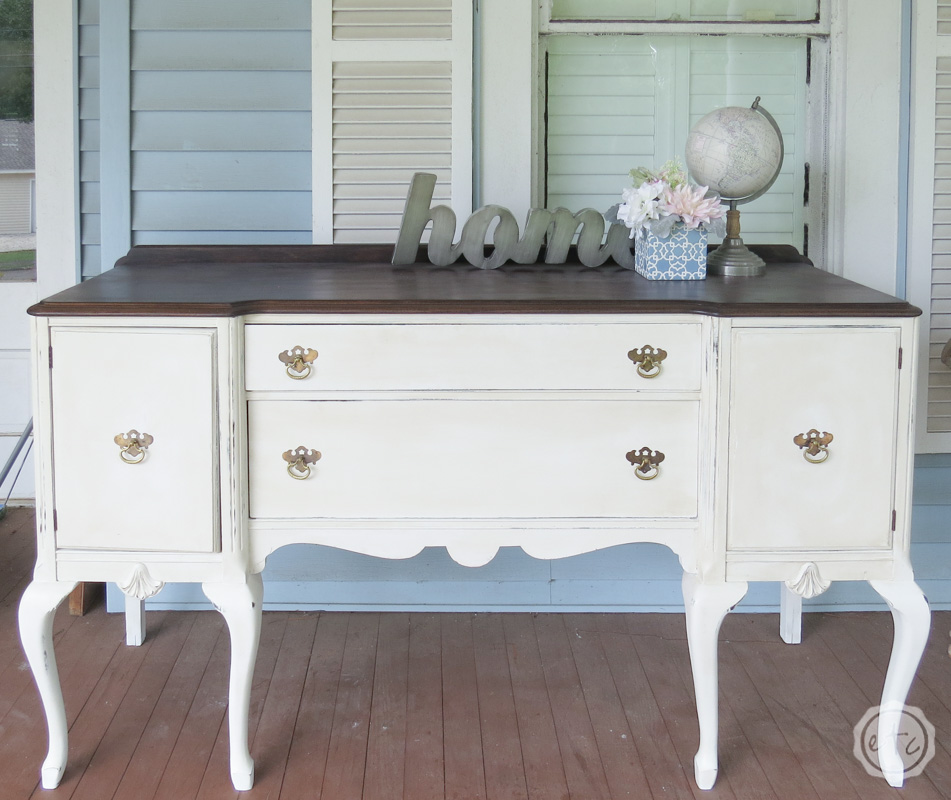
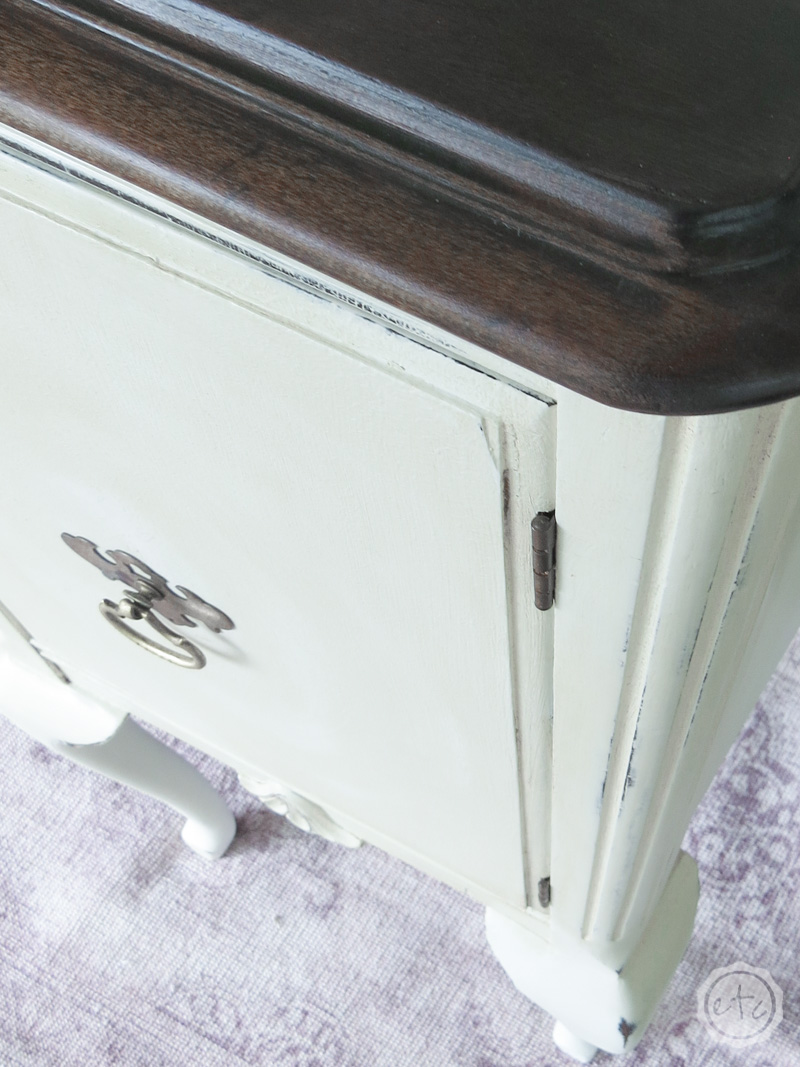
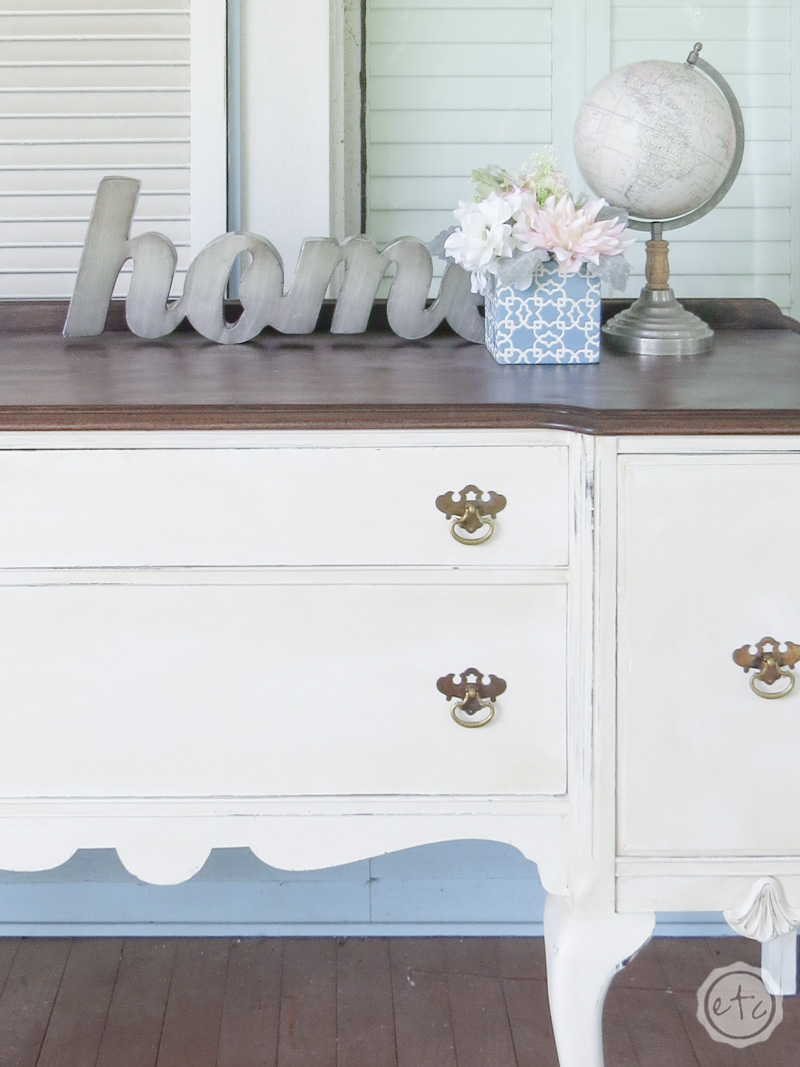
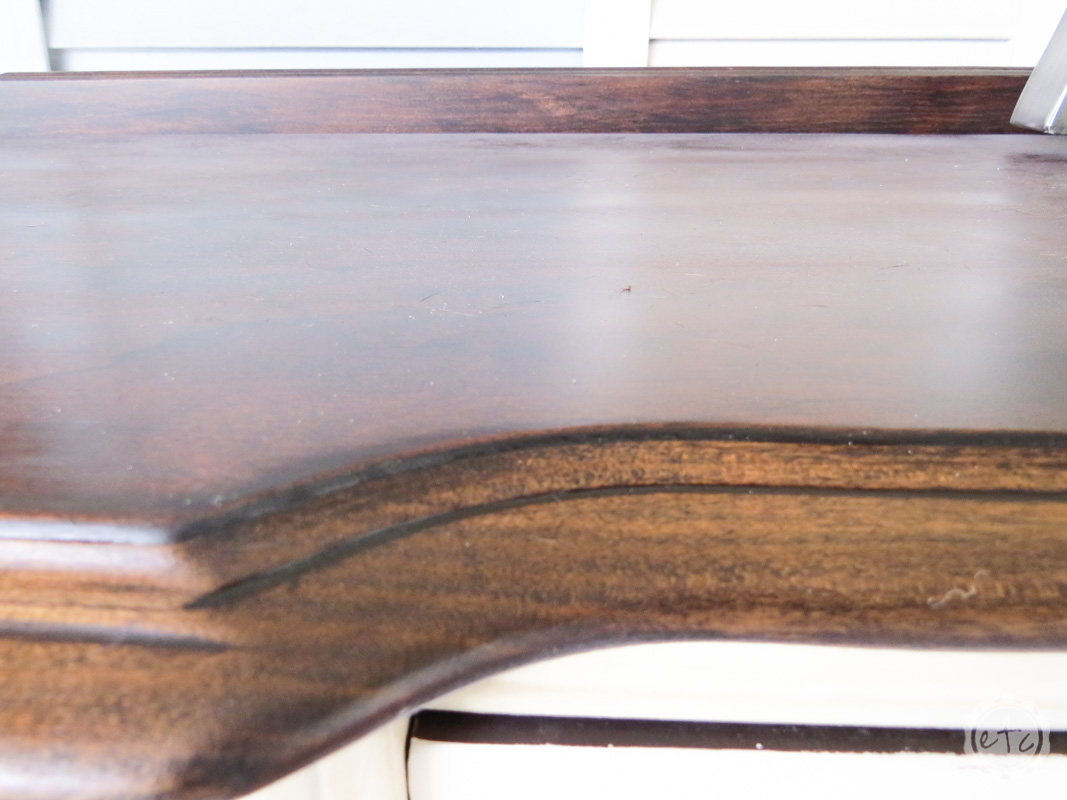
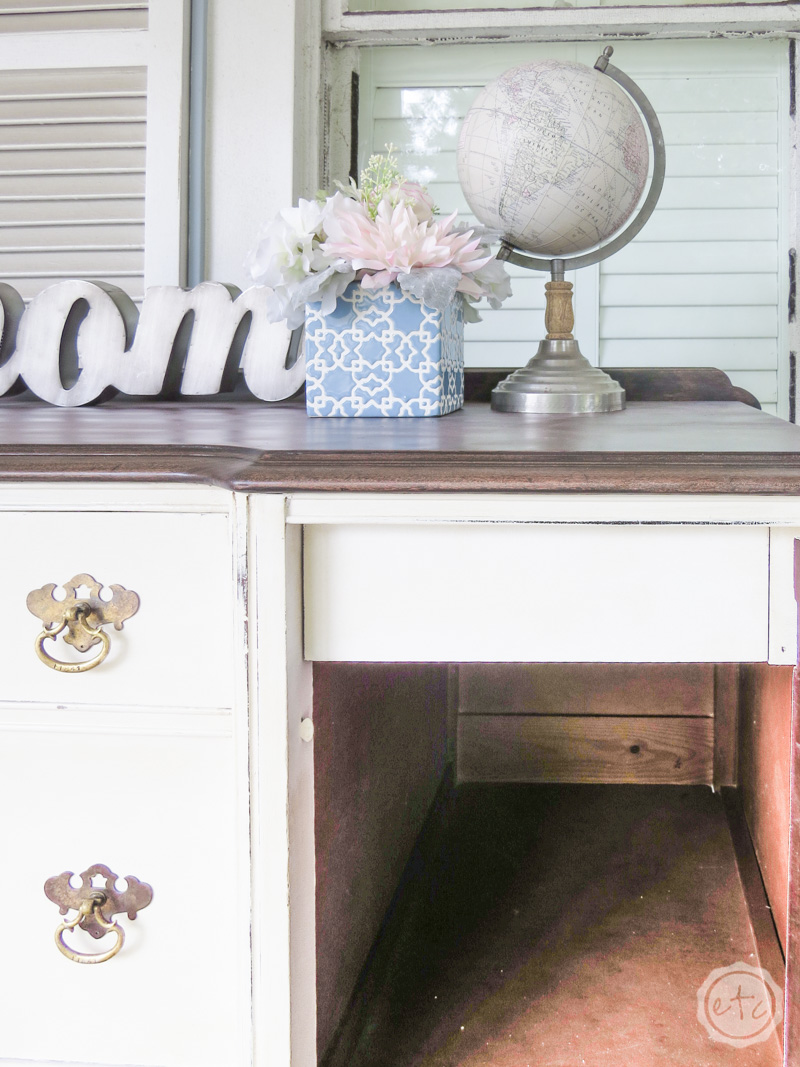
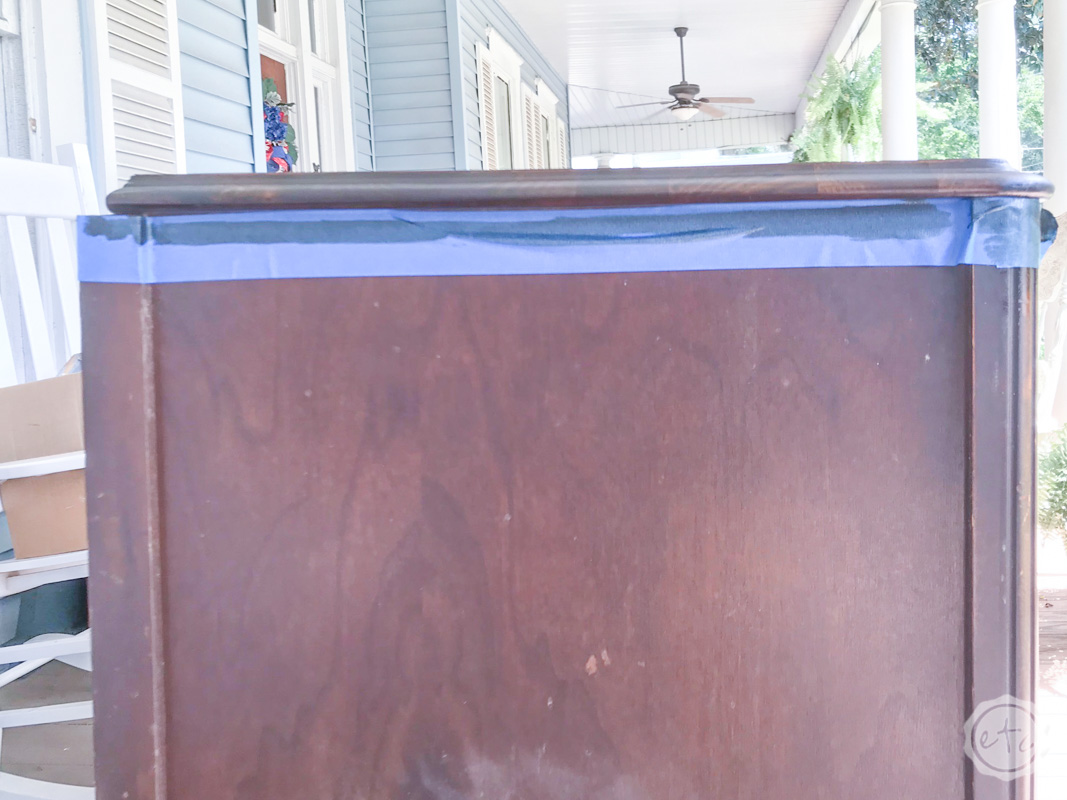
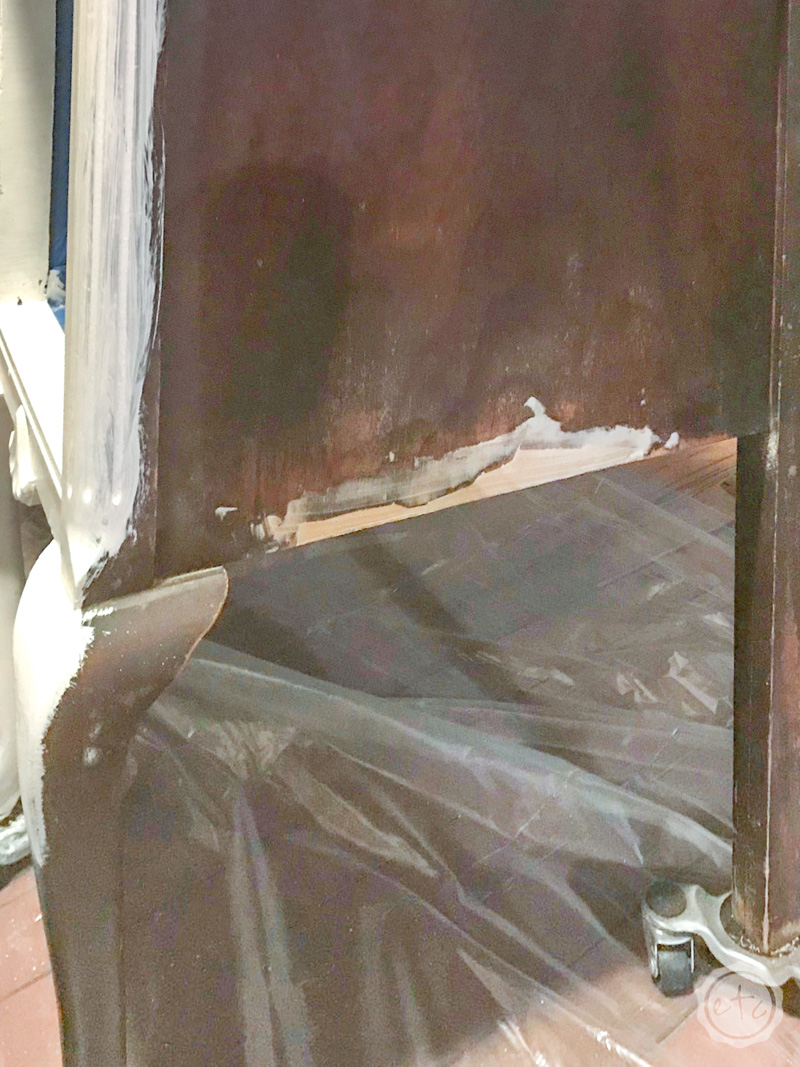
Since the bottom has quite a bit of broken veneer we decided to stain the top and paint the bottom. A neutral white chalk paint with a bit of good old fashioned distressing (I stuck with my absolute favorite: linen white by Rust-Oleum). It should go beautifully with a dark walnut stained top.

Since the veneer would be the hardest part to fix we started with the top.

Sanding the uneven finish down so that we could re-stain the surface.

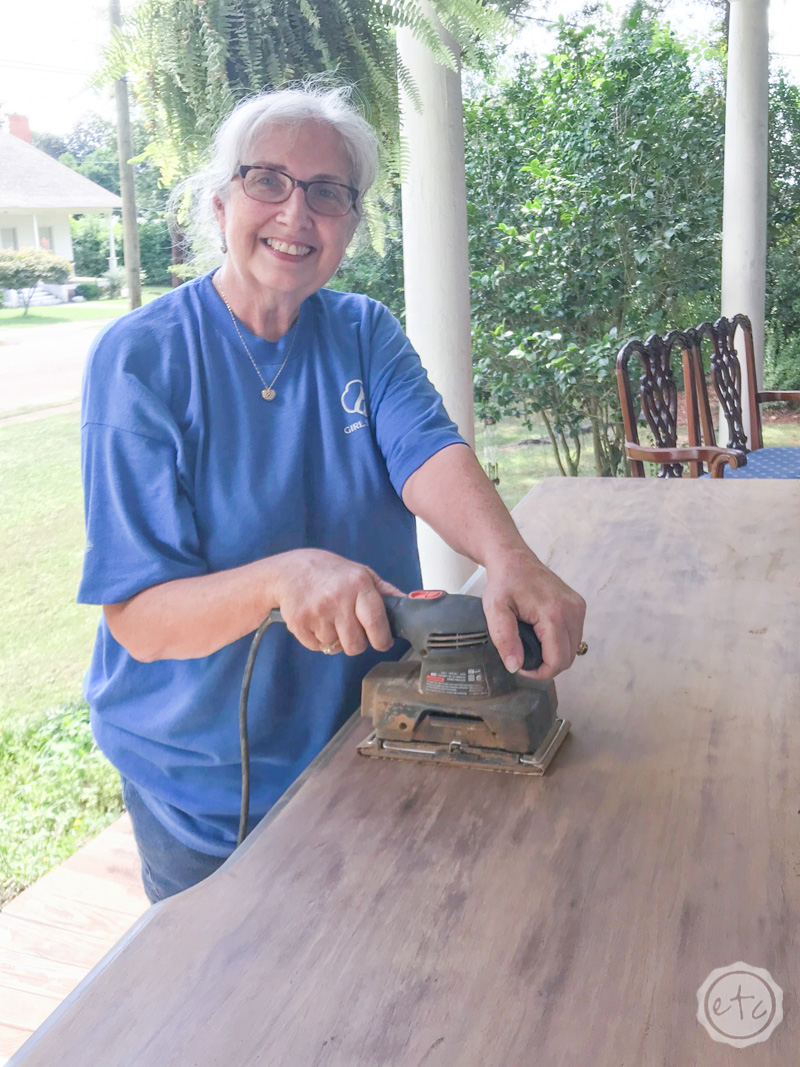
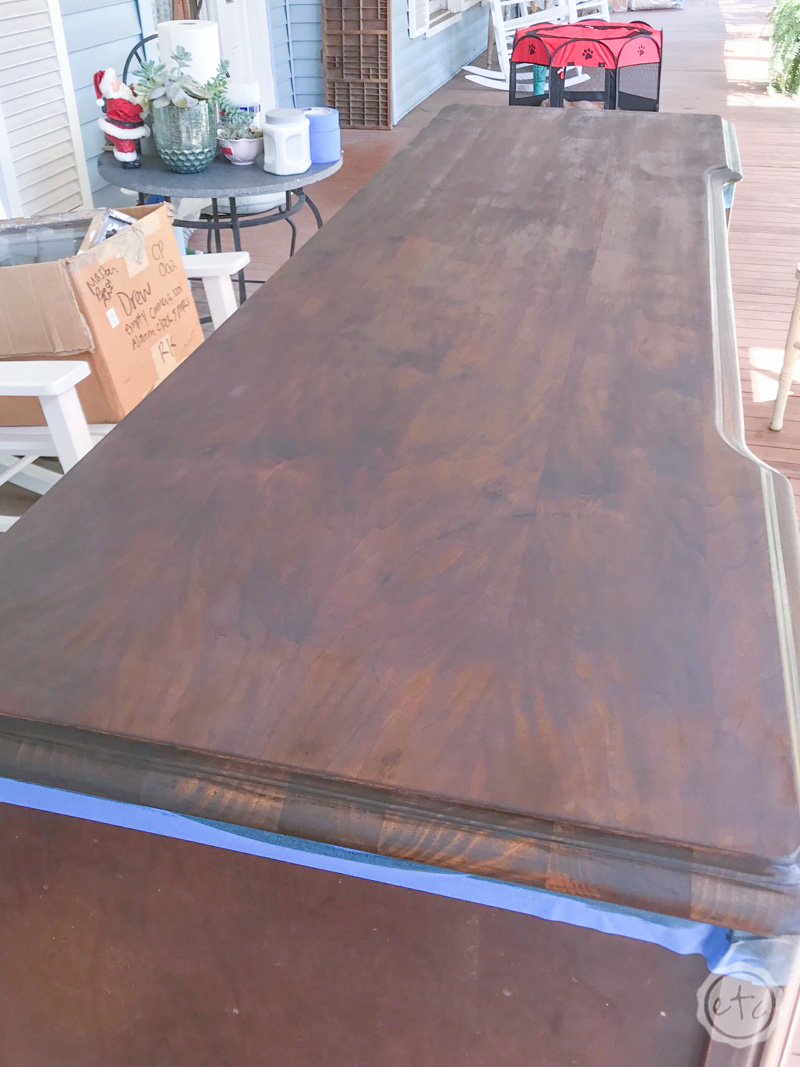
Step 2: Time to Sand and Stain the Surface

Since we’re re-staining the surface with a similar color to the original stain (in this case Minwax Dark Walnut) we don’t have to sand the surface allllllll the way down to the bare bones but simply sand the sealer off and the surface smooth. It was finished with different sealers that needed to be removed before it could be re-stained… so once the sealer is removed and the little nooks and cranny’s are clear we’re good to re-stain this baby.

Of course, if we were trying to re-stain the top with a lighter color we would have to keep going with the sanding but in this case the colors are so close they’ll bend together.

Score!

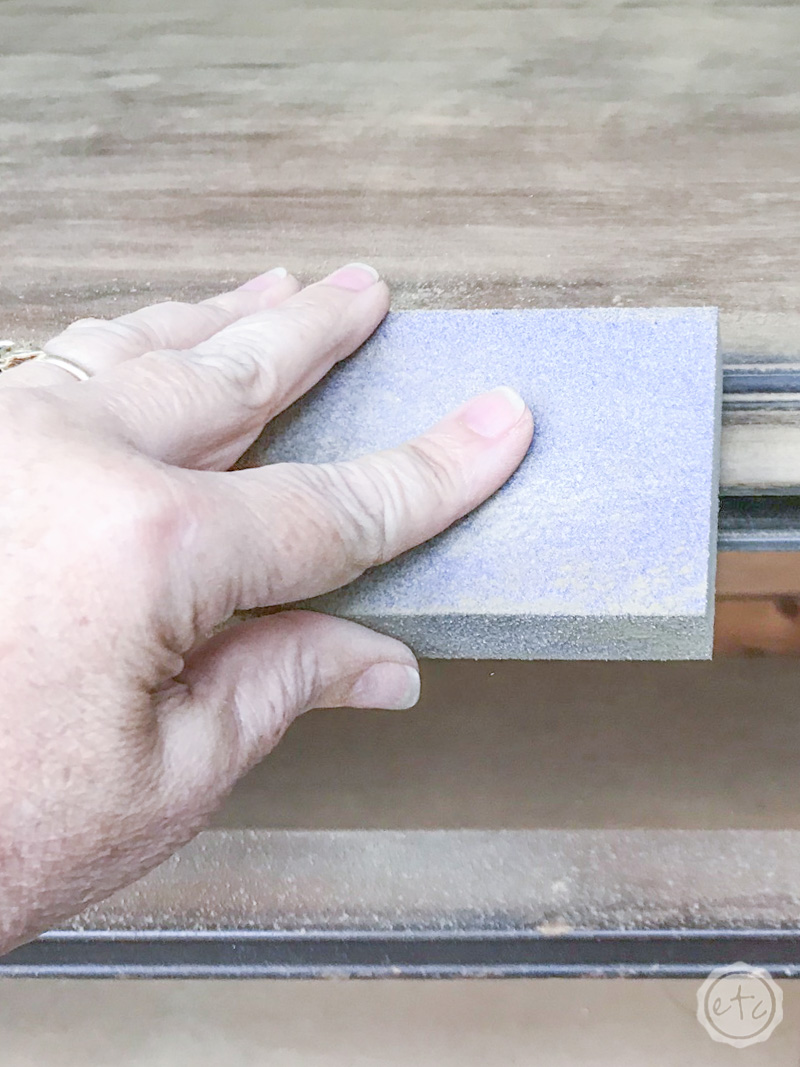
Now that our surface is free of sealer we can go ahead and re-stain the top. Once it’s stained it’s easy enough to seal the entire surface! Easy peezy.

Light layers of sealer y’all… layer of sealer, sand, layer of sealer, sand, layer of sealer. Repeat until the surface is smooth.

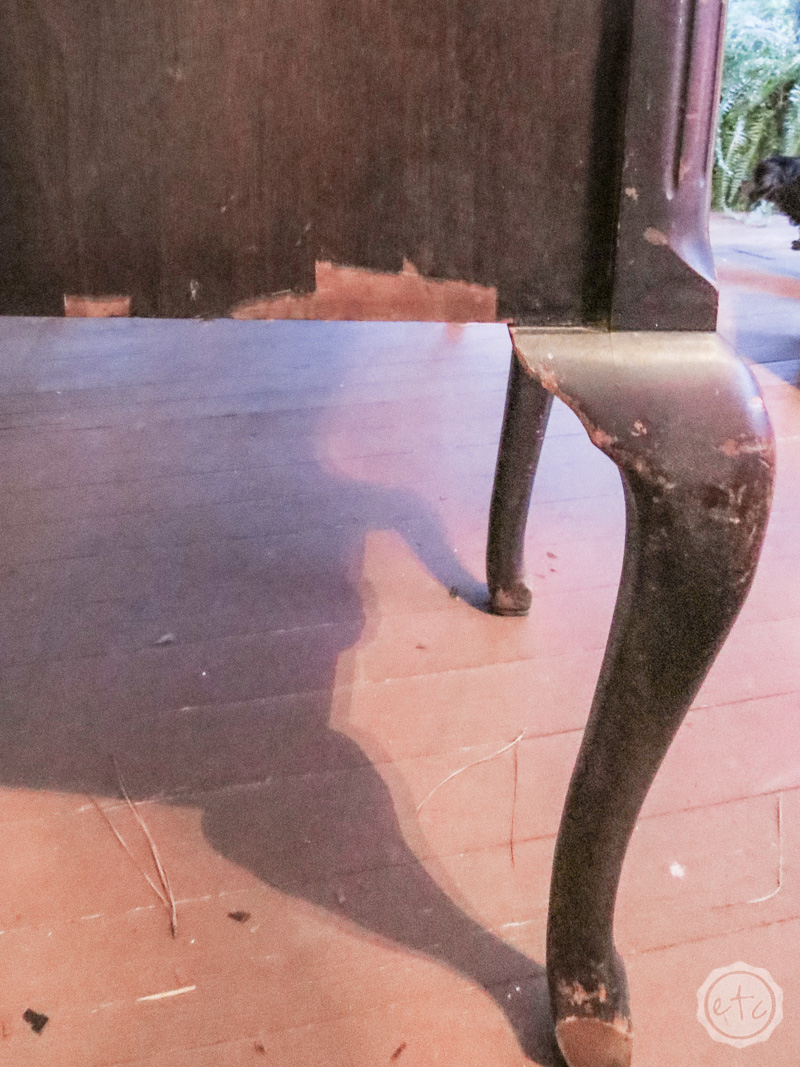
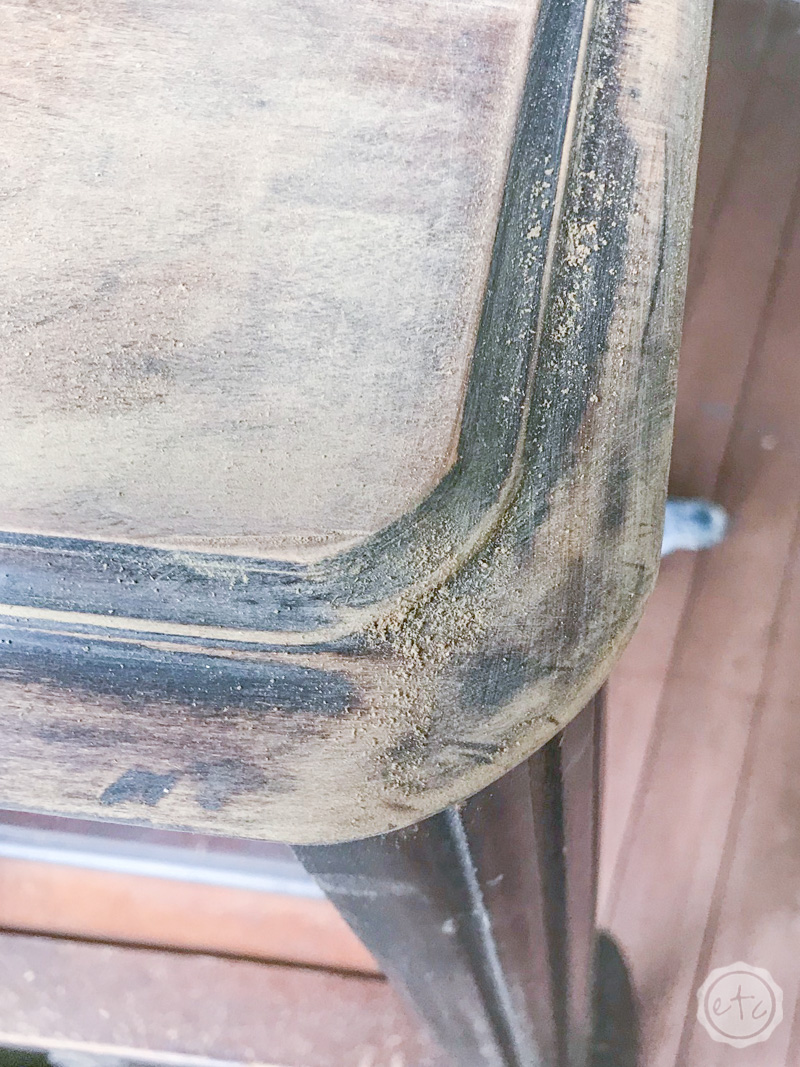
Step 3: Time to Fix the Veneer!

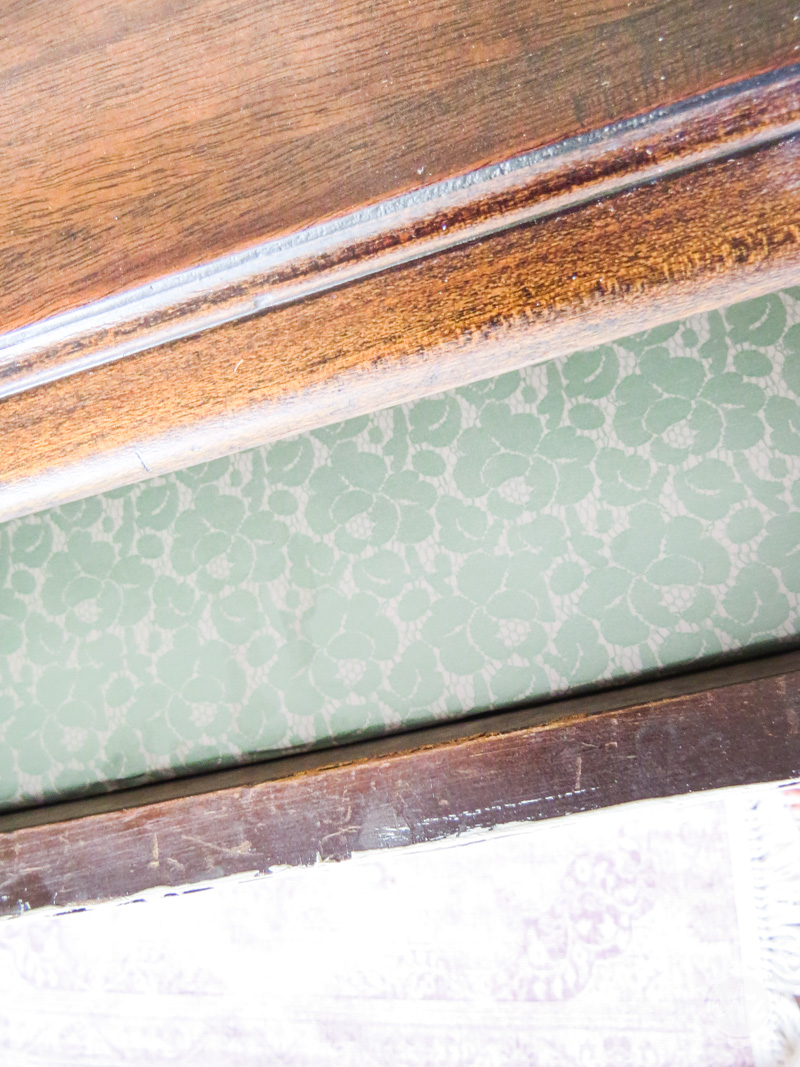
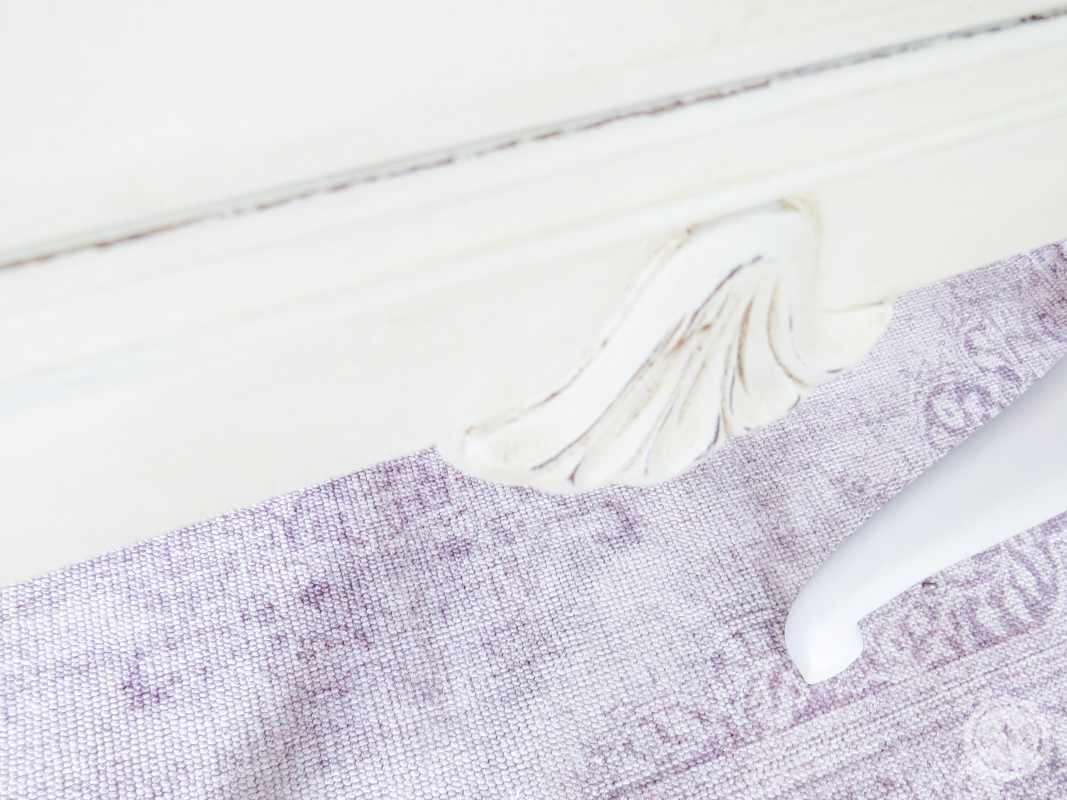
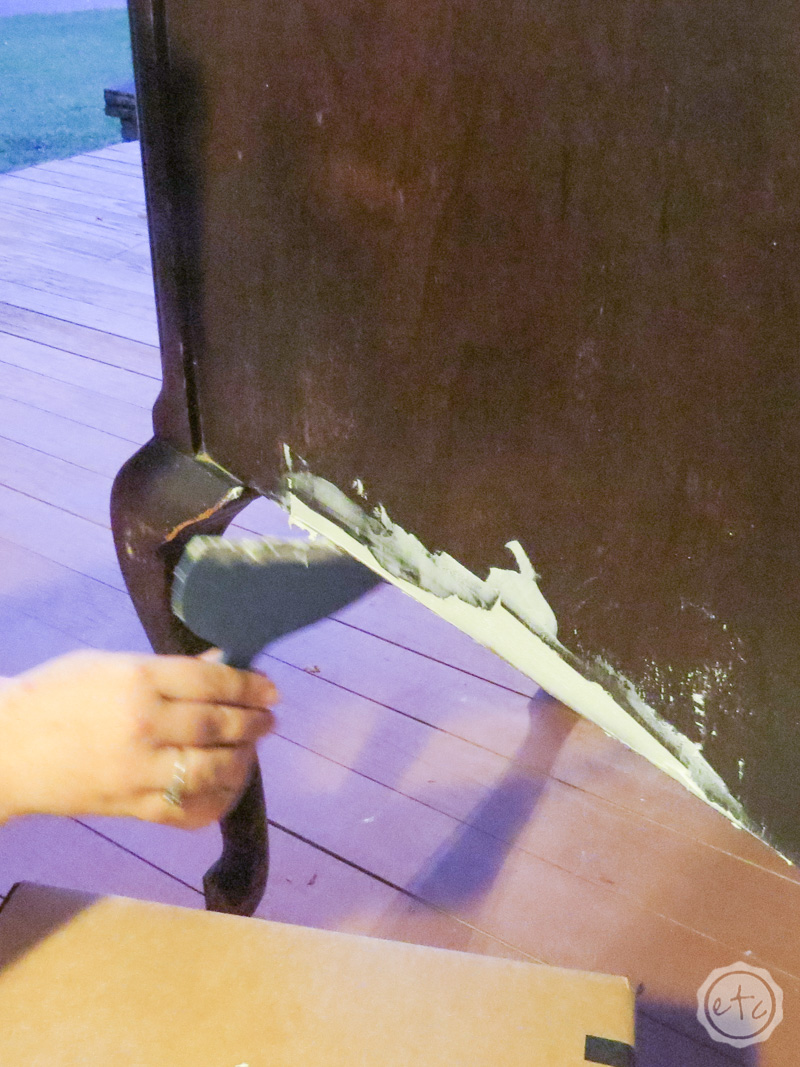
Just take a look at allllll that chipped veneer. Icky icky. Since the veneer is already chipping off we have two options for the edges… finish taking it off or glue it back on. Large pieces that can be glued and clamped are fine but anything smaller and jagged that’s still loose can come off.

Just be sure not to make a bigger mess… if you’re not able to take the peeling veneer off without it flaking even more use an exacto knife to remove the bigger chipping pieces.

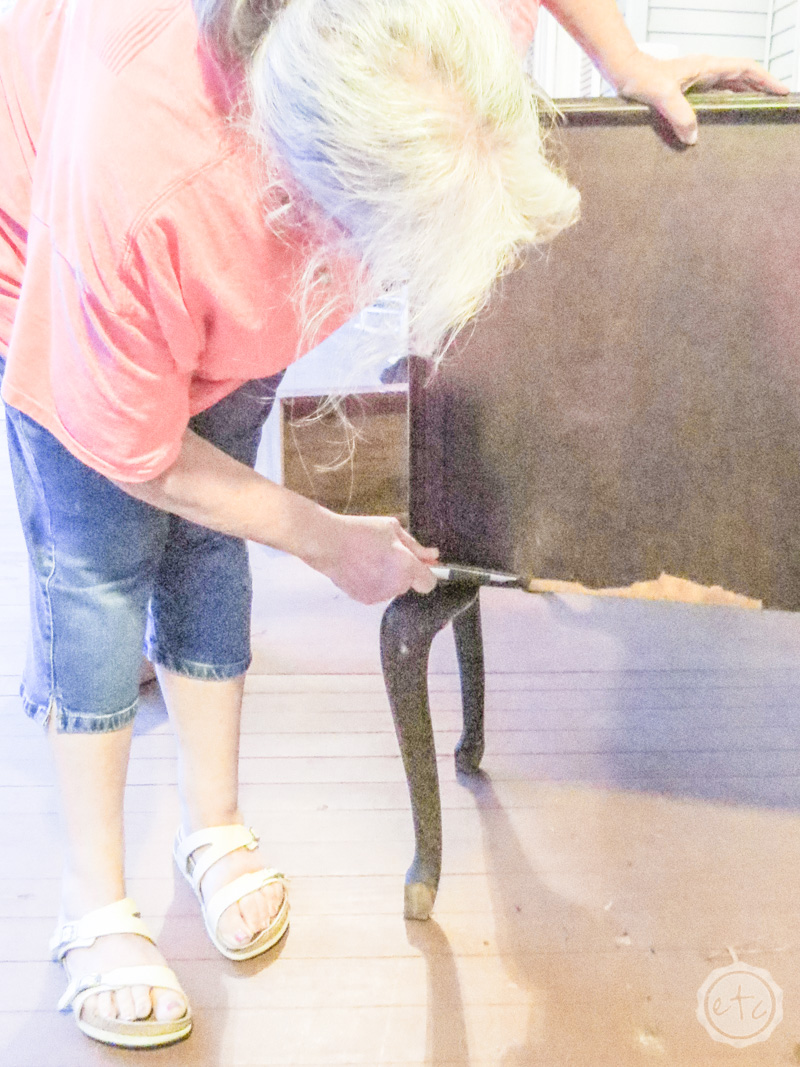
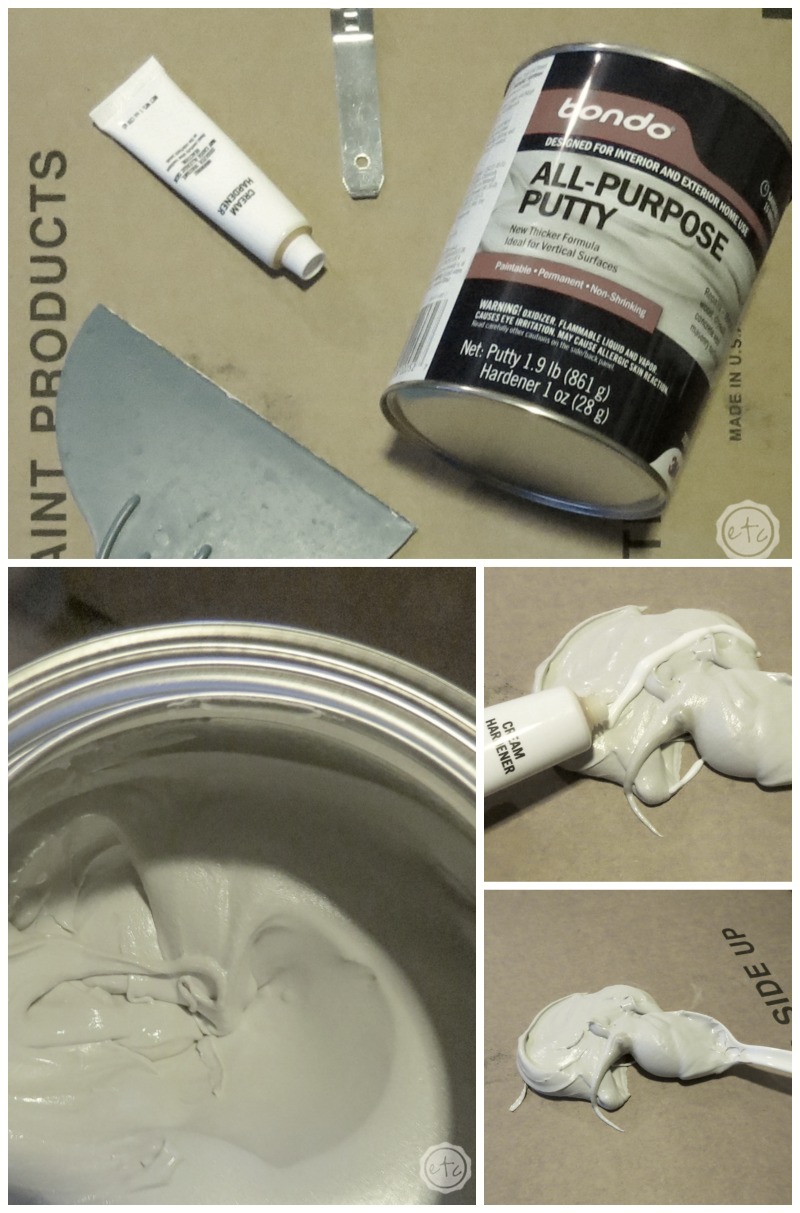
Once the veneer is done being… chippy… it’s time to fill in the pieces. Bondo is the perfect solution… it’s like wood putty except it dries hard.

Like concrete hard.

Luckily it’s easy to use but un-luckily it dries reallllllllyyyy fast so you can’t move slow. It’s a two part formula so only mix small bits so that you don’t have an entire brick worth of dried bondo before the story is over.

I’ve put together a little Bondo mixing collage for you… basically the steps are simple. A spoon full of bondo on a flat surface with a spoon you don’t mind throwing away… preferably a disposable one. Then take your tube of part B and add just a bit to your Bondo (I simply draw a line across the spoonful… it’s not an exact science but luckily it doesn’t have to be).

Now mix it all together and get ready to move.

You’ll apply the Bondo to your piece just like it was a nail hole in a wall you’re trying to spackle. Add a blob of Bondo to the chippy veneer area and then use your putty knife to smooth it out. Remember that at the end of the day you’ll be able to sand the surface smooth once the Bondo dries so more is better than less but at the end of the day you’re creating the illusion that the sideboard is whole so you’ll want the side to be even.

Bondo dries in less than 10 minutes so mix small amounts if you have a large piece to work on. Once the Bondo is applied the package says you can sand it in about 15 minutes but I’m always an overachiever so I like to wait about an hour.

Just in case.

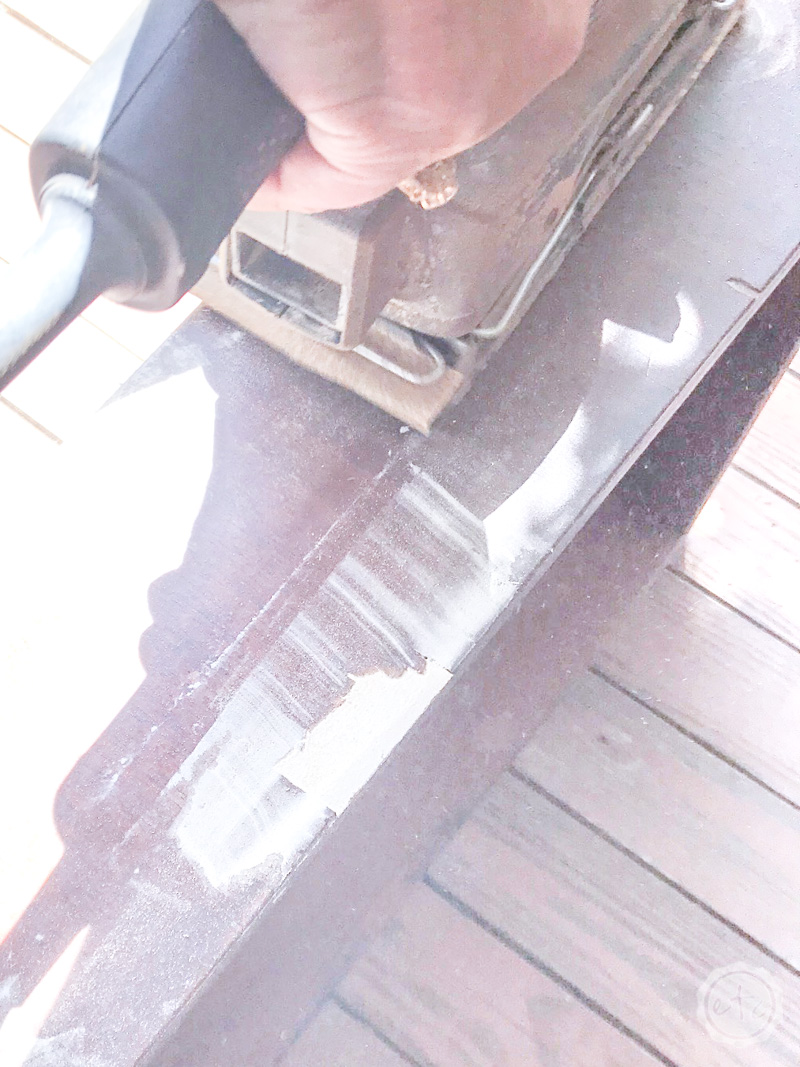
Once the Bondo dries go ahead and sand the surface smooth. If there are still divots in the surface apply a second coat of Bondo until the surface is back to one piece. Perfecto!

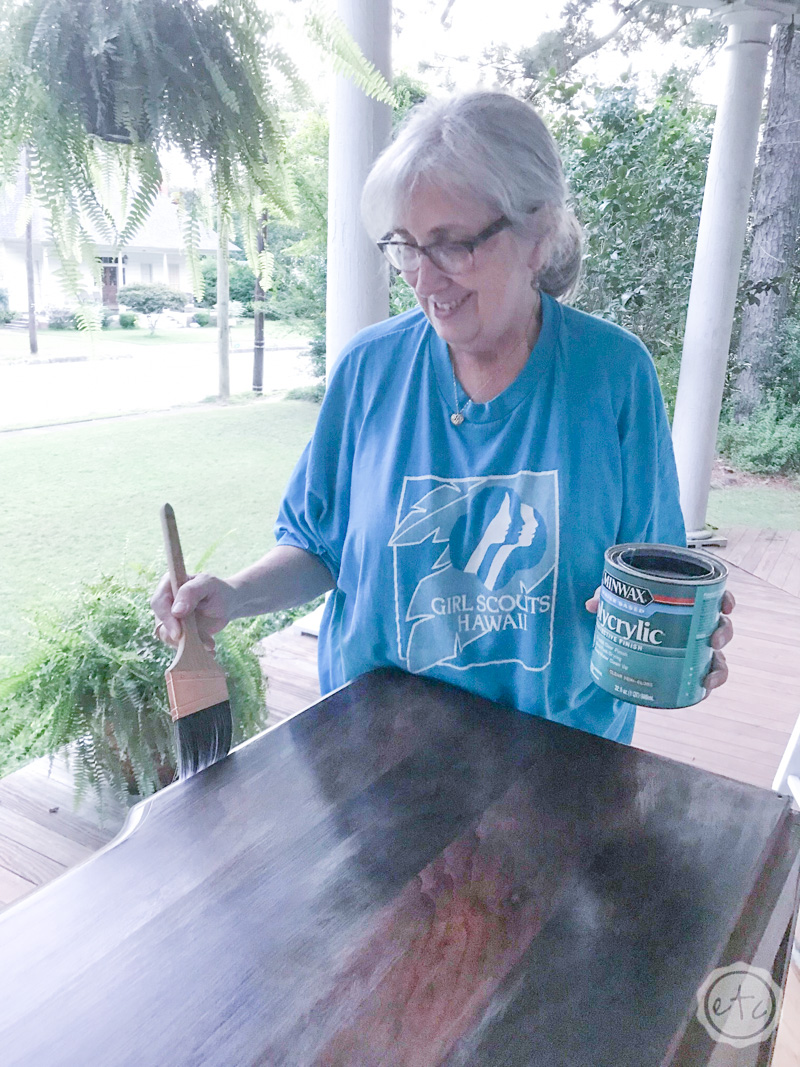
Step 4: On to the Paint

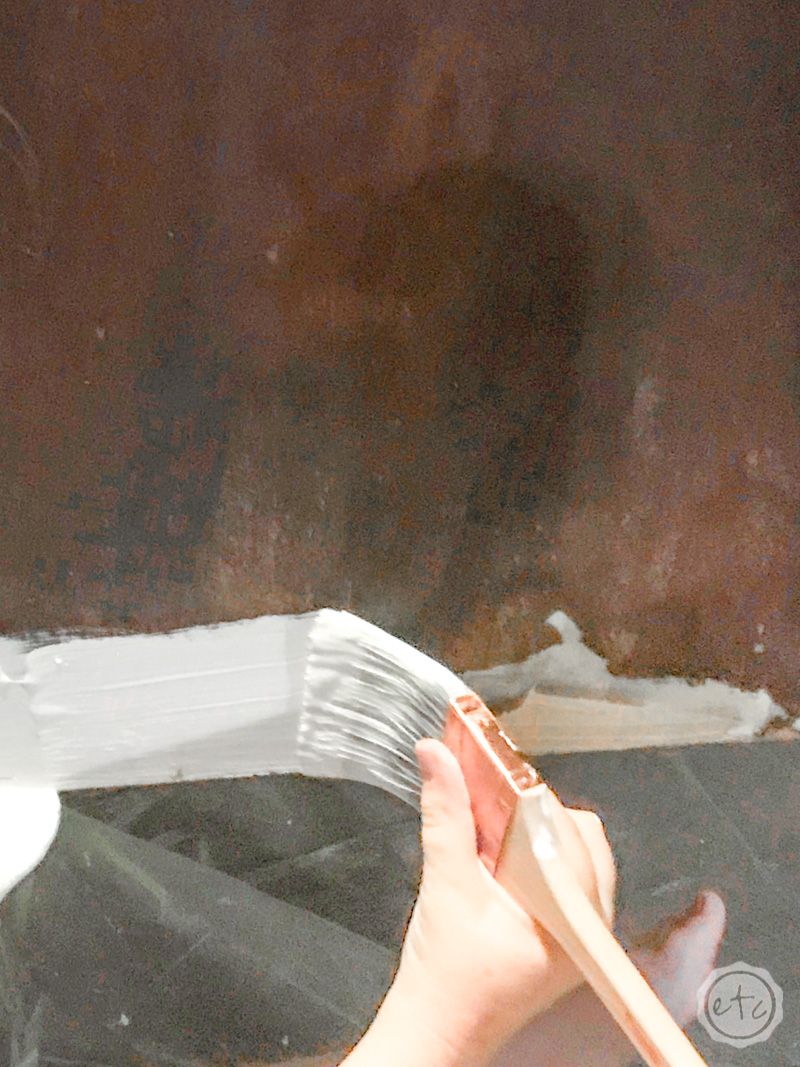
Now that the Bondo is dry it’s time to paint the entire piece… which if you’re me is done at 1 in the morning on the front porch.

Which makes for reallllllyyyyy flattering photos!

Luckily I live in Alabama and chalk paint dries quickly here (even at 1 in the morning!) So I was able to put two coats of Rust-Oleum linen white on this baby in no time flat. This buffet didn’t have too many hidden nooks and crannies to paint so I stuck with a standard 2″ purdy brush and the paint went on like butter.

Now that we’re finished with the piece are you ready for the after pictures? This little buffet took so many days to finish (mainly because the Bondo just kept drying… making me re-mix spoonfuls at a time!).

Of course, I’d like to say this little piece was going in my home but as you know I’m in between houses at the moment… so this little gal is going over to the antique booth with all the other pieces I’ve painted lately.

I hope someone loves it as much as I do!

Get Your FREE Wedding Binder

Trying to plan your perfect wedding?

Here's 42 FREE printables to help you get organized!

Success! Now check your email to confirm your subscription.

There was an error submitting your subscription. Please try again.

Powered by ConvertKit
You made it through the entire post? That means you're one of my new favorite people! I'd love to be friends and see what else you would like to read about! Leave me a comment and then sign up for your very own FREE paint planner.... so that you can keep track of every single paint color with ease!
Welcome back! I'd love to be friends and see what else you would like to read about! Leave me a comment and then sign up for your very own FREE paint planner.... so that you can keep track of every single paint color with ease!

Show me some LOVE y'all:

  • Facebook
  • Pinterest
  • Twitter
  • Email

Related

«
»

Furniture, Home Decor 3

Trackbacks

  1. How to Refurbish Antique Hardware - Happily Ever After, Etc. says:
    October 28, 2018 at 5:07 pm

    […] recently spent a little time restoring the veneer on an old buffet… it took a couple days but when the buffet was finally pieced back together and painted a new […]

    Reply
  2. Before and After: Chalk Paint Armoire Transformation - Happily Ever After, Etc. says:
    March 5, 2019 at 5:00 pm

    […] entire piece with an all purpose cleaner (which really helped on that funky bottom!). Then it was a little repair work for the veneer at the bottom before doing two coats of chalk paint on the […]

    Reply
  3. 10 Beginner Tips to Using a Paint Sprayer - Happily Ever After, Etc. says:
    March 14, 2019 at 12:55 am

    […] clean clean clean. Multi-purose cleaner and a rag are never out of style! If you need to sand or repair veener this is the time to do it. Next you can remove all the hardware or tape over […]

    Reply

Leave a Reply Cancel reply

Your email address will not be published. Required fields are marked *

sidebar betsy I'm Betsy, Home Decor Enthusiast, Yorkie Mama, Crafter, Blogger, Picky Eater, Chief Mess Maker, Antique Hoarder and Graphic Designer. You can generally find me working on (attacking with a paintbrush) the 3 bed, 2 bath home we are currently renting! Our home might not be perfect but it is ours & if you hang out long enough you'll see that what we lack in know-how we make up for in passion!
Shop My Craft Room

Shop My Home

Featured Articles

15 Fabulous Ideas to Organize your Laundry Room
25 FREE Printables For Your Home!
What to do with EXTRA Paint with Happily Ever After Etc
10 Ways to Make Your Bed EXTRA Comfy with Happily Ever After Etc.
Ready to Pick your Perfect Paint Color? We'll help you with our 6 Day FREE E-Course

Hey y’all,

Profile

I'm Betsy, Home Decor Enthusiast, Yorkie Mama, Picky Eater, Chief Mess Maker, & Graphic Designer...

A Little Note!

Many of the links on Happily Ever After, Etc. are affiliate links. If you purchase a product after clicking an affiliate link, I receive a small percentage of the sale for referring you, at zero cost to you! How awesome is that? Purchasing through affiliate links is an easy, painless way to help out your favorite bloggers. Thank you so much for your continued love and support! Read the full disclosure here!

Instagram

The number one question people ask when they watch The number one question people ask when they watch my new home tour on YouTube? Why is there so much clutter... um excuse me I like stuff! The second question? How did you frost the doors? Don’t worry... I wrote out the whole process, check out the step by step tutorial on the blog!
With Christmas fast approaching I’m having secon With Christmas fast approaching I’m having second thoughts... about taking down my holiday decorations! I absolutely love all the blush and rose gold this year and think I might have to add more pink to my every day decor. Until then maybe it will just stay Christmas at the Smith house! Tutorials for both the “Merry Christmas” resin sign and the “Dear Santa” Cricut sign are in my profile! #pinkchristmas #pinkchristmastree #pinkchristmasdecor
Well y’all Christmas is coming up quick... which Well y’all Christmas is coming up quick... which means I need to get a move on with all that wrapping! I got a jump start this morning after whipping up a few little resin light bulbs! Check out the full tutorial over on the blog if you’d like to wrap your presents with a few resin goodies this year... and tell me in the comments below. Are you finished wrapping or (like me) are you still getting started? #pinkchristmas #pinkchristmasdecor #resinchristmas #giftwrappingideas
Ready for another fun and easy resin project? Thes Ready for another fun and easy resin project? These little Christmas trees are the perfect beginner level project so if you’ve never done resin before don’t let it intimidate you!! Grab your heat gun and jump in... I’ll walk you through it! Check out the full blog post for these little guys on the blog (link in profile!)
If you haven’t joined Michelle at @weekendcraft If you haven’t joined Michelle at @weekendcraft SVG membership then WHAT ARE YOU WAITING FOR?! I am obsessed with all the cute svg’s and y’all she is doing a live craft night every month to walk you through making one of her designs... and the first craft night is tomorrow! She’ll be making this “Merry everything and Happy always” SVG and it’s so cute! You don’t want to miss it! See you there! 

(Also who noticed the sneak peek at my new kitchen?!)

#cricutsvgfiles #christmassvg #cricutsled
Well y’all I’m getting this close to unpacked Well y’all I’m getting this close to unpacked in my new house!! And since I’m a blogger Christmas is going up! So here’s the question... do you want a 1 month house update or do you want to wait for the Christmas tour? #lulamaefarmhouse #rosegoldchristmastree #newhouse
Well it’s still a work in progress but I finally Well it’s still a work in progress but I finally have a house!! They have to put it together and do all the detailing before I get keys... but we’re in the end game now! Check out my stories for a sneak peek at the moving process... full YouTube video coming soon!
#ad how amazing did these little fall coasters tur #ad how amazing did these little fall coasters turn out?! Plus I absolutely love the matching tray! The best part? This is such a quick and easy resin project... a silicone mold, a little resin and your trusty heat gun and I promise you can make this baby!! Link in profile for the tutorial!! #fallresin #resinforbeginners #cheetahprint
Okay... is it bad if you just want to make coaster Okay... is it bad if you just want to make coasters in the same mold with the same technique but different colors?? They turn out soo differently! Just a sneak peek of my fall coasters and the blush ones I made last year!
Happy #nationaldogday to the fur babies that are ( Happy #nationaldogday to the fur babies that are (literally) behind (beside... or underneath!) all Of my projects! These sweet little cuddle muffins make everything better 😊🐶😘
GIVEAWAY CLOSED Our winner is @kamikvega Check you GIVEAWAY CLOSED
Our winner is @kamikvega Check your inbox girl, this little machine is headed your way! Thanks to everyone who participated... I can’t wait to see where we go from here!

🥳📦🥳 GIVEAWAY🥳📦🥳
If you have loved all of the Cricut projects I make here is your chance to win a Cricut Joy of your very own! If you’re ready for a little craftiness (maybe a little time to relax) then this giveaway is for you! I’m teaming up with a few of my cavities crafty bloggers so that one of you can win your very own mini crafting machine. Good Luck!!!!

TO ENTER GIVEAWAY:
1.) Follow
@creativeramblings 
@weekendcraft 
@craftylumberjacks 
@this.is.tisa 
@justcallmehomegirl 
@happilyeverafteretc
@lovebird_heartworks 
2.) Like this post
3.) Tag a friend in the comments.
.
.
.
Hurry! Giveaway ends Saturday 8/29/20 at 11:59PM PST. Winner will be notified via Direct Message. Share or tag a friend who'd love to win a Cricut. .
.
.
This contest is in no way affiliated with or sponsored by Instagram or Cricut. To enter you must have a U.S shipping address.
A little peek into the fun summery Tablescape I pu A little peek into the fun summery Tablescape I put together for a little garden party! Want to check out the full table? Wondering where to find all the pieces... click the link in my profile for all the details!
#ad Did you know you can put infusible ink onto al #ad Did you know you can put infusible ink onto aluminum? It's sooooo simple... honestly it's one of the easiest projects I've ever done. Even if you've never used your Cricut before you. can. do. this. I'll show you how every step of the way! Follow along with the full tutorial video over on YouTube! The best part? These little aluminum signs look amazing as part of a larger project! Check out how I added mine to a larger resin wave project on the last slide! @officialcricut #cricutcreated https://lnk2.io/wvMllZf
Okay so It’s no secret that I’ve been obsessed Okay so It’s no secret that I’ve been obsessed with resin for a while now but this week I’ve been playing around with resin waves! Including this tiny resin sea shell! Check out the link in my profile for the full tutorial!
After a lot of struggle, loss and frustration I am After a lot of struggle, loss and frustration I am finally dotting the i’s and crossing the t’s on my next chapter. Yesterday I went and signed the million and one papers to close on my new house! I cannot wait to share the moving (and decorating) process with all of you... next step: keys! #firsttimehomebuyer #newhouse
Load More... Follow on Instagram

Copyright © 2021 · Darling theme by Restored 316

Copyright © 2021 · Darling Theme on Genesis Framework · WordPress · Log in · Privacy Policy

loading Cancel
Post was not sent - check your email addresses!
Email check failed, please try again
Sorry, your blog cannot share posts by email.