• House Tour
    • Reveals
  • About
    • Smith Life
    • Disclosure and Privacy Policy
      • Terms and Conditions
      • Store Affiliates
  • Contact Me
    • Want a Button?
  • Shop
    • Floral Printable Planners
    • Paint eBooks and Packages
    • Wedding Binders & Extra Printables!
    • Planner Bundles
    • Planner Accessories
    • Home Decor Printables!
    • Cart
    • Bloglovin
    • Facebook
    • Instagram
    • Pinterest
    • Twitter
    • YouTube

Happily Ever After, Etc.

Creating Our Own Fairytale

  • Happily Ever After, Etc.
  • Home
  • Home Decor
    • My Home
    • Paint
    • Before and After
    • Tablescapes
    • Mood Boards
    • Furniture
  • DIY & Crafts
    • New to Cricut – Start Here
    • Cricut Projects
    • Resin
    • Scrapbooking
  • Organization & Planning
    • Cricut
    • Organization
    • Planner
  • Wedding
    • Cricut Wedding Projects
    • Free Wedding Binder
    • Bride Bag- The Ultimate Wedding Planner

DIY Love is Patient Love is Kind Sign

Hey y'all,

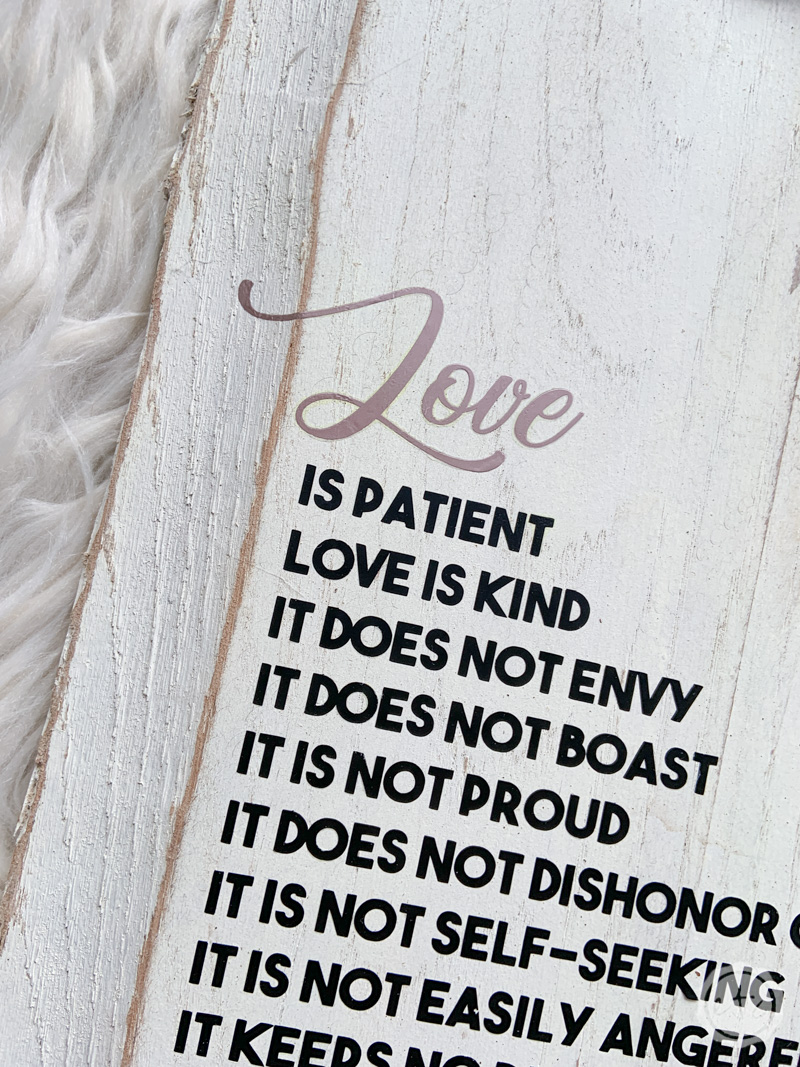
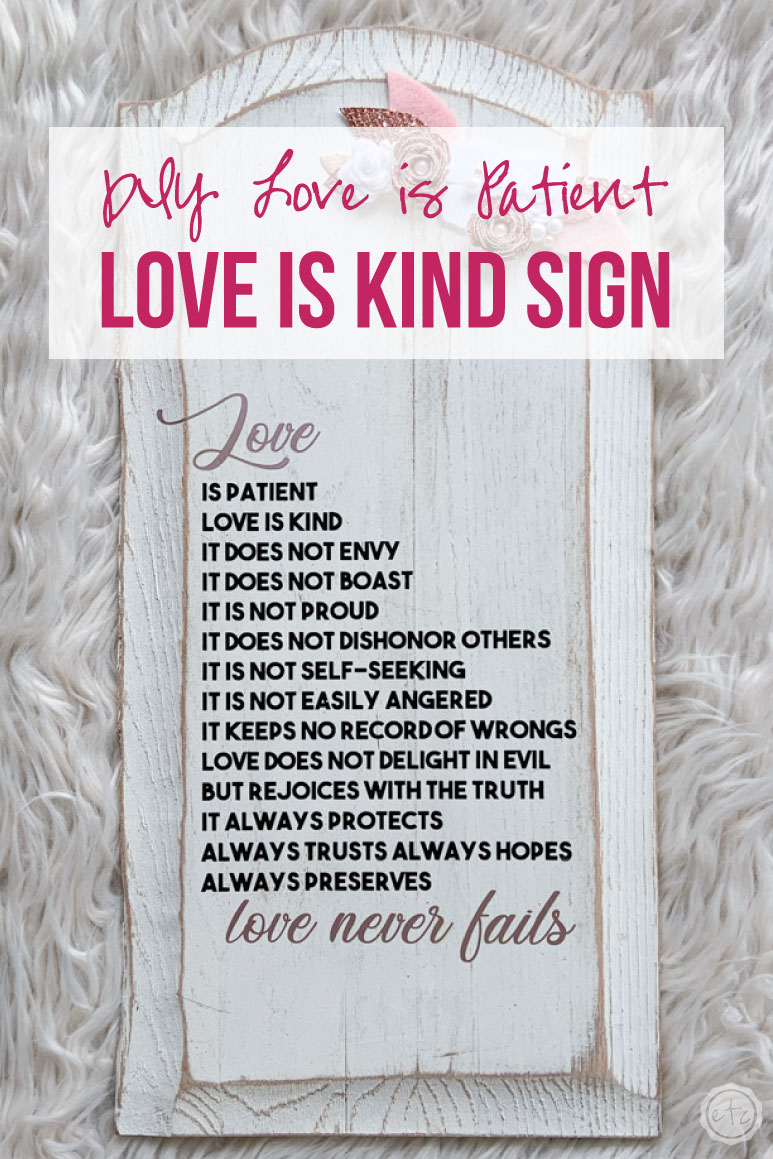
With Valentines Day right around the corner I decided to take a page out of the bible and make a little sign with the famous quote from 1 Corinthians 13. You know… the one that says: love is patient, love is kind. It has the perfect feeling for Valentines Day but it can totally be used year round… and like a lot of couples we had this verse read at our wedding. So it’s a tripe threat!

The best part is that this little sign was quick and easy to make. From start to finish the entire project took about 30 minutes! Ready to get started on your very own Valentines Day 1 Corinthians 13 sign?

Supplies:

  • Cricut Maker
  • Cricut SVG Files (FREE at the bottom of this post)
  • Cricut Standard Grip Mat (that’s the green one!)
  • Weeding Tool
  • Standard Point Blade
  • Hot Glue Gun/Hot Glue
  • Felt Flowers (you can follow the tutorial at the bottom of this post)
  • Mini Easy Press
  • Metallic Rose Gold Iron On
  • Black Iron On
  • White Sign

Step 1: Cut and Weed the Design

Go ahead and download your SVG’s from the bottom of this post and then upload them to cricut design space. I’ve color coded the SVG file to cut the “Love” at the beginning of the sign and the “love never fails” at the bottom of the post in one color vinyl (I picked rose gold) and the rest of the items in black.

That will make cutting these babies out super quick!

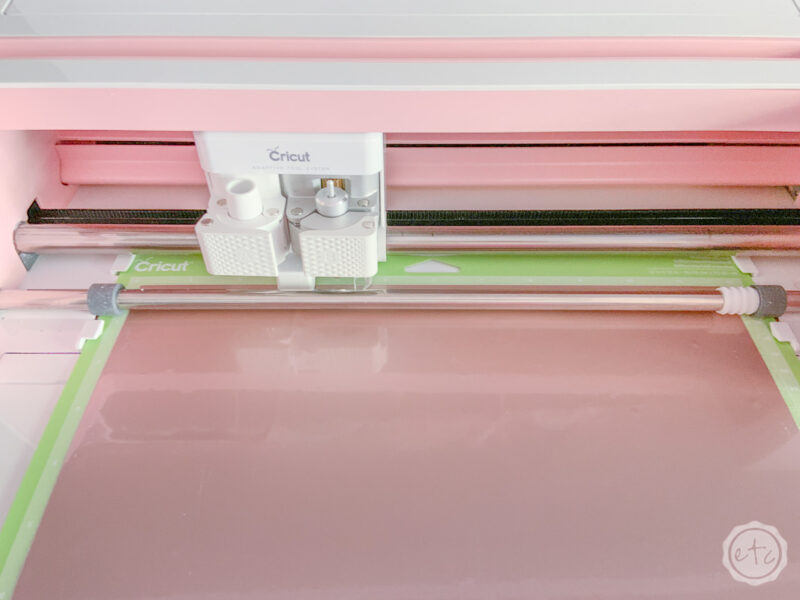
Make sure to mirror your design so that the words cut out properly, pop your iron-on onto a standard grip mat (with the clear plastic covering side down) and then cut the entire design out with a standard cutting blade.

The black iron-on and the rose gold took about 10 minutes to cut out total! The black lettering portion of the quote took a while but all in all that’s pretty darn fast!

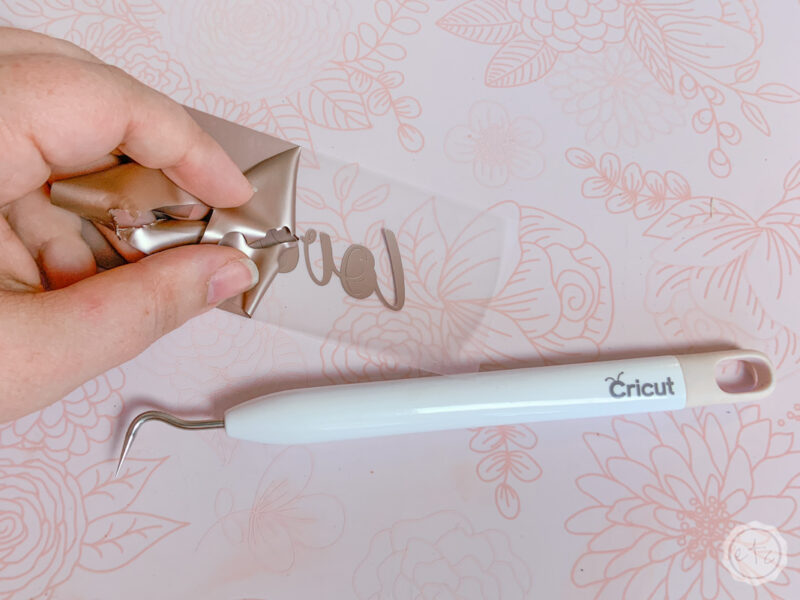
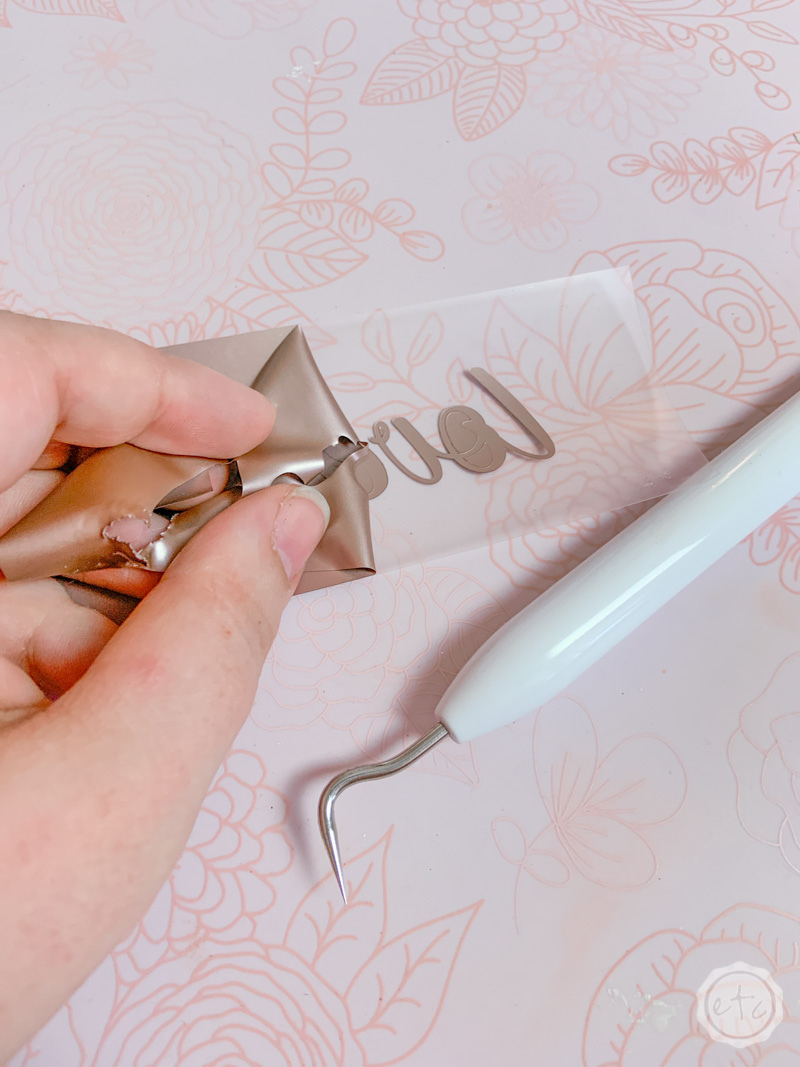
Ready for weeding? Use your little weeding tool to take all of the negative bits and bobs out of the design. You want your letters and stamps to be left on the carrier sheet and the tiny insides or the o’s and e’s to be long gone.

This step is probably the most tedious… although you can pull most of the outside vinyl off in one fell swoop.

Easy peezy.

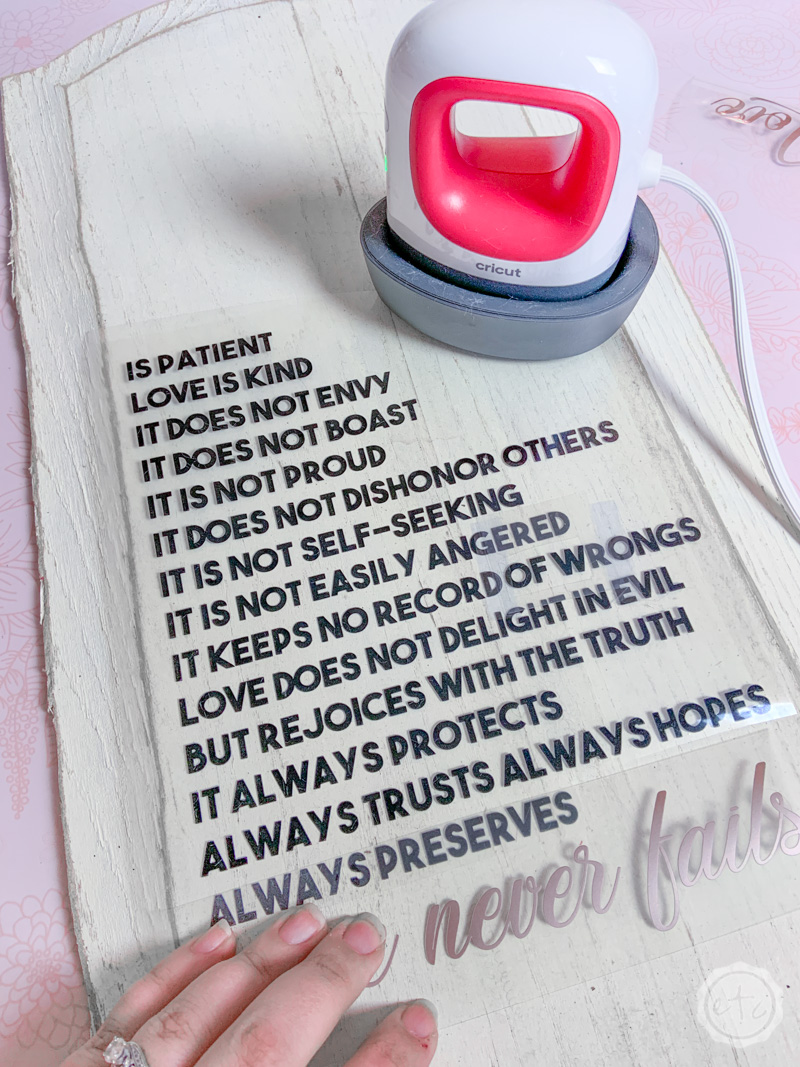
Step 2: Iron On Your Design!

Now I know what you’re thinking… Iron On on wood? I know you can use regular permanent vinyl but since the mini easy press came out I am absolutely obsessed with iron on on wood (check out the “Dear Santa” sign I made for Christmas!). It bonds quickly, you don’t have to fool around with transfer tape and it seems to bond to every nook and cranny of the wood whereas permanent vinyl simply sticks over the holes.

It may come down to personal preference but I feel like I get a stronger bond with the Iron On… so I’m going to keep doing it!

Let’s get started! Go ahead and heat up your mini easy press… put it on the middle heat setting and let it heat up.

In the meantime you can take all of the little pieces and lay them out on your sign. Cut the plastic carrier sheet at the bottom of the black lettering so that the “love never fails” letters can fit right below them.

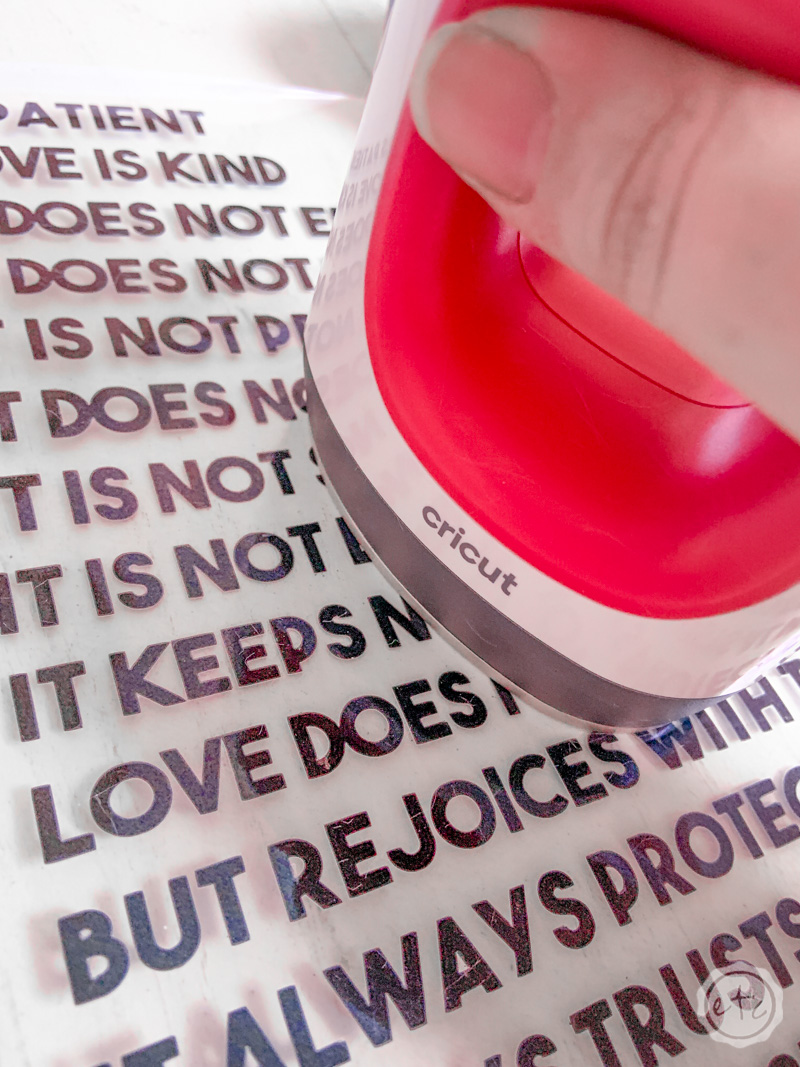
Then it’s time to start ironing! Start in the middle of your quote and hold your easy press in place for about 5 seconds at a time. Then with circular motions slowly move the easy press outward to the edges.

Make sure to do the entire word/stamp section/row before moving on and do the entire quote and the “love never fails” section before moving on to the next step!

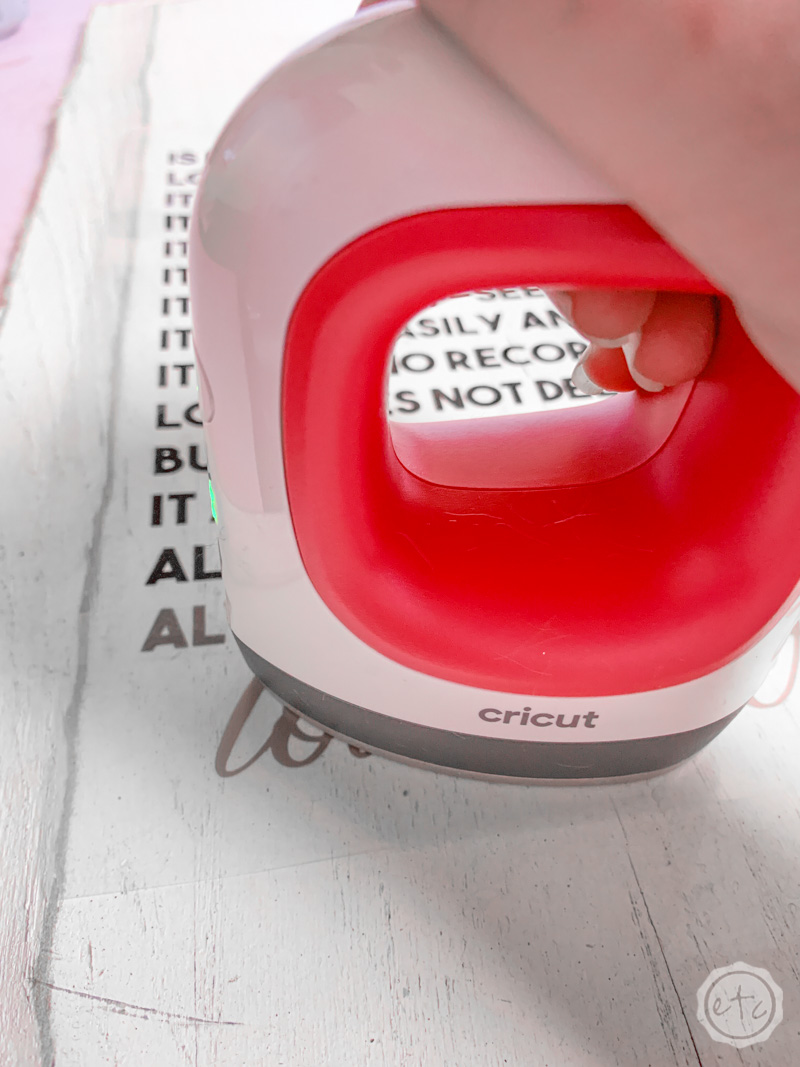
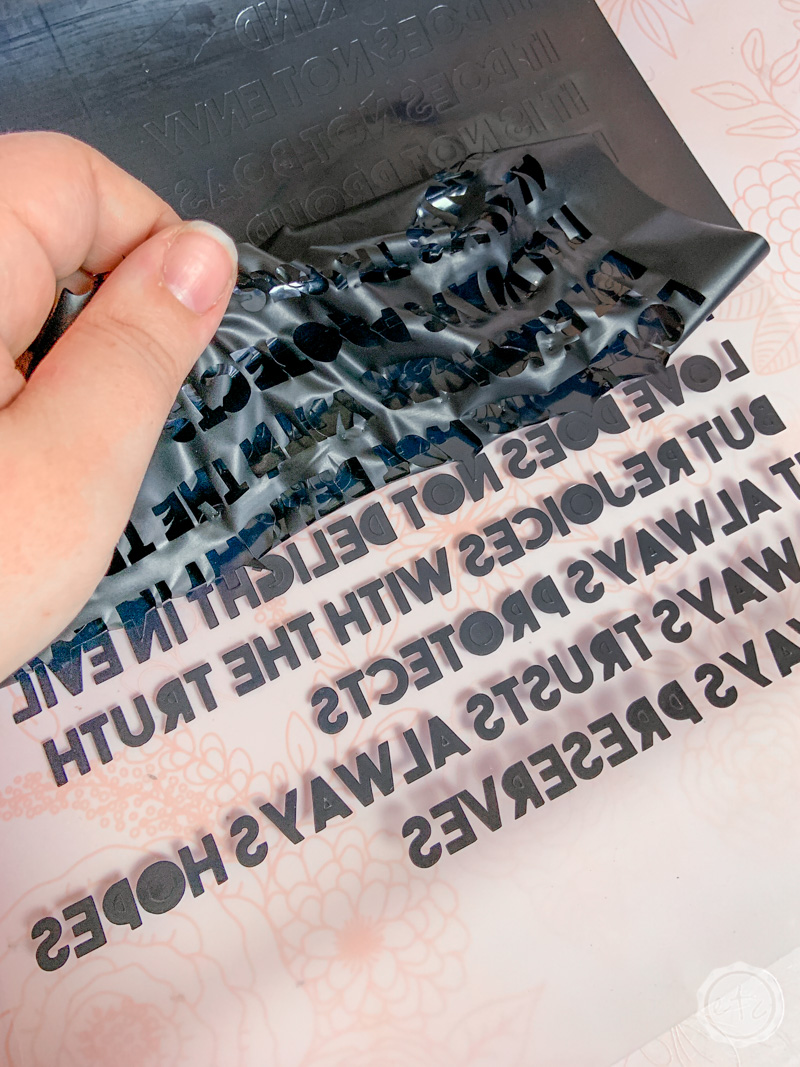
Step 3: Remove the Carrier Sheet

Ready to remove the clear plastic carrier sheet and reveal the awesomeness that is iron on vinyl?

Once you’ve gone over all the letters and they are firmly bonded to the sheet it’s time to remove the clear plastic. Make sure it’s cool to the touch and then slowly start to peel back the carrier sheet leaving the iron on behind! If any of the little letters aren’t quite bonded to the wood simply press them down with the easy press (over the carrier sheet) for a couple seconds… then peel up the carrier sheet!

Pretty simple!

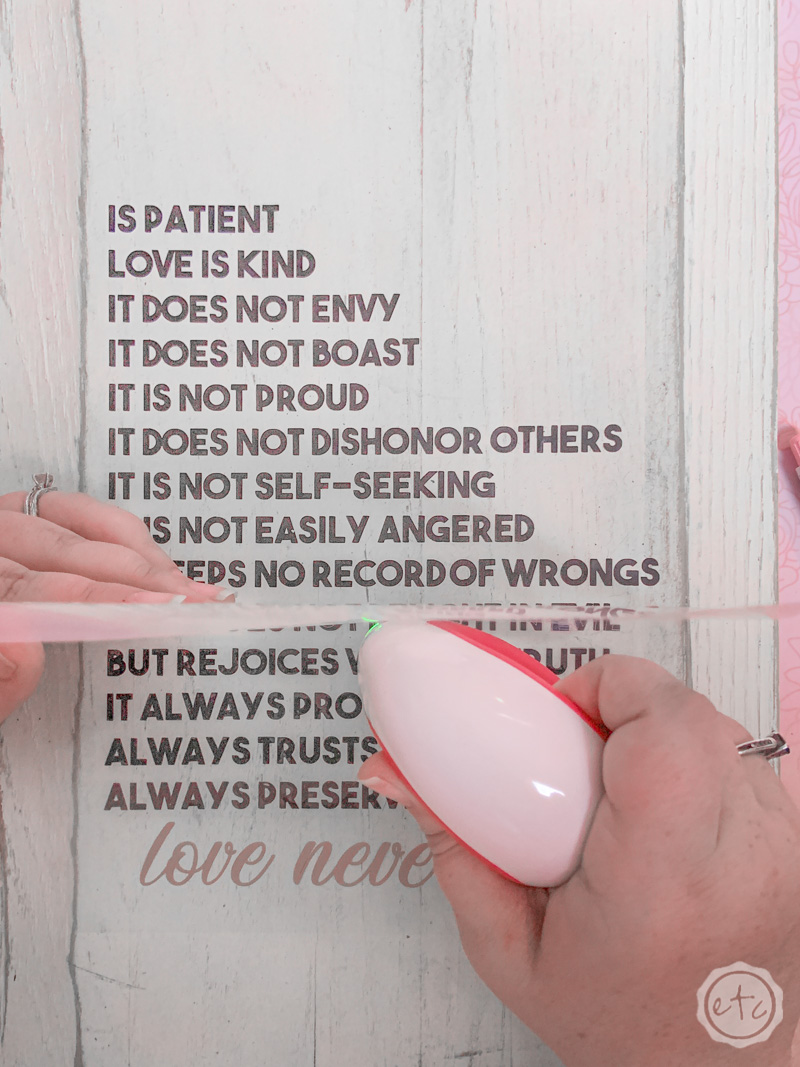
Once you’ve done the entire quote you can layer the little rose gold “Love” at the top of the sign and hit it with your easy press for about 5 seconds. Because my sign has a ridge around the edge I wanted to do the love word last so that I could be extra careful with the flourish on the L.

Luckily it went on smoothly and didn’t have any problems!

I made sure to cut the carrier sheet around my “Love” word big enough for my mini easy press but in case you need a little more room just place a protective sheet over the black lettering. No matter what you always want to have a plastic carrier sheet of some kind in-between the easy press and the iron-on.

Otherwise you’ll melt the iron on!

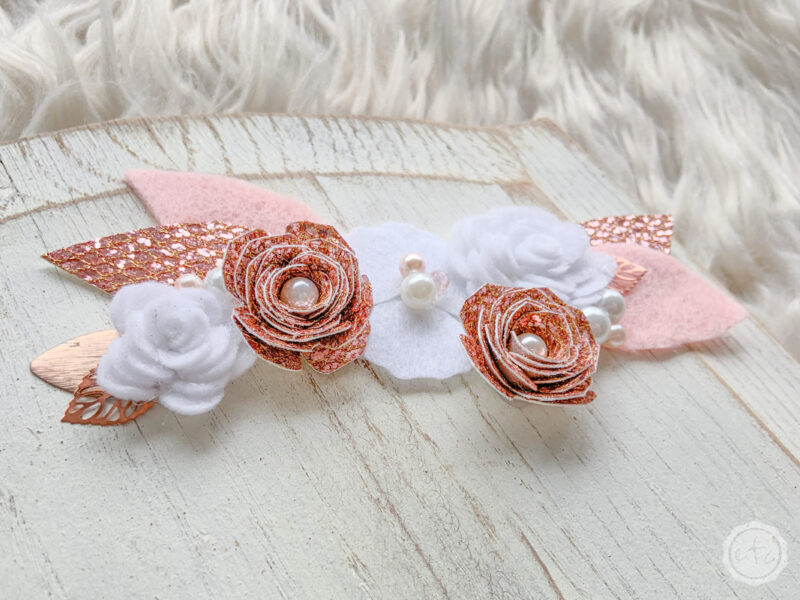
(Optional) Step 4: Add Felt Flowers

Alright y’all now we’re done with our sign! I had a bit of negative space at the top of my sign that was left blank. I liked it blank but I’m always up for adding felt flowers to a project… they make me happy!

So I grabbed the hot glue gun and added a few (five) felt flowers, beads and leaves to the top right corner of my sign. I always have a few felt flowers laying around since I love using them but if you don’t have any (get ready for a new obsession) you can follow my tutorial for making your own flowers at the bottom of this post.

I simply arranged them on my sign and then hot glued them in place. Easy peezy.

Ready to see the finished sign?

I absolutely love it! I’ve wanted a sign with the full 1 Corinthians 13 verse since we got married and now I have one. I know it was suppose to be a Valentines Day project but it’s just so pretty I really think I’m going to give in to my temptation and leave it out year round.

I mean… why not?!

You made it through the entire post? That means you're one of my new favorite people! I'd love to be friends and see what else you would like to read about! Leave me a comment and then sign up for your very own FREE paint planner.... so that you can keep track of every single paint color with ease!
Welcome back! I'd love to be friends and see what else you would like to read about! Leave me a comment and then sign up for your very own FREE paint planner.... so that you can keep track of every single paint color with ease!

Show me some LOVE y'all:

  • Facebook
  • Pinterest
  • Twitter
  • Email

Related

«
»

Cricut, Holidays 0

Leave a Reply Cancel reply

Your email address will not be published. Required fields are marked *

sidebar betsy I'm Betsy, Home Decor Enthusiast, Yorkie Mama, Crafter, Blogger, Picky Eater, Chief Mess Maker, Antique Hoarder and Graphic Designer. You can generally find me working on (attacking with a paintbrush) the 3 bed, 2 bath home we are currently renting! Our home might not be perfect but it is ours & if you hang out long enough you'll see that what we lack in know-how we make up for in passion!
Shop My Craft Room

Shop My Home

Featured Articles

15 Fabulous Ideas to Organize your Laundry Room
25 FREE Printables For Your Home!
What to do with EXTRA Paint with Happily Ever After Etc
10 Ways to Make Your Bed EXTRA Comfy with Happily Ever After Etc.
Ready to Pick your Perfect Paint Color? We'll help you with our 6 Day FREE E-Course

Hey y’all,

Profile

I'm Betsy, Home Decor Enthusiast, Yorkie Mama, Picky Eater, Chief Mess Maker, & Graphic Designer...

A Little Note!

Many of the links on Happily Ever After, Etc. are affiliate links. If you purchase a product after clicking an affiliate link, I receive a small percentage of the sale for referring you, at zero cost to you! How awesome is that? Purchasing through affiliate links is an easy, painless way to help out your favorite bloggers. Thank you so much for your continued love and support! Read the full disclosure here!

Instagram

The number one question people ask when they watch The number one question people ask when they watch my new home tour on YouTube? Why is there so much clutter... um excuse me I like stuff! The second question? How did you frost the doors? Don’t worry... I wrote out the whole process, check out the step by step tutorial on the blog!
With Christmas fast approaching I’m having secon With Christmas fast approaching I’m having second thoughts... about taking down my holiday decorations! I absolutely love all the blush and rose gold this year and think I might have to add more pink to my every day decor. Until then maybe it will just stay Christmas at the Smith house! Tutorials for both the “Merry Christmas” resin sign and the “Dear Santa” Cricut sign are in my profile! #pinkchristmas #pinkchristmastree #pinkchristmasdecor
Well y’all Christmas is coming up quick... which Well y’all Christmas is coming up quick... which means I need to get a move on with all that wrapping! I got a jump start this morning after whipping up a few little resin light bulbs! Check out the full tutorial over on the blog if you’d like to wrap your presents with a few resin goodies this year... and tell me in the comments below. Are you finished wrapping or (like me) are you still getting started? #pinkchristmas #pinkchristmasdecor #resinchristmas #giftwrappingideas
Ready for another fun and easy resin project? Thes Ready for another fun and easy resin project? These little Christmas trees are the perfect beginner level project so if you’ve never done resin before don’t let it intimidate you!! Grab your heat gun and jump in... I’ll walk you through it! Check out the full blog post for these little guys on the blog (link in profile!)
If you haven’t joined Michelle at @weekendcraft If you haven’t joined Michelle at @weekendcraft SVG membership then WHAT ARE YOU WAITING FOR?! I am obsessed with all the cute svg’s and y’all she is doing a live craft night every month to walk you through making one of her designs... and the first craft night is tomorrow! She’ll be making this “Merry everything and Happy always” SVG and it’s so cute! You don’t want to miss it! See you there! 

(Also who noticed the sneak peek at my new kitchen?!)

#cricutsvgfiles #christmassvg #cricutsled
Well y’all I’m getting this close to unpacked Well y’all I’m getting this close to unpacked in my new house!! And since I’m a blogger Christmas is going up! So here’s the question... do you want a 1 month house update or do you want to wait for the Christmas tour? #lulamaefarmhouse #rosegoldchristmastree #newhouse
Well it’s still a work in progress but I finally Well it’s still a work in progress but I finally have a house!! They have to put it together and do all the detailing before I get keys... but we’re in the end game now! Check out my stories for a sneak peek at the moving process... full YouTube video coming soon!
#ad how amazing did these little fall coasters tur #ad how amazing did these little fall coasters turn out?! Plus I absolutely love the matching tray! The best part? This is such a quick and easy resin project... a silicone mold, a little resin and your trusty heat gun and I promise you can make this baby!! Link in profile for the tutorial!! #fallresin #resinforbeginners #cheetahprint
Okay... is it bad if you just want to make coaster Okay... is it bad if you just want to make coasters in the same mold with the same technique but different colors?? They turn out soo differently! Just a sneak peek of my fall coasters and the blush ones I made last year!
Happy #nationaldogday to the fur babies that are ( Happy #nationaldogday to the fur babies that are (literally) behind (beside... or underneath!) all Of my projects! These sweet little cuddle muffins make everything better 😊🐶😘
GIVEAWAY CLOSED Our winner is @kamikvega Check you GIVEAWAY CLOSED
Our winner is @kamikvega Check your inbox girl, this little machine is headed your way! Thanks to everyone who participated... I can’t wait to see where we go from here!

🥳📦🥳 GIVEAWAY🥳📦🥳
If you have loved all of the Cricut projects I make here is your chance to win a Cricut Joy of your very own! If you’re ready for a little craftiness (maybe a little time to relax) then this giveaway is for you! I’m teaming up with a few of my cavities crafty bloggers so that one of you can win your very own mini crafting machine. Good Luck!!!!

TO ENTER GIVEAWAY:
1.) Follow
@creativeramblings 
@weekendcraft 
@craftylumberjacks 
@this.is.tisa 
@justcallmehomegirl 
@happilyeverafteretc
@lovebird_heartworks 
2.) Like this post
3.) Tag a friend in the comments.
.
.
.
Hurry! Giveaway ends Saturday 8/29/20 at 11:59PM PST. Winner will be notified via Direct Message. Share or tag a friend who'd love to win a Cricut. .
.
.
This contest is in no way affiliated with or sponsored by Instagram or Cricut. To enter you must have a U.S shipping address.
A little peek into the fun summery Tablescape I pu A little peek into the fun summery Tablescape I put together for a little garden party! Want to check out the full table? Wondering where to find all the pieces... click the link in my profile for all the details!
#ad Did you know you can put infusible ink onto al #ad Did you know you can put infusible ink onto aluminum? It's sooooo simple... honestly it's one of the easiest projects I've ever done. Even if you've never used your Cricut before you. can. do. this. I'll show you how every step of the way! Follow along with the full tutorial video over on YouTube! The best part? These little aluminum signs look amazing as part of a larger project! Check out how I added mine to a larger resin wave project on the last slide! @officialcricut #cricutcreated https://lnk2.io/wvMllZf
Okay so It’s no secret that I’ve been obsessed Okay so It’s no secret that I’ve been obsessed with resin for a while now but this week I’ve been playing around with resin waves! Including this tiny resin sea shell! Check out the link in my profile for the full tutorial!
After a lot of struggle, loss and frustration I am After a lot of struggle, loss and frustration I am finally dotting the i’s and crossing the t’s on my next chapter. Yesterday I went and signed the million and one papers to close on my new house! I cannot wait to share the moving (and decorating) process with all of you... next step: keys! #firsttimehomebuyer #newhouse
Load More... Follow on Instagram

Copyright © 2021 · Darling theme by Restored 316

Copyright © 2021 · Darling Theme on Genesis Framework · WordPress · Log in · Privacy Policy

loading Cancel
Post was not sent - check your email addresses!
Email check failed, please try again
Sorry, your blog cannot share posts by email.