
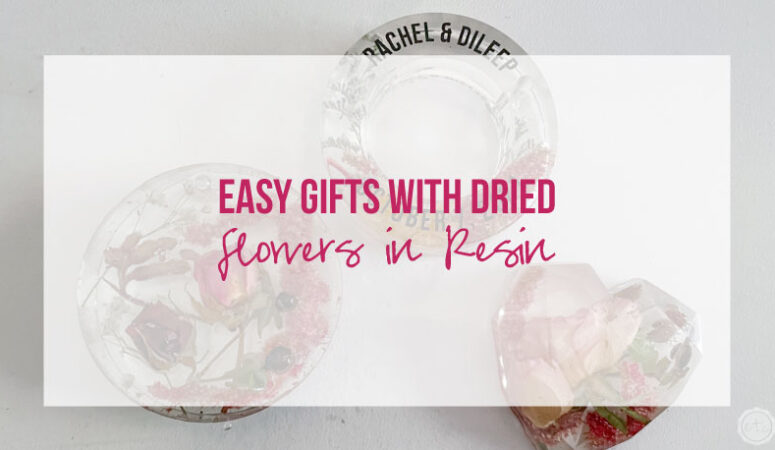


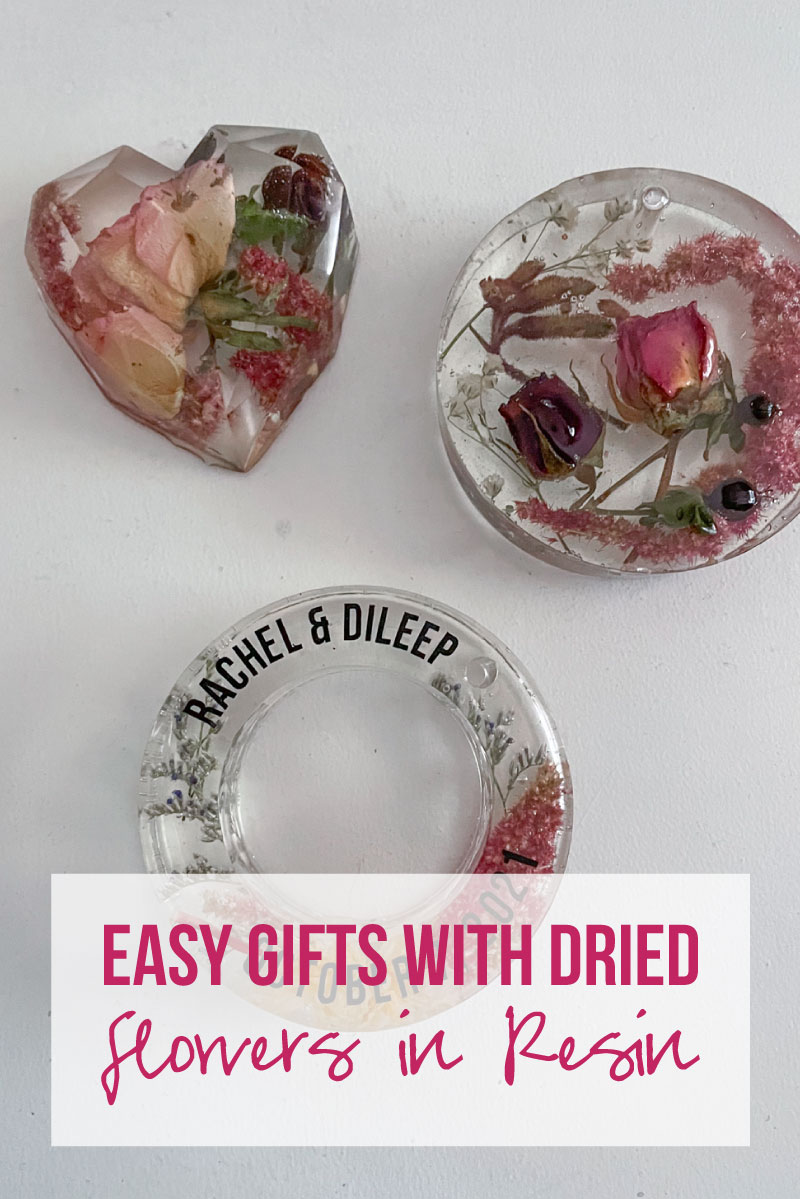
I absolutely LOVE working with resin but I’m still learning all the tips and tricks to working with flowers. Not trapping air in tiny flower buds or scorching the edges of delicate petals takes practice. I show you how to preserve an entire wedding bouquet in my Resin for Beginners class but today we’re tackling a smaller project: easy gifts with dried flowers in resin!
Christmas ornaments and paperweights with beautiful (sentimental) flowers from my besties wedding!
Whether you’re saving flowers from your garden, blooms from a special bouquet or just really like flowers you can make all kinds of pretty resin pieces to showcase your blooms.
Let’s get started on a few small molds!
Supplies:
- Total Boat Makerpoxy Epoxy Resin
- Silicone Ornament Mold
- Fractured Heart Mold
- Flowers (Here’s a set I love if you need filler flowers)
- Respirator/Mask (resin graded filters)
- Gloves
- Wagner HT400 Heat Gun
- Freezer Paper
- Silicone Mat
- Baking Pan
- Heart Shaped Silicone Mixing Cup
- Small Mixing Cups
- Silicone Measuring Cup/Larger Mixing Cups
- Reusable Silicone Stir Sticks
- Toothpicks
- Paper Towels
Just getting started with resin? Download my free resin supply list and make your first project today!

Step 1: Arrange your Flowers
Before we get started with the ACTUAL resin we need to setup our flowers. I have both of my molds placed in baking pans so that I can easily level them and move them around once they’re full of resin… then I started arranging the flowers.
There’s no rules here just keep a few things in mind.
You want to keep the flowers under the top of the mold. Otherwise they won’t be inside the resin once everything cures!
PLUS Certain flowers trap air… for example flowers like roses have a tendency to keep air inside their petals. You’ll need resin to go INSIDE these petals so placing them face down into a mold won’t work well. If you really need to place a rose on it’s face (say the front of the piece is the bottom of the mold) you’ll need to fill that flower with resin, let it cure and then place it in your mold.
Once you’ve thought about composition and which flowers will work best in resin you’re good to go. Add in all the pretty extras and we’ll move on to mixing!


Step 2: Mix your Resin
Ready for the fun?! Let’s start mixing our resin! For both of these molds we’re going to be mixing about 150ml of resin (one ornament spot takes about 100ml of resin and our heart takes roughly 50ml). Of course, depending on the size of you flowers you might need a bit more resin OR a bit less.
Today I’m using MakerPoxy which is easy to work with and dries pretty bubble free. Which is ideal for sentimental flowers!
MakerPoxy is a 1:1 ratio resin which means you’ll use 1 part a to 1 part b… so we’ll put 75ml of A and 75ml of B into a mixing cup. Then slowly stir your resin for 3 minutes… make sure you’re scraping the sides and bottom of your container to thoroughly mix all parts of the mixture together. Then let it sit for a couple of minutes so that as many bubbles as possible can rise to the surface.
Then hit the whole thing with your heat gun!
Pop those bubbles!

Bonus Tip: If you’ve never mixed resin before it’s not nearly as intimidating as you’d think! I’ll walk you through all the steps here in my How to Mix Resin for Beginners Tutorial.


Step 3: Slowly Start to Fill your Flowers with Resin
Once your resin is mixed (and fairly bubble free) we can start to pour our resin into our molds. Instead of actually pouring it directly from our little cup I like to use my stir stick to “pour” a thin stream of resin into each flower.
You’ll want to force as much resin into each flower as possible… for your larger, deeper flowers (like your roses, ranunculuses, daisies… things with a lot of petals) that may take a while. Just keep carefully adding resin in thin streams until each flower is coated and resin stops entering the inner portions of the flower.
If you see bubbles in the resin at this point you can carefully hit them with your heat gun… otherwise we’ll move on to filling our molds with resin.


Step 4: Fill the Remaining Space with Resin
Coating the flowers may be quick but it may take a while… but patience is key. Once allllll of the flowers are coated we can slowly pour our resin into the mold. Make sure you’re pouring your resin in a thin stream and no large bubbles are getting trapped underneath stems or leaves.
Instead of pouring into large empty areas continue to pour your thin stream onto your flowers. The resin will flow off the stems and petals of your flowers and down into the mold.
Once the entire mold is full to the top you’re done! You can pop all the bubbles with your heat gun and leave your pretty molds to cure for 24 hours. Make sure to cover everything with a cardboard box so no cat hair or dust will fall into the curing resin!
Tip: Flower petals are very difficult so be careful when popping bubbles with your heat gun… keep it moving never staying in one spot too long. Otherwise you may scorch your petals!


Step 5: Continue to Pop Bubbles as the Resin Cures
Remember how I said that flowers (especially enclosed flowers like roses) are often filled with air? That means air bubbles will slowly pop out of each flower as they cure! Yay!
Keep a close eye on these babies for at least the first 10 minutes they’re curing… the molds are pretty shallow so they’ll cure quickly. Popping bubbles as they appear is the easiest way to get rid of them.
Once bubbles have cured into the resin you’ll have to sand them down and add a flood coat to get rid of them.
Which is possible (check out my tutorial here if you need help… it’s specifically for removing hair or fuzz but it’s the same process for dog hairs and big bubbles) but not tooo much fun.


Step 6: Un-Mold your Resin
After 24 hours we can take our pretty pretty resin pieces out of our silicone molds. Start to peel the silicone away from the resin… work your way around the entire mold until you’ve introduced as much air to the mold as possible.
Then slowly remove the piece from the mold all together.
This is the best moment of all… we finally get to see the front of the piece!


Step 7: Enjoy!
Ahhhhh! They’re so pretty!
I am literally IN LOVE with how these turned out… and so is my bestie! I can’t wait until she gives them to her Mom and Mama-in-law!
They’re such special presents and I hope they love them as much as I loved making them!


Leave a Reply