• House Tour
    • Reveals
  • About
    • Smith Life
    • Disclosure and Privacy Policy
      • Terms and Conditions
      • Store Affiliates
  • Contact Me
    • Want a Button?
  • Shop
    • Floral Printable Planners
    • Paint eBooks and Packages
    • Wedding Binders & Extra Printables!
    • Planner Bundles
    • Planner Accessories
    • Home Decor Printables!
  • Cart
    • Bloglovin
    • Facebook
    • Instagram
    • Pinterest
    • Twitter
    • YouTube

Happily Ever After, Etc.

Creating Our Own Fairytale

  • Happily Ever After, Etc.
  • Home
  • Home Decor
    • My Home
    • Paint
    • Before and After
    • Tablescapes
    • Mood Boards
    • Furniture
  • DIY & Crafts
    • New to Cricut – Start Here
    • Cricut
    • Resin
    • Scrapbooking
  • Organization & Planning
    • Organization
    • Planner
  • Holidays
    • Christmas
    • Halloween
    • Thanksgiving
    • Easter
  • Wedding
    • Cricut Wedding Projects
    • Free Wedding Binder
    • Bride Bag- The Ultimate Wedding Planner

Fun Summer Unicorn Canvas with Cricut

Hey y'all,

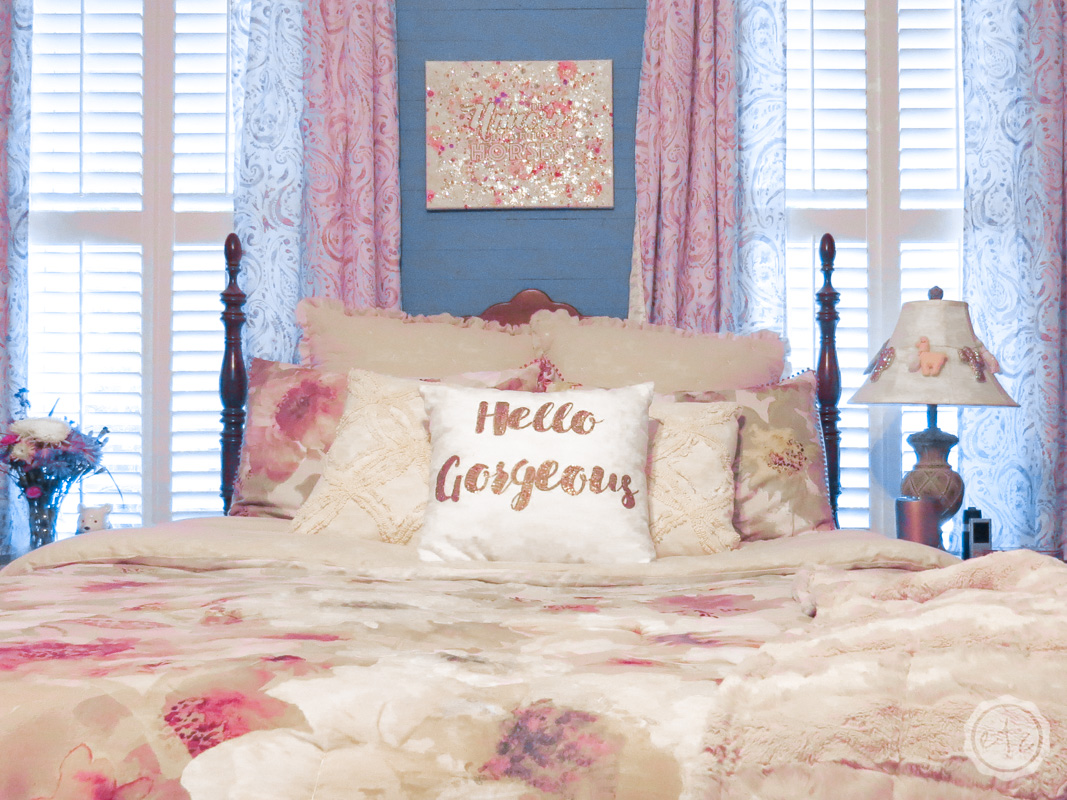
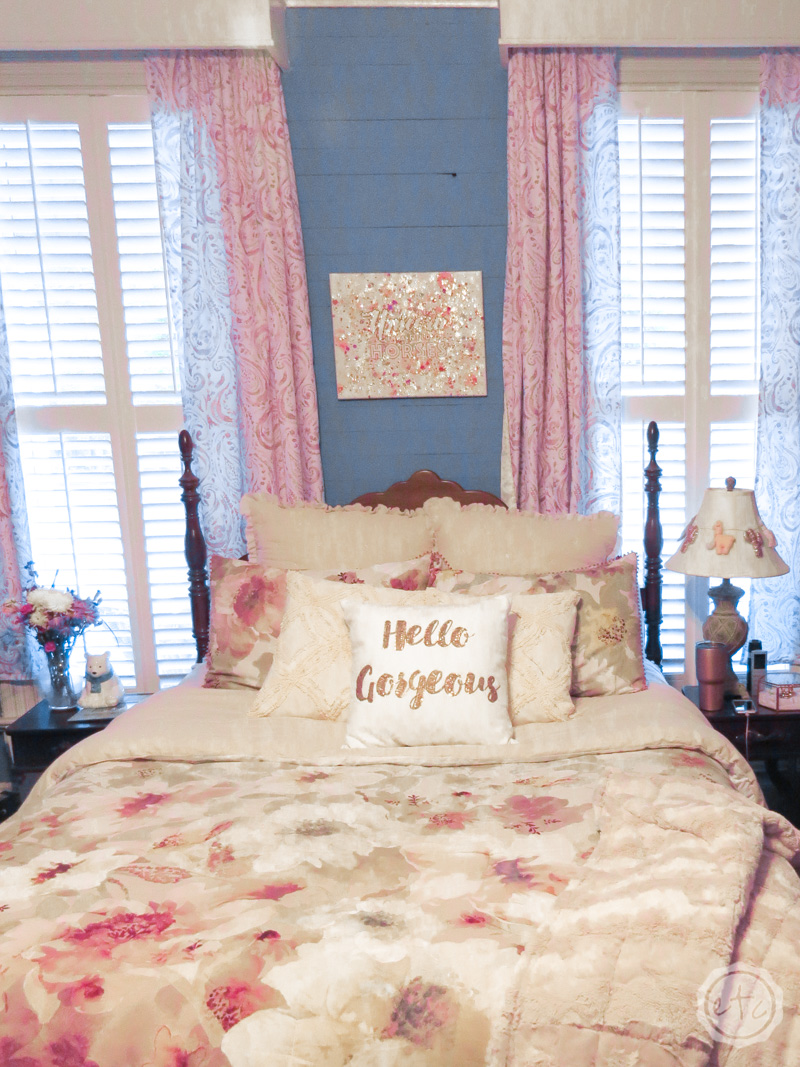
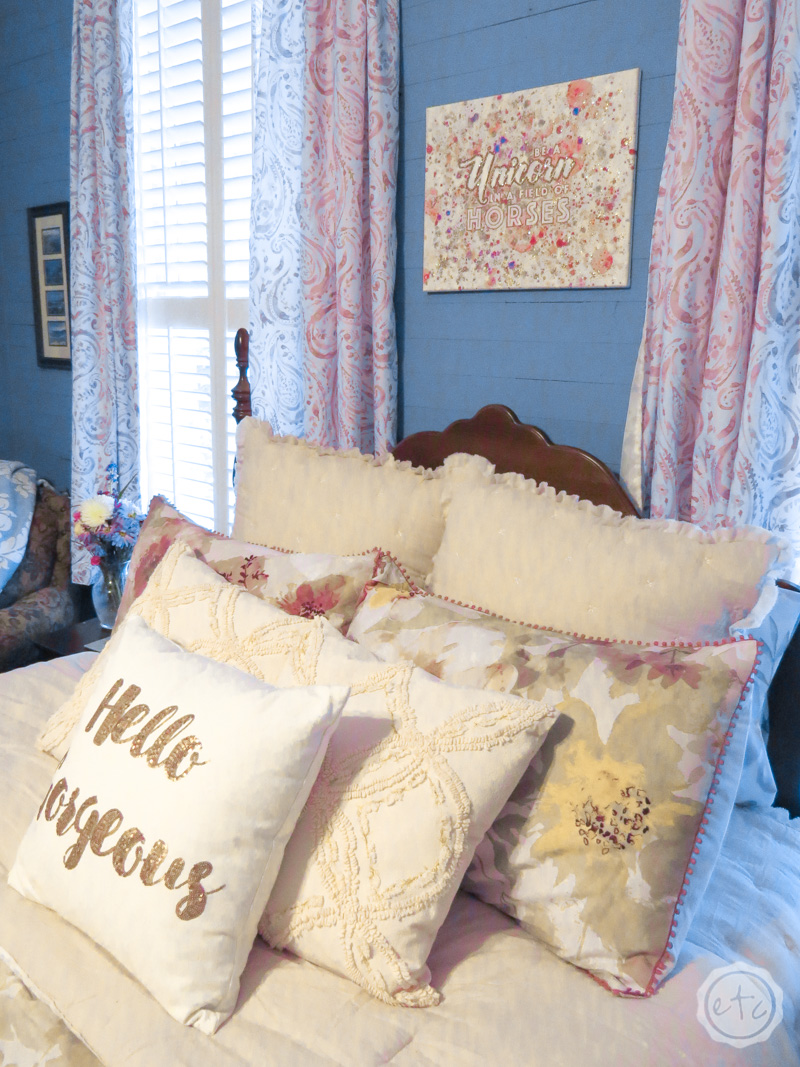
It’s May y’all… May! Which means it’s officially summer which means down here in Alabama it’s H-O-T. The hour or two I spent outside blowing bubbles were absolutely scorching! Of course, that all pales when you’re having a blast creating this fun summery unicorn canvas!

I am literally in love!

I love all of my Cricut projects but this one was so much fun to make. I mean bubbles y’all… playing with bubbles is way more fun then I remember. I highly recommend an afternoon with a few bubbles in the backyard as a fun stress reliever… add a kitty and a puppy to chase the bubbles.

Just trust me on that one!

Supplies

  • Cricut Explore Air 2
  • Fine-Point Cutting Blade
  • Standard Cutting Mat (that’s the green one!)
  • Cricut Cut Files
  • Vinyl
  • Weeding Tool
  • Transfer Tape
  • Scissors
  • Bubbles!
  • Glue
  • Disposable Bowls or Cleanable Jars
  • Watercolors
  • Rose Gold Glitter
  • Silver Glitter
  • Canvas
  • Paper Towels
  • Small Paint Brush

Need help picking your perfect machine? I’ve got you covered!


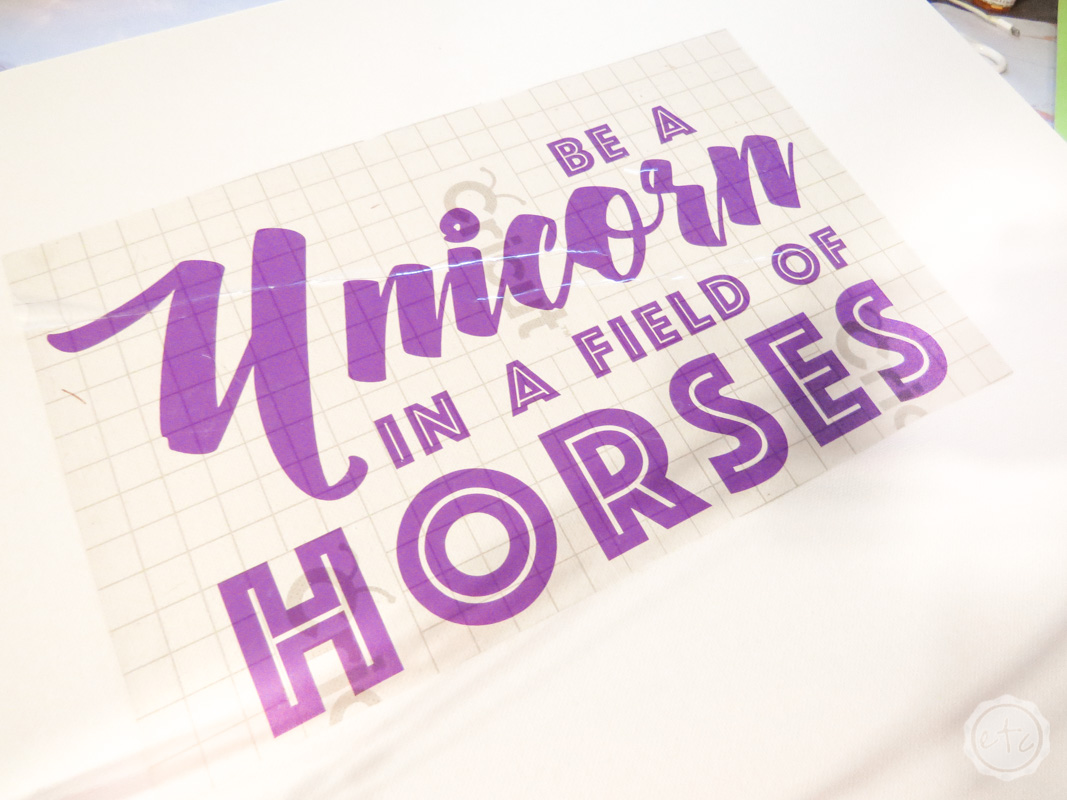
Step 1: Cut Your Vinyl

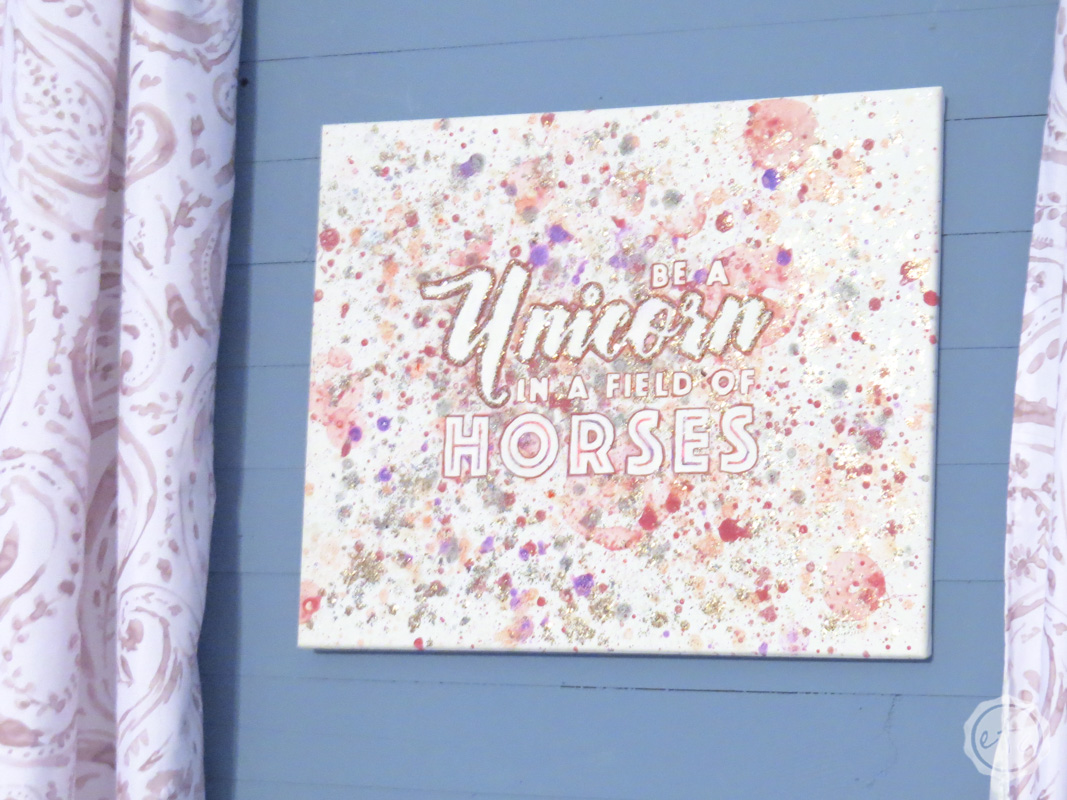
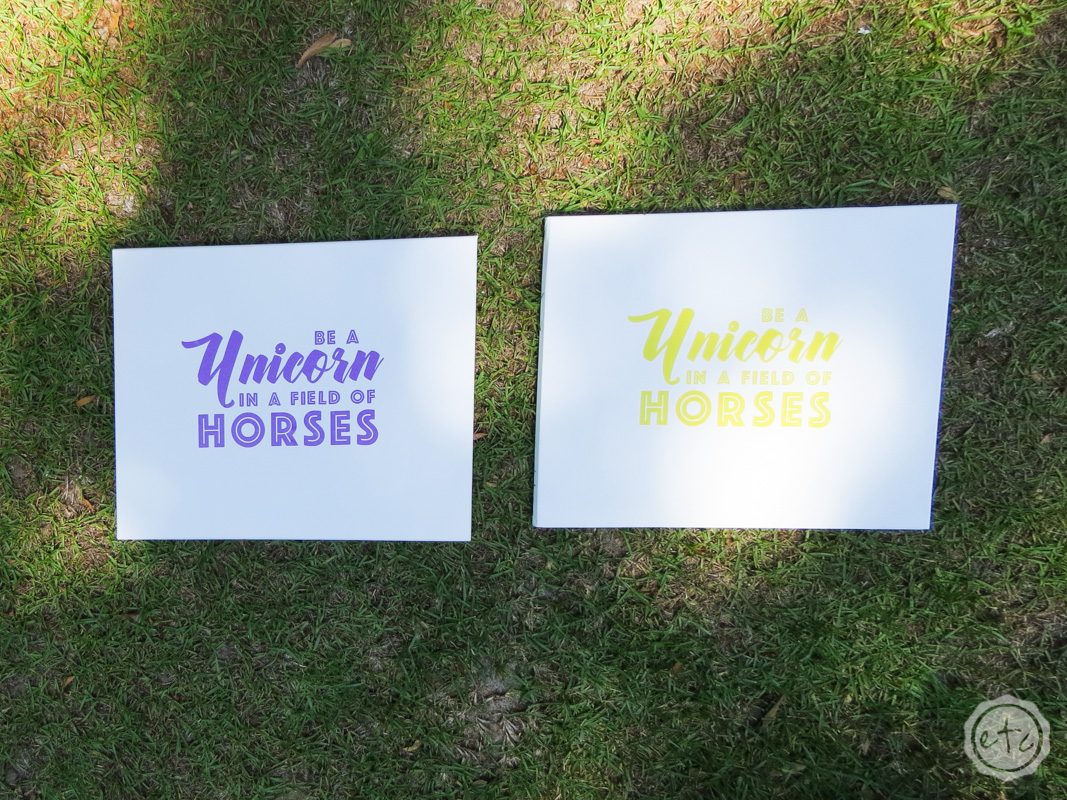
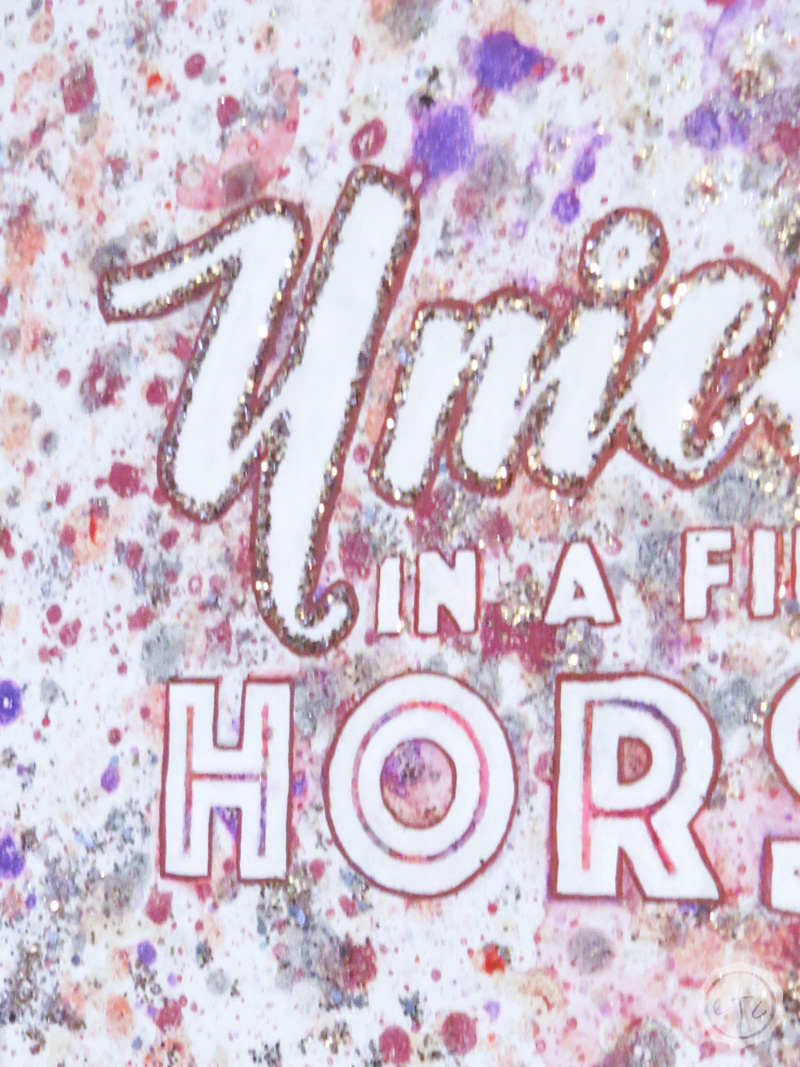
The first step is to cut your phrase out of vinyl using your Cricut. I decided to go with “Be a Unicorn in a Field of Horses” since I wanted to use fun summery colors! You can download the Cricut Cut Files for this project here! Once your vinyl is cut use your transfer tape to place the letters onto your canvas.

Make sure to smooth down the edges of each letter very carefully. Since we’re using watercolors they have a tendency to bleed and you want as little bleeding as possible since the bubble solution will help spread the color.

Step 2: Blow Your Bubbles!

This is the fun part… go ahead and mix all of your colors using your watercolors and bubble solution. I found that about an inch of watercolor squeezed into your container with about 1/2 of bubbles was a good mixture. It allowed for vibrant colors that still worked with the bubbles.

No I didn’t measure… I just eye-balled it and added a bit more pigment or bubbles if it was too saturated or too liquid. This isn’t science… it’s art!

I did try acrylic craft paint just to see how it would work and the paint was way too dense to work with the bubbles… which is sad because I had a beautiful blush tone I wanted to use!

Try to blow your bubbles when it’s not very windy and from a couple feet away from your canvas for larger bubbles! For smaller spots I like to dip my fingers or bubble wand in the bubble paint and kind of fling it at the canvas. You do get a bit better control this way so you can direct where you want the spots to go… and is the reason why I put paper towels on the supply list!
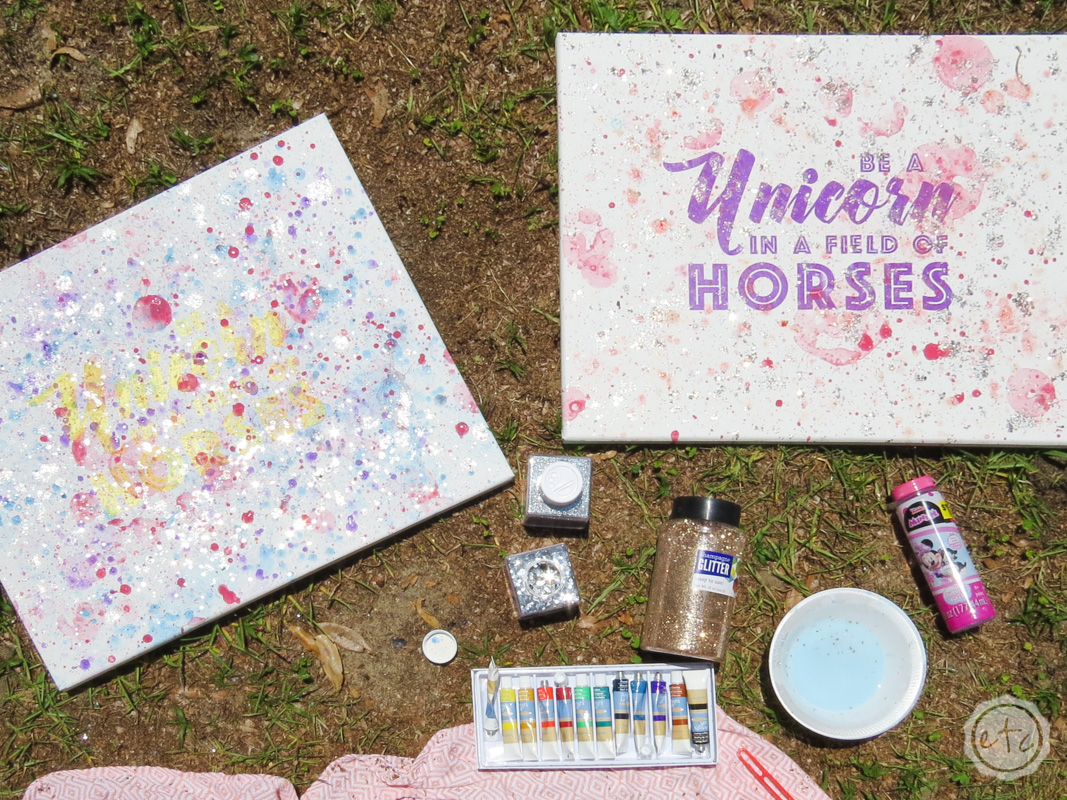
Step 3: Add Glitter

If you are looking for a little more sparkle try adding glitter! I made a mixture with 1 part glitter, 1 part bubbles and one part clear glue (the kind you buy at WalMart for kids projects). That way it sticks to the canvas but isn’t a huge clump of just glitter and glue.

Now just let your canvas dry! I like to make sure it’s out of the wind so that dirt and leaves can’t blow into the glue but it can’t get knocked over.

Step 4: Take off the Vinyl

Now it’s time to take the vinyl off! This is the fun part.

Just make sure when you go to take off the vinyl that all of the letters are clearly defined first. While there are plenty of bubbles on the canvas I used my watercolor pens to add a little more color to the lines in between “horses.”

Then I used my metallic brush pens to add a boarder around the letters so that they popped just a tiny bit more!

Step 5: Brighten up your Letters

Remember when I said your letters might bleed a little if the paint went under the vinyl? Well luckily that’s fairly easy to fix. Since we used watercolors the first step is to use a water pen (or a small brush and water) to pick up as much of the pigment as possible. Simply brush water over the white letters (where the pigment is) and either push the pigment to the edge of the letter or pick it up with a bit of paper towel.

If there is still a bit of pigment left simply go over the letters with white watercolors and a small brush! Easy peezy lemon squeezy. Just make sure the water from picking up the pigment is dry before adding more watercolors… otherwise they’ll just mix.

Step 6: Add Glitter!

If you’re up for it go ahead and add a little more glitter! I decided that I wanted “Unicorn” to stand out even more so I went a little further off the grid and added a rose gold glitter boarder to “Unicorn.” I used a little fine tip needle bottle to add clear craft glue around the letters and then shook glitter onto the canvas.

Make sure to brush all the excess glitter off the canvas and back into your jar… and then you’re done!

Time to enjoy!

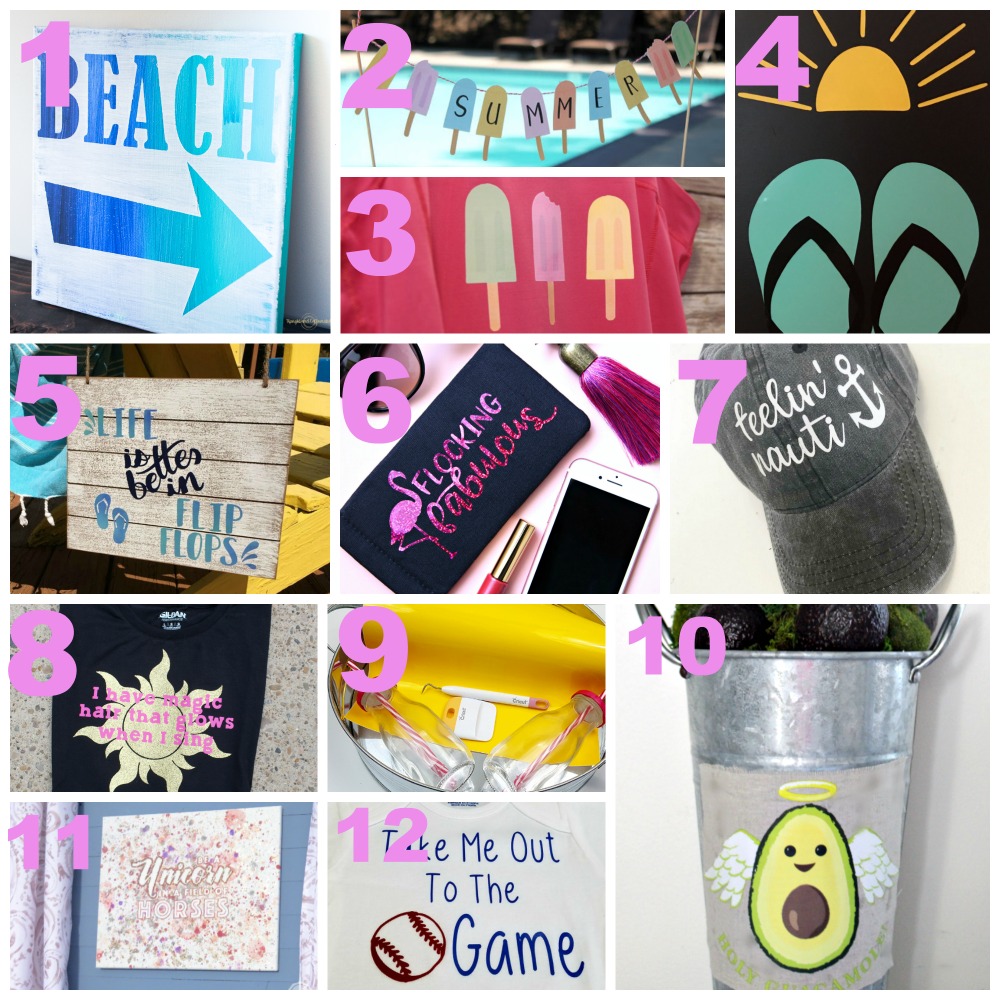
If you’re looking for a few other summer cricut crafts I’ve got you covered! The ladies in the Craft & Create With Cricut Challenge have whipped up quite a few fun summer projects… check them out for yourself!

12 Summer Projects to Make with Your Cricut:

    1. DIY Beach Art
    2. Personalized Popsicle Banner
    3. Summer Tank Top using Printable Iron-On
    4. Flip Flop Summer Sign
    5. Wooden Summer Sign with Iron-On Vinyl
    6. Flocking Fabulous Sunglasses Case
    7. Summer Ball Cap DIY
    8. Rapunzel Magic Hair Disneyland Shirt
    9. Summer Sun Drink Tray
    10. Holy Guacamole! It’s An Avocado Topiary!
    11. Fun Summer Unicorn Canvas
    12. Take Me Out to the Ballgame Onesie


You made it through the entire post? That means you're one of my new favorite people! I'd love to be friends and see what else you would like to read about! Leave me a comment and then sign up for your very own FREE paint planner.... so that you can keep track of every single paint color with ease!
Welcome back! I'd love to be friends and see what else you would like to read about! Leave me a comment and then sign up for your very own FREE paint planner.... so that you can keep track of every single paint color with ease!

Get Your FREE PDF Guide!

Don't forget to snag your free PDF Guide to buying your first Cricut!

Success! Now check your email to confirm your subscription.

There was an error submitting your subscription. Please try again.

Powered by Kit

Show me some LOVE y'all:

  • Click to share on Facebook (Opens in new window) Facebook
  • Click to share on Pinterest (Opens in new window) Pinterest
  • Click to share on X (Opens in new window) X
  • Click to email a link to a friend (Opens in new window) Email

Related

«
»

Cricut, DIY & Crafts, Home Decor 15

Comments

  1. Jenny says

    May 13, 2018 at 9:26 am

    This sign is so cute & extra fun to make! Love Love Love this idea! My kids would love trying something like this (& me). Pinning!

    Reply
  2. Jeanie says

    May 13, 2018 at 10:08 am

    Betsy!!!! This is so cool! Unicorns, bubbles, and glitter! What’s not to love!!! Me and my granddaughter are going to try this!

    Reply
    • Happily Ever After, Etc. says

      May 14, 2018 at 1:11 pm

      It would be such a fun project with kids! It made me think of childhood the entire time! Hope you have a blast.

      Reply
  3. Marie Dabbs says

    May 13, 2018 at 12:27 pm

    This looks like it was a blast to make! I love the way it turned out and as a lover of glitter, I fully support you adding even more glitter, lol.

    Reply
  4. Mary Hunnicutt says

    May 14, 2018 at 9:53 am

    This looks like such a fun project and it turned out so pretty!

    Reply
  5. Allison | Upright and Caffeinated says

    May 17, 2018 at 8:13 am

    This is such a cool project!! I have never tried this bubble technique. I will have to test it out with my kids! Thanks for sharing this tutorial!

    Reply

Trackbacks

  1. Summer Ball Cap DIY perfect for Carefree Summer Hair says:
    May 13, 2018 at 6:01 am

    […] Fun Summer Unicorn Canvas […]

    Reply
  2. Summer Projects to Make with Your Cricut - Create and Babble says:
    May 13, 2018 at 6:02 am

    […] Unicorns continue to be popular. I love the pretty colors in this Fun Summer Unicorn Canvas by Happily Ever After. […]

    Reply
  3. How To Make An Avocado Topiary Our Crafty Mom says:
    May 13, 2018 at 7:48 am

    […] Fun Summer Unicorn Canvas […]

    Reply
  4. Summer Sun Drink Tray - The Inspiration Vault says:
    May 15, 2018 at 11:22 am

    […] Fun Summer Unicorn Canvas […]

    Reply
  5. Feminine Master Bedroom Update - Happily Ever After, Etc. says:
    July 2, 2018 at 12:21 am

    […] the curtains were up it’s time to add a bit of interest on the walls. Like this Be a Unicorn in a Field of Horses canvas or the white erase board the hubby bought me for our last anniversary. I always like to add a bit […]

    Reply
  6. Feminine Bedroom Mood Board - Happily Ever After, Etc. says:
    July 2, 2018 at 10:13 pm

    […] DIY Be a Unicorn in a Field of Horses Canvas […]

    Reply
  7. Tips for Putting Together a Mood Board for your Bedroom - Happily Ever After, Etc. says:
    July 2, 2018 at 10:26 pm

    […] DIY Be a Unicorn in a Field of Horses Canvas […]

    Reply
  8. The Ultimate Guide to the Cricut Maker - Happily Ever After, Etc. says:
    May 28, 2020 at 1:20 pm

    […] Canvas Art […]

    Reply
  9. Flocking Fabulous Flamingo Free SVG Cut File - Happy-Go-Lucky says:
    July 11, 2020 at 1:46 pm

    […] Fun Summer Unicorn Canvas […]

    Reply

Leave a Reply Cancel reply

Your email address will not be published. Required fields are marked *

sidebar betsy I'm Betsy, Home Decor Enthusiast, Yorkie Mama, Crafter, Blogger, Picky Eater, Chief Mess Maker, Antique Hoarder and Graphic Designer. You can generally find me working on (attacking with a paintbrush) the 3 bed, 2 bath home we are currently renting! Our home might not be perfect but it is ours & if you hang out long enough you'll see that what we lack in know-how we make up for in passion!
Shop My Craft Room

Shop My Home

Featured Articles

15 Fabulous Ideas to Organize your Laundry Room
25 FREE Printables For Your Home!
What to do with EXTRA Paint with Happily Ever After Etc
10 Ways to Make Your Bed EXTRA Comfy with Happily Ever After Etc.
Ready to Pick your Perfect Paint Color? We'll help you with our 6 Day FREE E-Course

Hey y’all,

Profile

I'm Betsy, Home Decor Enthusiast, Yorkie Mama, Picky Eater, Chief Mess Maker, & Graphic Designer...

A Little Note!

Many of the links on Happily Ever After, Etc. are affiliate links. If you purchase a product after clicking an affiliate link, I receive a small percentage of the sale for referring you, at zero cost to you! How awesome is that? Purchasing through affiliate links is an easy, painless way to help out your favorite bloggers. Thank you so much for your continued love and support! Read the full disclosure here!

Instagram

Follow on Instagram

Copyright © 2025 · Darling theme by Restored 316

Copyright © 2025 · Darling Theme on Genesis Framework · WordPress · Log in · Privacy Policy