• House Tour
    • Reveals
  • About
    • Smith Life
    • Disclosure and Privacy Policy
      • Terms and Conditions
      • Store Affiliates
  • Contact Me
    • Want a Button?
  • Shop
    • Floral Printable Planners
    • Paint eBooks and Packages
    • Wedding Binders & Extra Printables!
    • Planner Bundles
    • Planner Accessories
    • Home Decor Printables!
  • Cart
    • Bloglovin
    • Facebook
    • Instagram
    • Pinterest
    • Twitter
    • YouTube

Happily Ever After, Etc.

Creating Our Own Fairytale

  • Happily Ever After, Etc.
  • Home
  • Home Decor
    • My Home
    • Paint
    • Before and After
    • Tablescapes
    • Mood Boards
    • Furniture
  • DIY & Crafts
    • New to Cricut – Start Here
    • Cricut Projects
    • Resin
    • Scrapbooking
  • Organization & Planning
    • Cricut
    • Organization
    • Planner
  • Holidays
    • Christmas
    • Halloween
    • Thanksgiving
    • Easter
  • Wedding
    • Cricut Wedding Projects
    • Free Wedding Binder
    • Bride Bag- The Ultimate Wedding Planner

DIY Rustic String Art Ornaments

After weeks of fun Christmas projects, crafts, cricut ideas… it’s finally time for fun Christmas ornaments! I absolutely love Christmas trees and coming up with fun ornaments are the best part of the season.

This year, I thought we’d do a quick and fun Christmas ornament project. This one is inexpensive and only takes a couple of minutes per ornament. Which is my absolute favorite part of the whole project. The best part? If you’re looking for even more ornament ideas you can look through any of the other fun projects down below!

I’ve have teamed up with 50 plus bloggers to bring you a oodles of DIY Ideas and Recipes to make your holiday season merrier. There are 12 different posts in the series and we have spread them out over a four week period with three posts per week. Now is the time to subscribe!

Welcome to Day 6 of the Fourth Annual 12 Days of Christmas Series!

DIY Christmas Ideas and Recipes you can use this year! DIY Christmas Decor and Games Ideas #12daysofChristmas

GO HERE for the complete list of Dates and Topics plus a collection of most popular holiday ideas including ornaments, games, recipes and more from all 50 plus talented bloggers!

It’s Day 6 and we are sharing DIY Ornament Ideas!


Supplies:

Wood Slices
Yarn/Thread
Nails
Hammer
Scissors

Step 1: Add Your Nails

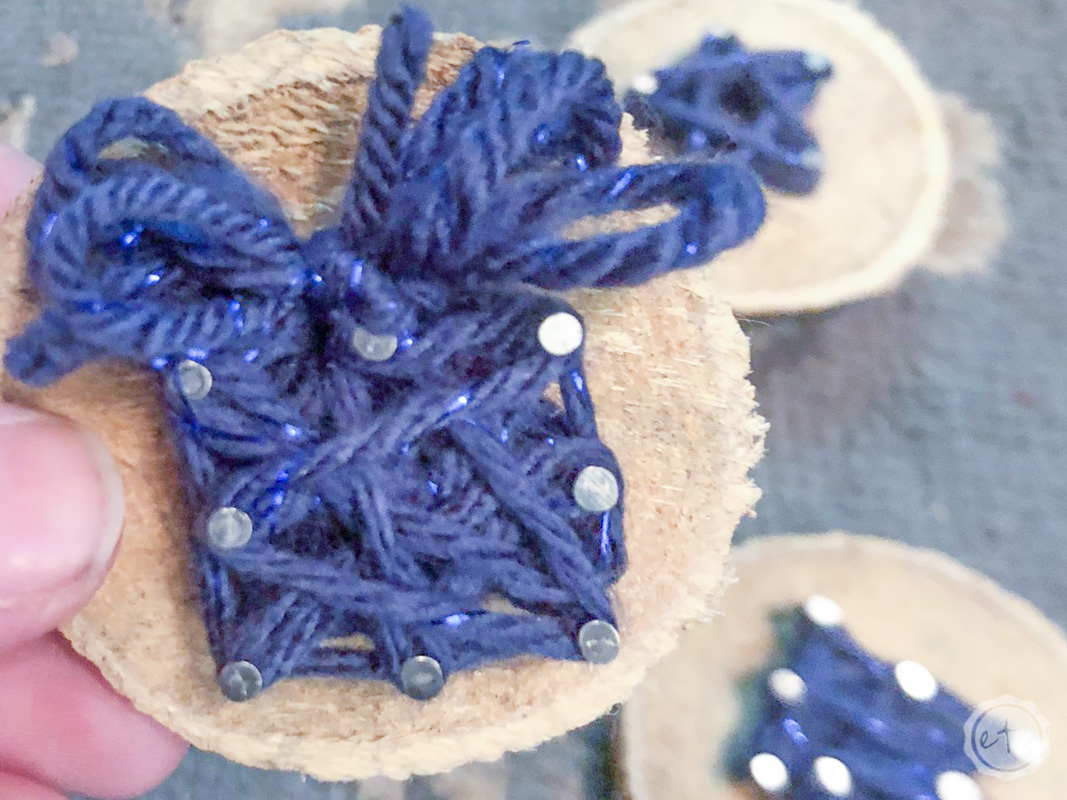
The very first step is to add your little nails into your wood slice. It’s easiest to do simple shapes like a star or present… maybe a little Christmas tree! String art can be pretty complicated but with little wood slices you lose the space to do larger string art.

If you’re not sure where to put the nails go ahead and sketch your shapes onto the wood with a pencil… then add all of your nails onto the wood slice. Just make sure not to push the nails through the back of the wood slice… and if you accidentally go through the wood slice just pull the nail back through!

Easy peezy!

Step 2: Tie Your Yarn to a Nail

Now it’s time to tie your yarn onto the first nail. This is very simple… simply tie your yarn onto a nail! Trim down the tail making sure that you’re close enough to the knot that there won’t be any bits of yarn peeking out.

Before you move onto the next step make sure to pull on the yarn to double check that the knot will hold. Sometimes that pesky yarn will slip right out of the knot!

Step 3: Wind Your Yarn

Now’s the fun part… winding the yarn! Make sure to go around the outside before hitting the inside of the little shape. Just keep going around and around the little nails and push down the yarn every so often so that the little nails are covered up.

Just keep winding the yarn around and around making sure to watch the pattern in the yarn so that it looks nice when you’re done! Once you’ve filled up all of the nails go ahead and tie off the yarn on an inconspicuous nail making sure to cut off the tail of the yarn so that it doesn’t show.

Step 4: Add a Bit of Yarn to the Back

We are so close to finished with our little yarn ornament project! All we need to do now is add a bit of yarn to the back of our little wood slice so that we can hang it on the tree. You can use a bit of hot glue or just add an extra nail to the back so you have a place to tie your loop.

Now hang your ornaments on the tree and enjoy!

Looking for more Christmas?! Here are the rest of my fun holiday projects from this year!

An InLinkz Link-up


Scroll down for many more DIY Ornament Ideas for your holiday season!


You made it through the entire post? That means you're one of my new favorite people! I'd love to be friends and see what else you would like to read about! Leave me a comment and then sign up for your very own FREE paint planner.... so that you can keep track of every single paint color with ease!
Welcome back! I'd love to be friends and see what else you would like to read about! Leave me a comment and then sign up for your very own FREE paint planner.... so that you can keep track of every single paint color with ease!

Show me some LOVE y'all:

  • Facebook
  • Pinterest
  • Twitter
  • Email

Related

«
»

Christmas, DIY & Crafts, Holidays 2

Comments

  1. Erlene says

    December 5, 2018 at 1:13 am

    This would be a fun way to use up yarn and some of my wood slices 🙂 This is a craft that’s still on my ‘to do’ list.

    Reply
  2. Super Mom - No Cape! says

    December 15, 2018 at 3:48 pm

    Those string art ornaments are really sweet! They’d be a fun crafts to do with kids or grandkids.

    Reply

Leave a Reply Cancel reply

Your email address will not be published. Required fields are marked *

sidebar betsy I'm Betsy, Home Decor Enthusiast, Yorkie Mama, Crafter, Blogger, Picky Eater, Chief Mess Maker, Antique Hoarder and Graphic Designer. You can generally find me working on (attacking with a paintbrush) the 3 bed, 2 bath home we are currently renting! Our home might not be perfect but it is ours & if you hang out long enough you'll see that what we lack in know-how we make up for in passion!
Shop My Craft Room

Shop My Home

Featured Articles

15 Fabulous Ideas to Organize your Laundry Room
25 FREE Printables For Your Home!
What to do with EXTRA Paint with Happily Ever After Etc
10 Ways to Make Your Bed EXTRA Comfy with Happily Ever After Etc.
Ready to Pick your Perfect Paint Color? We'll help you with our 6 Day FREE E-Course

Hey y’all,

Profile

I'm Betsy, Home Decor Enthusiast, Yorkie Mama, Picky Eater, Chief Mess Maker, & Graphic Designer...

A Little Note!

Many of the links on Happily Ever After, Etc. are affiliate links. If you purchase a product after clicking an affiliate link, I receive a small percentage of the sale for referring you, at zero cost to you! How awesome is that? Purchasing through affiliate links is an easy, painless way to help out your favorite bloggers. Thank you so much for your continued love and support! Read the full disclosure here!

Instagram

Load More... Follow on Instagram

Copyright © 2023 · Darling theme by Restored 316

Copyright © 2023 · Darling Theme on Genesis Framework · WordPress · Log in · Privacy Policy