


On my mad rush to organize everything in my life (ok everything in my house) I ran into a stumbling block. That stumbling block was big, oddly shaped and came in the form of my office closet! Grrr! I decided that December was the perfect month to organize that particular closet, mainly because it houses part of my Christmas decoration stash. So with the Christmas supplies out of the closet I was free to go completely crazy… and pull everything else out of the closet too! (Insert evil laugh here).
Which would have been a great strategy if I had any idea how to put all of said closet supplies BACK IN! I have hoards of craft supplies, boxes, bins, camera equipment, scrap-booking paper, stickers, ribbon, etc. If you’re a crafter you know what I mean… it explodes and expands and completely takes over your life. Either way it wasn’t going back in the closet the same way it came out!
Looking for a bunch of posts on DIY & Crafts? I’ve got you covered!
Click here to see all of my how to DIY & Craft posts in one place!
So I started brainstorming: a cube bookshelf would be perfect but it really wasn’t in the budget. I tried to use hanging shoe organizers (like the one in my master closet) but they couldn’t withstand the weight. Then one day at work I had a giant epiphany: CARDBOARD BOXES! They’re free and readily available at work. They’re the perfect size to hold my bins and totes and since the ones at Sherwin Williams are designed to hold 4 gallons of paint at a time they are STRONG!
So here’s the 411 on how to make your very own Cardboard Bookcase:
Start by taping down all of the box flaps.
Paint a few of the boxes, 1/4 or 1/3 would be a great place to start.
Stack your boxes and build your structure!
Clip the front of all the boxes together, using binder clips.
Take the wings off of the binder clips for a clean look.
Cut two boxes in half and use the halves to fill in the empty spaces.
Turn the whole thing over and tape the backs together.
Place the bookcase in it’s new home.
Attach to the wall with pieces of plywood and screws!
Fill with goodies, sit back and Enjoy!
Of course, If you want the long explanation I have one of those for you too! Including pictures! Yay!
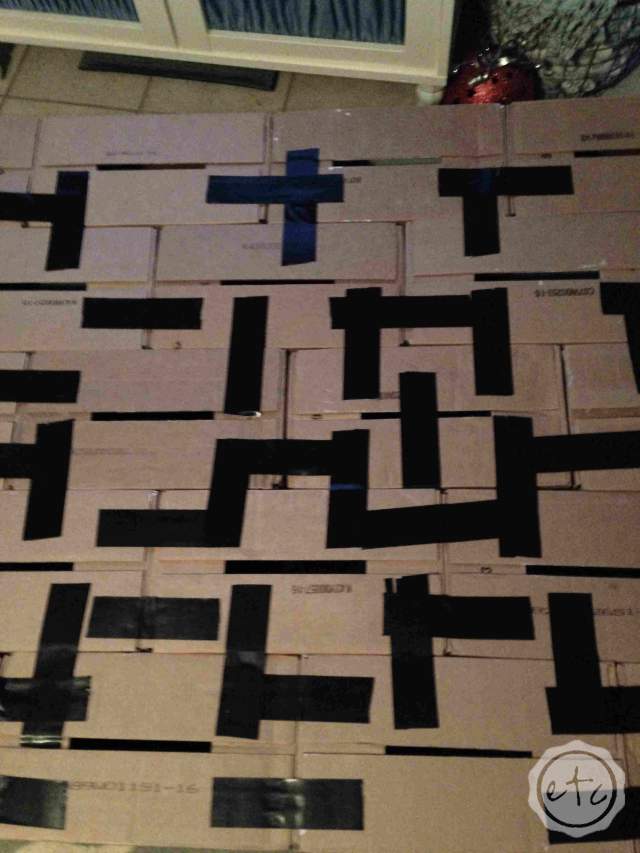
I started out by taping down all four box flaps… with gorilla tape. Also really strong! I wanted the flaps out of the way which would have been easily achieved by ripping the flaps off! However 1) that would have been super ugly and 2) taping them down reinforced the sides… which is an added bonus! Now I’m sure you ladies are super resourceful and could totally figure out how to tape box flaps up all by your lonesome…. but after taping 20 boxes I figured out the absolute best strategy! (You’re welcome 😉 ) Using Four separate pieces of tape I securely taped all four flaps to the box, then I taped up the seam between side 1 and side 4. Just to be sure!
Check out the steps below:


Looking for a bunch of posts on organization & planning? I’ve got you covered! Click here to see all of my organization & planning posts in one place!
After all of the boxes were taped (and my hands were completely sticky… that gorilla tape really lives up to it’s name!) I decided to paint 8 of my 20 boxes light blue. I figured it would give the bookcase a little sass and pizazz! Sizzle and pop! If I could I would paint all 20 boxes… however the paint definitely weakens the integrity of the cardboard. (Which is super annoying 🙁 I REALLY LIKE the blue boxes!) By only painting a select few boxes and staggering them throughout the bookcase we get that fun pop of paint while keeping the bookcase super strong! Yay!
The next step in the amazing cardboard bookcase saga (yes, it’s a saga) is to attach all of the boxes together. I used binder clips to attach one box to the next. They worked perfectly… plus they come in fun colors and are super cheap (just like me! super fun and cheap 🙂 ). I bought two packs of clips (20 clips total) in silver and blue, once they were attached the metal arms were super easy to detach! That left me with a clean look that was super strong (when you’re building a bookcase out of cardboard, strong is important).


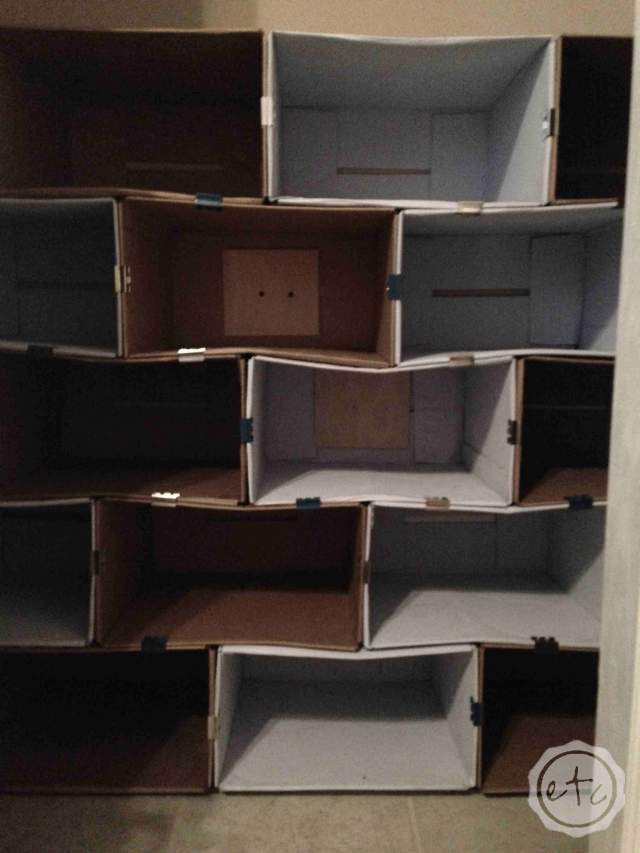
Now here’s the confusing part. You’ll notice from the picture below that the finished structure is a complete square. However, the boxes are staggered. The entire structure is 4 boxes on the bottom, 3 boxes on the next row, 4 on the middle row, 3 on the 4th row and 4 on the top. So it’s staggered: 4, 3, 4, 3, 4. This means that the flimsiest part of the box (the middle) is resting on the strongest part of the boxes below it (the seam where two edges meet). It also means that rows 2 and 4 will have empty spots on the very end. In order to fill those and keep the structure strong (there’s the strong word again!) We cut two boxes in half and filled in the empty spots. It was actually my hubby’s idea and it worked perfectly! Trust me, it’s so much better with the holes filled in!


The final step is to securely tape the BACK of all the boxes together. Start in the middle and tape towards the outside. This insures that all of the boxes are tight and side by side. Psst… extra tip: it helps to have an extra pair of hands for this part! I enslaved the willing hands of my handsome hubby for my extra help (see the shameless plug there?) however best friends, moms, neighbors, children, helper elves… really any pair of extra hands will do! Although I’m partial to my helper ;).


Now’s the fun part… putting it in your closet! Placing it only took a minute or two however the whole structure does need to be secured to the wall. Otherwise it will be top heavy and try to topple forward! No bueno. I decided to go low-tech on this one. I used several pieces of plywood that were lying around to secure the structure to the wall. Each piece was placed into the back of one box and then screwed directly into the wall. Of course a few of those screws have to go into studs… otherwise what’s the point? (I apologize if there is a highly technical way to describe all of this, I think my way makes more sense 🙂 ). I used toggle bolts for the pieces that didn’t go into studs… I think it worked pretty well!


Here’s the final product! I absolutely love it! It holds all my supplies and was (minus the price of binder clips) completely free! Hopefully these plans will help someone else fix a problem area in their home… if not I’ll just sit here admiring mine!


P.S. Make sure to check in tomorrow night (Tuesday January 6, 2015) @8pm sharp for a very special post! Eek! I can hardly wait!
Linking up with: Tatertots and Jello
If you loved this post you might like my latest project… an eBook all about paint! House paint that is… it’s not quite ready but if you want to be the first to know what’s up sign up for the super special paint eBook e-mail list! Don’t worry I’ll only send you super important updates… if you’d rather receive every single fabulous post sign up for the main mailing list here!


This is brilliant! I might just do this for my kids’ bedroom because I have no idea where to stack away all their books. Thanks for sharing!
Thanks for stopping by Kim! Your two ‘minis’ are adorable! I’m so glad you liked my bookcase, it would work great for kids books! If you make one please share a picture, I’d love to see!
This looks awesome! I’m trying it on my closet next weekend. Though I think I’ll paint on a separate piece of paper (even newspapers will do I think, if I apply two coats) and wrap/glue it around the cardboard boxes, rather than paint them directly. That way the paint shouldn’t hurt the structural integrity!
That sounds like a great idea! I was a bit worried about the paint weakening the structure but after using this little guy for a couple years I haven’t had any problems. It held up great! Good luck, hope it works well for you.